Toasty Delight: No-Bake S’mores Bars
Introduction
The mere mention of s’mores evokes a wave of nostalgia, transporting many of us back to sun-soaked summer evenings spent around crackling campfires. The classic combination of graham crackers, melty chocolate, and gooey marshmallows has become synonymous with outdoor adventures, family gatherings, and cozy nights under the stars. However, as much as we cherish the traditional s’mores experience, the thought of roasting marshmallows over an open flame can sometimes feel like a challenge, especially in the hustle and bustle of modern life. Enter the no-bake version: a delightful twist that captures all the flavors of the original without the fuss.
Introducing the Toasty Delight: No-Bake S’mores Bars, a delicious and convenient way to enjoy this beloved treat. With minimal effort and no need for an oven, these bars are perfect for any occasion—whether you’re hosting a summer barbecue, planning a cozy movie night, or simply satisfying a sweet craving. Not only are they easy to prepare, but they also offer a versatile canvas for customization, allowing you to add your favorite ingredients or adjust flavors to suit your taste.
Understanding the Ingredients
To create the perfect Toasty Delight: No-Bake S’mores Bars, it’s essential to understand the key ingredients that come together to form this delectable treat. Each component plays a vital role in achieving the right balance of flavor and texture.
– Graham Cracker Crumbs: The foundation of our bars, graham cracker crumbs provide a crunchy texture and subtly sweet flavor that echoes the taste of traditional s’mores. This ingredient brings a nostalgic quality, serving as the base layer that holds everything together.
– Cocoa Powder: To elevate the chocolate experience, we incorporate cocoa powder into the mix. This ingredient adds a rich, deep chocolate flavor that complements the sweetness of the marshmallows and enhances the overall taste of the bars.
– Granulated Sugar: Sweetness is a key element in any dessert, and granulated sugar serves to balance the flavors while contributing to the texture of the bars. It helps to create a delightful sweetness that pairs perfectly with the other ingredients.
– Unsalted Butter: Acting as a binding agent, unsalted butter is crucial for holding the mixture together. It adds a rich, creamy texture that enhances the overall mouthfeel of the bars. Melting the butter before mixing ensures that it blends seamlessly with the dry ingredients.
– Mini Marshmallows: No s’mores recipe would be complete without marshmallows, and mini marshmallows are the perfect choice for this no-bake version. Their chewy texture and sweet flavor provide that signature s’mores experience, making each bite a delightful treat.
– Semi-Sweet Chocolate Chips: For that gooey chocolate layer, semi-sweet chocolate chips are a must. They melt beautifully, creating a luscious layer that brings the beloved chocolatey goodness of s’mores to the forefront.
– Peanut Butter (optional): For those looking to add an extra layer of flavor, peanut butter is a fantastic optional ingredient. Its creamy texture and nutty taste complement the chocolate and marshmallows, creating a more decadent treat.
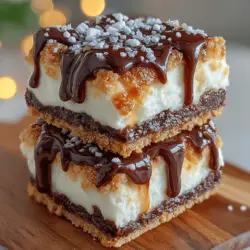
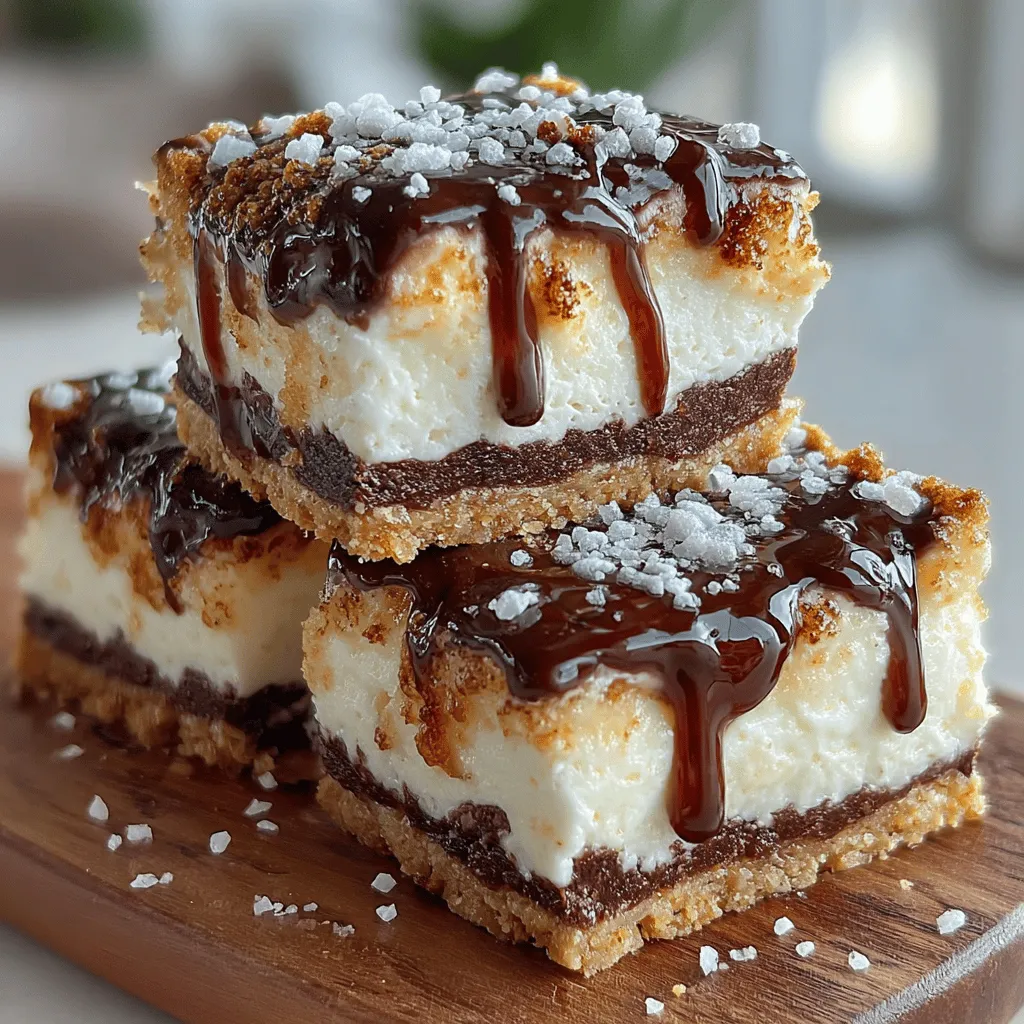
– Chocolate Syrup: A drizzle of chocolate syrup not only adds sweetness but also enhances the visual appeal of the bars. It creates an irresistible finish that makes them even more tempting.
– Sea Salt: Finally, a sprinkle of sea salt helps to elevate the flavors in the bars. It balances the sweetness and enhances the overall taste, making each bite a blissful experience.
Step-by-Step Preparation
Now that we’ve explored the ingredients, let’s dive into the preparation of our Toasty Delight: No-Bake S’mores Bars. This straightforward process will have you savoring the flavors of s’mores in no time.
Preparing the Base
Start by gathering all your dry ingredients. In a large mixing bowl, combine the graham cracker crumbs, cocoa powder, and granulated sugar. It’s important to mix these dry ingredients thoroughly to ensure an even distribution of flavor throughout the bars. Using a whisk can help break up any clumps and create a uniform mixture.
Next, you’ll want to create a consistency that resembles wet sand. To achieve this, slowly add in the melted unsalted butter while stirring the mixture. The butter will help to bind the dry ingredients together, so don’t be afraid to really incorporate it well. If the mixture feels too dry, you can add a little more melted butter until you reach the desired texture.
Incorporating Wet Ingredients
Once the base is prepared, it’s time to introduce the wet ingredients. If you’re opting to include peanut butter, melt it along with the butter in the microwave or on the stovetop. Once melted, pour the mixture into the dry ingredients. This step is crucial, as the melted peanut butter will combine more easily and ensure a creamy texture throughout the bars.
Stir the mixture until everything is well combined. You should aim for a thick, sticky consistency that holds together when pressed. If the mixture appears too crumbly, it may need a bit more melted butter or peanut butter to reach the right consistency.
Pressing into the Pan
With your mixture ready, it’s time to transfer it to a prepared pan. Line an 8×8 inch baking dish with parchment paper for easy removal, allowing the edges to hang over the sides. This will make it easier to lift the bars out once they’re set.
Use a spatula or your hands to press the mixture evenly into the bottom of the pan. It’s important to apply even pressure to ensure the bars hold their shape once cut. Aim for a smooth, level surface; you can even use the bottom of a measuring cup to help you achieve a firm and compact layer.
With the base layer firmly in place, you’ll be well on your way to creating these scrumptious Toasty Delight: No-Bake S’mores Bars. Stay tuned for the next steps where we’ll explore the delicious toppings and final touches that make these bars truly irresistible.
Creating delectable desserts doesn’t always require hours in the kitchen. With these Toasty Delight: No-Bake S’mores Bars, you can bring the classic campfire treat to your home with minimal fuss. Let’s dive into the remaining steps to transform your ingredients into a mouthwatering dessert that will impress your family and friends.
Importance of Using Parchment Paper for Easy Removal
Before you begin crafting your no-bake s’mores bars, it’s essential to line your baking dish with parchment paper. This simple step ensures that the bars release effortlessly once they’ve set. Parchment paper acts as a barrier between the sticky mixture and the dish, allowing for clean edges and smooth removal. When ready to slice your bars, simply lift the parchment paper out of the dish, making cleanup a breeze.
Creating the Chocolate Layer
The chocolate layer is a highlight of these bars, providing a rich and creamy contrast to the crunchy crust and fluffy marshmallows.
Instructions for Melting Chocolate Chips Safely
1. Choose Your Chocolate: Select high-quality chocolate chips, either semi-sweet or dark, depending on your preference for sweetness.
2. Prepare the Melting Method: You can melt chocolate chips using one of two methods: the microwave or a double boiler. If using the microwave, place the chocolate chips in a microwave-safe bowl. Heat in 30-second intervals, stirring in between to prevent scorching. This method usually takes about 1-2 minutes.
3. Double Boiler Method: For a more controlled melting process, fill a saucepan with water and bring it to a simmer. Place a heatproof bowl over the saucepan, ensuring it doesn’t touch the water. Add the chocolate chips to the bowl and stir until melted and smooth.
Tips on Achieving a Smooth Texture and Spreading Evenly
Once melted, allow the chocolate to cool slightly but still remain pourable. Pour the chocolate over the graham cracker crust, then use a spatula to spread it evenly. For a smoother finish, tilt the baking dish gently so the chocolate flows to the edges, filling any gaps. Allow the chocolate layer to set slightly before adding the marshmallow topping.
Adding the Marshmallow Topping
The marshmallow layer is what truly elevates these s’mores bars, providing that signature gooeyness.
Suggestions for Arranging Mini Marshmallows for an Appealing Look
1. Use Mini Marshmallows: For the best results, opt for mini marshmallows. They are easier to spread and melt evenly over the chocolate layer.
2. Arrangement: Begin by sprinkling a generous layer of marshmallows directly over the chocolate. For an appealing look, arrange them in a single layer, ensuring they touch but do not overlap. This way, each bite contains a perfect balance of chocolate and marshmallow.
Optional Variations for Extra Fluffiness
If you desire an even fluffier topping, consider using marshmallow fluff instead of mini marshmallows. Spread a layer of fluff over the chocolate before chilling, or mix some fluff with the mini marshmallows for a delightful combination.
Chilling the Bars
Now that you’ve layered your chocolate and marshmallows, it’s time to chill the bars.
Explanation of Chilling Time and Its Importance for Setting
Place the baking dish in the refrigerator for at least 2-3 hours. Chilling is crucial as it allows the chocolate to firm up and the marshmallows to set. Without sufficient time in the fridge, the bars may not hold their shape when sliced.
Discussing Texture Changes Post-Chill
After chilling, the bars will firm up considerably. The chocolate will have a nice snap, while the marshmallows will remain soft yet set, providing that classic s’mores experience. The combination of textures—from the crunchy base to the creamy chocolate and fluffy marshmallows—creates a delightful eating experience.
Slicing and Serving
Once the bars are fully chilled, it’s time to slice and serve them.
Tips for Cutting Bars Cleanly
1. Use a Sharp Knife: To achieve clean slices, use a sharp knife. Wipe the knife with a damp cloth between cuts to prevent sticking.
2. Cut into Even Squares: Aim for uniform pieces, approximately 2 inches by 2 inches. This size is perfect for sharing and enjoying!
Suggestions for Presentation and Serving Options
For a beautiful presentation, arrange the sliced bars on a platter. Drizzle with additional melted chocolate or sprinkle crushed graham crackers and mini marshmallows on top for a charming touch. Serve with a side of chocolate sauce or whipped cream for dipping, enhancing the experience even further.
Perfect Occasions for No-Bake S’mores Bars
These no-bake s’mores bars are perfect for various occasions, making them a versatile addition to your dessert repertoire.
Parties and Gatherings
Bring these bars to your next party or gathering, and watch them disappear! Their nostalgic flavors appeal to both kids and adults, making them a hit at any event.
Family Picnics and Outdoor Events
These bars are an excellent treat for picnics and outdoor events. They do not require baking, making them easy to prepare ahead of time and transport. Just keep them cool until serving to maintain their texture.
Quick Dessert for Weeknight Meals
If you need a quick dessert during the week, these bars are your solution. They can be made in advance and stored in the refrigerator, ready to be enjoyed after dinner.
Nutritional Information and Allergen Considerations
Understanding the nutritional profile and potential allergens in your recipe is essential for accommodating different dietary needs.
Overview of the Nutritional Profile of the Bars
Each bar provides a delightful balance of carbohydrates, fats, and sugars. While the exact nutritional content will vary based on the specific ingredients used, a typical bar contains approximately 150 calories, 7 grams of fat, and 20 grams of carbohydrates. They are a sweet treat, best enjoyed in moderation.
Discussion on Common Allergens in the Recipe
This recipe contains common allergens, including gluten (from graham crackers), dairy (from chocolate), and possibly soy (depending on the chocolate used). Be sure to check labels when purchasing ingredients to suit your dietary needs.
Suggestions for Substitutions to Accommodate Dietary Restrictions
– Gluten-Free: Substitute regular graham crackers with gluten-free options made from almond flour or coconut flour.
– Dairy-Free: Opt for dairy-free chocolate chips and marshmallows.
– Vegan: Use vegan chocolate chips and marshmallows to create a completely plant-based treat.
Conclusion
In conclusion, creating Toasty Delight: No-Bake S’mores Bars is a simple yet rewarding endeavor. With just a few ingredients and minimal effort, you can enjoy the delightful flavors of s’mores in a convenient bar format. These bars are perfect for any occasion—whether for a festive gathering, a family picnic, or a quick weeknight dessert.
We encourage you to try this recipe and share the joy it brings with your family and friends. Don’t hesitate to customize the bars to suit your tastes, experimenting with different add-ins or toppings. The possibilities are endless, and the delightful flavors will surely become a staple in your dessert rotation. Enjoy the bliss of these no-bake s’mores bars, and let the taste take you back to warm summer nights by the campfire!