
Piñata Surprise Cookies: A Fun and Festive Treat
In recent years, the world of baking has seen a delightful trend emerge: surprise-filled desserts that bring an element of fun and excitement to any occasion. From cakes that reveal hidden layers to cupcakes that burst with unexpected flavors, these treats have captivated dessert lovers everywhere. One standout recipe that embodies this playful spirit is the Piñata Surprise Cookie. These cookies are not just a feast for the eyes; they are also a delicious way to celebrate and create lasting memories with friends and family.
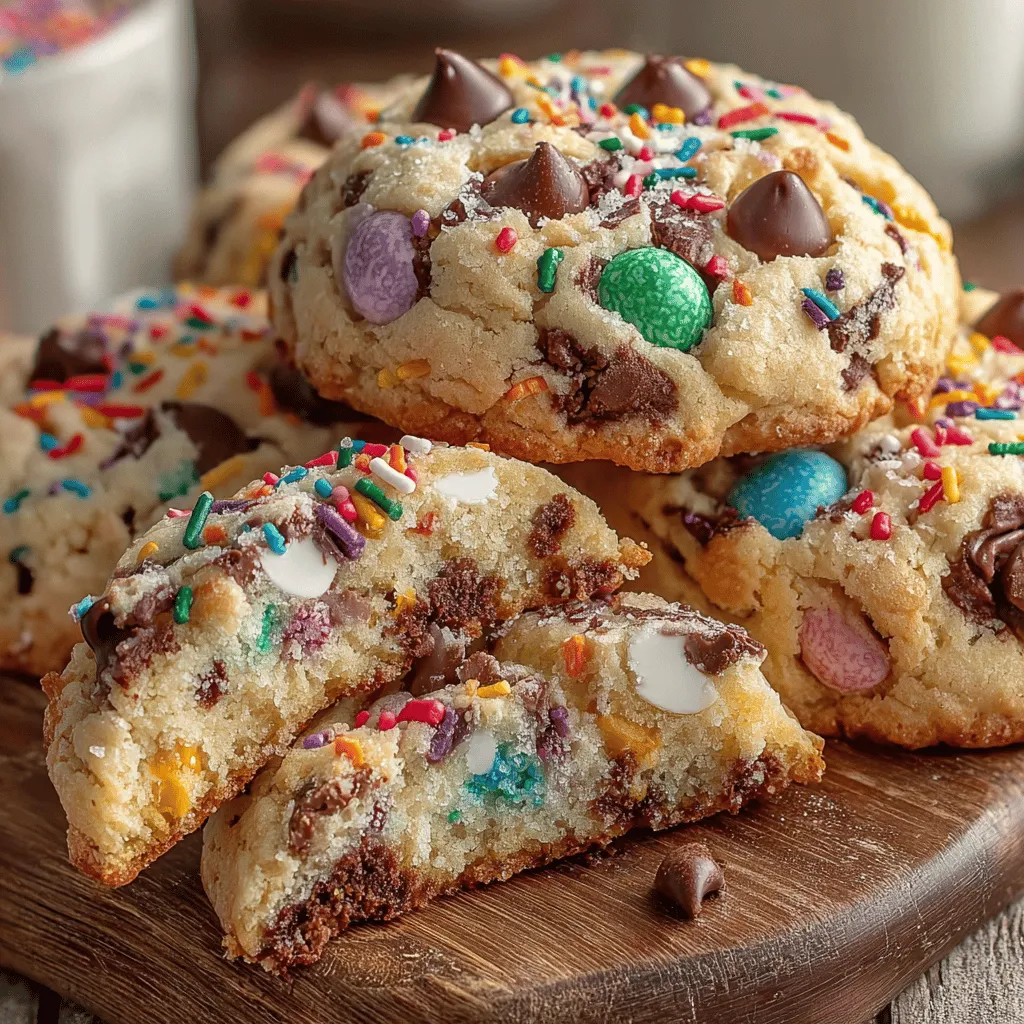
Piñata Surprise Cookies are perfect for birthdays, holidays, or any gathering where you want to add an element of surprise to the dessert table. Each cookie is a delightful package that hides an assortment of colorful mini candies within, making the moment of biting into one a joyous experience. The concept of piñata cookies takes the familiar comfort of homemade cookies and elevates it into a whimsical treat that’s sure to be a hit with both kids and adults alike. The vibrant colors and unexpected sweetness inside these cookies add a festive flair that can brighten any occasion.
Creating homemade cookies is not just about the final product; it’s about the experience of baking and sharing them. The process of mixing ingredients, shaping dough, and watching them bake in the oven fills the kitchen with warmth and the enticing aroma of freshly baked goods. The joy of sharing cookies with loved ones, especially ones as fun as Piñata Surprise Cookies, enhances any celebration and creates cherished memories.
Understanding the Ingredients
To create the perfect Piñata Surprise Cookies, it’s essential to understand the key ingredients that contribute to their deliciousness. Each component plays a significant role, ensuring the cookies are flavorful, chewy, and full of surprises.
Unsalted Butter: Using unsalted butter is crucial in cookie recipes as it allows for better control over the salt content. By choosing unsalted butter, you can season the dough to your preference, ensuring that the cookies’ sweetness shines through without being overshadowed by excess salt.
Sugar: The balance of granulated sugar and brown sugar in this recipe creates a delightful contrast in flavor and texture. Granulated sugar contributes to the crispiness of the edges, while brown sugar adds moisture and a rich, caramel-like flavor to the cookies.
Eggs: Eggs are a vital ingredient in cookie-making, providing moisture and acting as a binding agent. For Piñata Surprise Cookies, it’s important to add the eggs one at a time. This method ensures that they are well incorporated, leading to a smoother dough and a better texture in the final cookies.
Flour: All-purpose flour is the backbone of the cookie dough. It gives the cookies structure and helps achieve the desired chewy texture. The right flour-to-fat ratio is essential for cookies that are soft yet sturdy enough to encase the surprise filling.
Baking Soda: This leavening agent is responsible for the cookies rising and achieving that perfect chewy consistency. Baking soda also helps to create a slightly crisp edge while keeping the center soft.
Chocolate Chips and Mini Candies: The inclusion of chocolate chips adds a classic element to the cookie, providing melty pockets of chocolate in every bite. The assortment of mini candies, which can vary based on personal preference, brings the piñata surprise to life. From colorful sprinkles to gummy bears or M&M’s, the possibilities for customization are endless, allowing bakers to tailor the recipe to their taste and occasion.
Step-by-Step Guide to Making Piñata Surprise Cookies
Prep the Dough
Before diving into the mixing and baking, it’s essential to gather your ingredients and tools. Preheat your oven to 350°F (175°C), and line a baking sheet with parchment paper. This will prepare the kitchen for the delightful aroma of freshly baked cookies and ensure that they don’t stick to the baking surface.
The first step in making your Piñata Surprise Cookies is preparing the dough. Begin by whisking together the dry ingredients in a bowl. This typically includes all-purpose flour, baking soda, and a pinch of salt. Whisking these ingredients together ensures that the baking soda is evenly distributed throughout the flour, which is critical for achieving an even rise and preventing any bitter spots in your cookies.
Creaming the Butters and Sugars
Now it’s time to cream the unsalted butter with the granulated and brown sugars. Using a hand mixer or a stand mixer fitted with a paddle attachment, beat the butter and sugars together on medium speed until the mixture is light and fluffy. This process typically takes about 2 to 3 minutes. Achieving a light and airy texture during this step is essential; it incorporates air into the dough, which helps the cookies rise and results in a tender crumb.
Incorporating Eggs
Once the butter and sugars are creamed to perfection, it’s time to add the eggs. Crack one egg into the mixing bowl and beat it into the mixture until fully combined. Follow with the second egg, ensuring that it is also thoroughly incorporated. The eggs not only bind the ingredients together but also contribute to the moisture content of the cookie dough, making the final product delightfully chewy.
Combining Dry and Wet Ingredients
After the eggs are mixed in, it’s crucial to combine the dry and wet ingredients. Gradually add the flour mixture to the butter and sugar mixture, mixing on low speed. Be careful not to overmix; overmixing can lead to tough cookies due to the development of gluten in the flour. Stop mixing as soon as you see the last streaks of flour disappear, leaving you with a soft, pliable dough.
Mixing in Chocolate Chips and Sprinkles
With the dough ready, it’s time to personalize your Piñata Surprise Cookies. Gently fold in the chocolate chips and your choice of mini candies using a spatula. This step is where you can get creative; feel free to mix and match the candies to suit the theme of your celebration or your personal taste. Make sure that the candies are evenly distributed throughout the dough to ensure every cookie has a surprise waiting inside.
In the next part of this article, we’ll dive into shaping the cookies and baking them to perfection, ensuring they come out as delightful as they sound. Stay tuned for more tips and tricks to make your Piñata Surprise Cookies the highlight of your dessert table!
Creative Ways to Incorporate Mix-Ins
When it comes to Piñata Surprise Cookies, creativity knows no bounds. Not only can you play around with the surprise center, but you can also elevate the flavor and visual appeal by incorporating various mix-ins. Consider adding colorful sprinkles, chocolate chunks, or chopped nuts into the cookie dough before rolling it out. These additions not only enhance the taste but also contribute to a delightful visual presentation. For instance, using a combination of vibrant sprinkles and rich chocolate pieces can create an eye-catching contrast when the cookies are baked.
To further the creativity, think about using flavored extracts such as almond or mint to infuse your dough with an additional layer of flavor. This not only personalizes the cookie but also makes it a conversation starter at any gathering, as your guests will be intrigued by the unique taste combinations.
Creating the Surprise Center
The heart of the Piñata Surprise Cookie lies in its hidden treat. To create this surprise center, start by selecting your favorite small candies. Options such as mini M&Ms, chocolate chips, or gummy bears work wonderfully. Here’s how to ensure your candies remain hidden until the first bite:
1. Prepare the Dough: Roll out a portion of the cookie dough into a ball, about the size of a golf ball.
2. Create a Hollow Center: Using your thumb, gently press down into the center of the dough ball to create an indentation. Be careful not to press all the way through.
3. Add the Candies: Place a few candies into the hollowed-out center. Aim for about 3-5 pieces, depending on the size of the candies and the dough ball.
4. Seal the Dough: Carefully fold the edges of the dough over the candies, ensuring they are completely enclosed. Roll the ball between your hands to smooth out any seams.
This technique guarantees that your surprise remains a delightful secret until the cookies are bitten into, adding an element of surprise that is sure to enchant both kids and adults alike.
Chilling the Dough
Chilling the dough is a crucial step in cookie-making that should not be overlooked. It allows the fats in the dough to solidify, which in turn helps the cookies maintain their shape during baking. If you skip this step, you may end up with flat, misshapen cookies that lose their charming appearance.
To chill your dough, wrap it in plastic wrap and refrigerate for at least 30 minutes, or up to 24 hours for deeper flavor development. The longer the dough chills, the more the flavors meld, resulting in a richer cookie. When ready to bake, simply remove the dough from the refrigerator and allow it to sit at room temperature for about 10 minutes before shaping it into balls. This will make it easier to work with while still keeping the benefits of chilling.
Preheating and Baking
Getting the oven temperature just right is vital for achieving the perfect texture and color of your cookies. Preheat your oven to 350°F (175°C) and allow it to reach the desired temperature before placing your cookies inside. This ensures even baking and helps the cookies develop a beautiful golden-brown color.
When placing the cookies in the oven, remember to leave enough space between each cookie to allow them to spread as they bake. For the best results, bake in batches, keeping an eye on the cookies during the last few minutes of baking. Cookies are typically done when the edges are crisp, and the centers appear slightly soft. Remember, they will continue cooking slightly as they cool on the baking sheet, so it’s better to err on the side of underbaking a bit.
Cooling the Cookies
Once your Piñata Surprise Cookies are out of the oven, it’s important to cool them properly to achieve that perfect finish. Allow the cookies to sit on the baking sheet for about 5 minutes before transferring them to a wire rack. This initial cooling period helps the cookies firm up, reducing the risk of breaking.
After transferring them, let the cookies cool completely on the wire rack. This step is crucial as it allows the cookies to set properly. A well-cooled cookie will have a delightful texture, with a chewy center and crisp edges. Additionally, cooling on a wire rack prevents moisture from accumulating on the bottom, which can lead to soggy cookies.
Serving Suggestions and Presentation Ideas
When it comes to serving your Piñata Surprise Cookies, presentation is key to creating an impressive display at parties or gatherings. Here are some ideas to elevate your cookie presentation:
– Plating: Arrange the cookies on a colorful platter, stacking them in tiers or creating a playful cookie tower. Use parchment paper or decorative doilies beneath the cookies for an added touch.
– Garnishing: Dust the tops of the cookies with powdered sugar or drizzle with melted chocolate for an extra indulgent flair.
– Themed Displays: Tailor your presentation to your event. For a birthday party, consider adding balloons or confetti around the cookie display. For holidays, incorporate seasonal decorations that complement the cookie colors.
Pair your Piñata Surprise Cookies with a range of beverages. A classic pairing is a glass of cold milk, which complements the sweetness of the cookies beautifully. Alternatively, for adults, serve them alongside a rich cup of coffee or a warm mug of hot cocoa. The contrast of flavors and temperatures enhances the overall experience, making each bite even more enjoyable.
The Joy of Baking and Sharing
Baking is not just about creating delicious treats; it’s an experience that brings people together. Piñata Surprise Cookies are the perfect example of how a simple recipe can create joyous moments. Whether you’re baking with family, hosting a cookie decorating party, or sharing them with friends, these cookies foster a sense of community and celebration.
The act of baking allows for creativity and expression, as you can customize your cookies with different fillings and decorations. Each batch can tell a story, whether it’s through the choice of candies hidden inside or the way they are presented. Baking is an opportunity to bond with loved ones, creating memories that last long after the last cookie is gone.
Conclusion
In summary, making Piñata Surprise Cookies is a delightful and creative endeavor that offers endless possibilities for experimentation. From incorporating fun mix-ins to creating an exciting surprise center, every step in the process is infused with fun and joy.
Encourage yourself and others to experiment with different fillings and decorations. Perhaps try caramel pieces, fruity gummies, or even a surprise cream filling for a twist on the classic recipe. The warmth and joy of homemade cookies can enhance any occasion, making these cookies a perfect choice for gatherings, celebrations, or simply enjoying at home. So gather your ingredients, invite some friends or family, and start baking these delightful Piñata Surprise Cookies today!

