Introduction
The Nostalgic Cornflake Tart is more than just a dessert; it’s a culinary time capsule that transports many of us back to the carefree days of childhood. This delightful tart features a crunchy cornflake base, enriched with the sweetness of golden syrup and the richness of butter, creating a symphony of textures and flavors that is both satisfying and reminiscent of simpler times. For those who grew up enjoying this beloved treat, the very smell of it baking can evoke vivid memories of school lunches and family gatherings. In this article, we will not only explore the recipe in detail, but we will also delve into the background of this cherished dish, ensuring that you can recreate the Nostalgic Cornflake Tart in your own kitchen.
Understanding the Nostalgia Behind Cornflake Tart
The Cornflake Tart holds a special place in the hearts of many, particularly those who grew up in the UK during the mid-20th century. It was a staple in school canteens and a favorite among parents looking for an easy dessert to whip up after dinner. The tart’s simplicity made it an accessible treat, easily made with pantry staples, making it a go-to for busy families.
For many, the Cornflake Tart evokes memories of childhood parties, where it was often served alongside other classic treats like jelly and ice cream. The combination of crunchy cornflakes and sweet syrup is not just delicious; it is a reminder of carefree afternoons spent with friends and family, sharing laughs and stories over homemade sweets. Each bite of this tart carries with it the essence of nostalgia, reminding us of the little joys in life.
The popularity of Cornflake Tart has endured over the years, evolving from a modest dessert served in school lunches to a nostalgic recipe cherished by generations. In various regions, it has taken on different forms, but the core elements remain the same. The tart is a testament to how traditional recipes can transcend time and continue to bring people together, creating new memories while honoring the old.
Ingredients Breakdown
Before we dive into the preparation of the Cornflake Tart, let’s take a closer look at the key ingredients that contribute to its unique flavor and texture.
– Digestive Biscuits: Serving as the foundation of the tart crust, digestive biscuits provide a crumbly texture that complements the tart’s filling perfectly. Their mild sweetness and slight nuttiness create a balanced base.
– Unsalted Butter: This ingredient adds richness to the crust and helps bind the biscuit crumbs together. The butter also contributes to the overall flavor, ensuring that the base is both delicious and sturdy.
– Golden Syrup: A quintessential ingredient in many British desserts, golden syrup is a thick, amber-colored sweetener with a distinct flavor. It not only sweetens the filling but also adds a sticky texture that holds everything together.
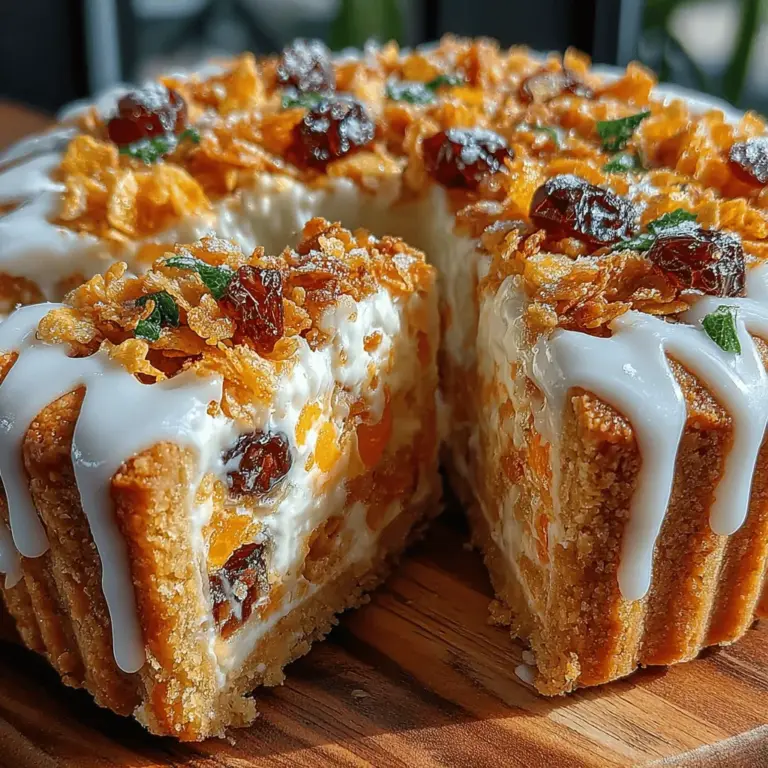
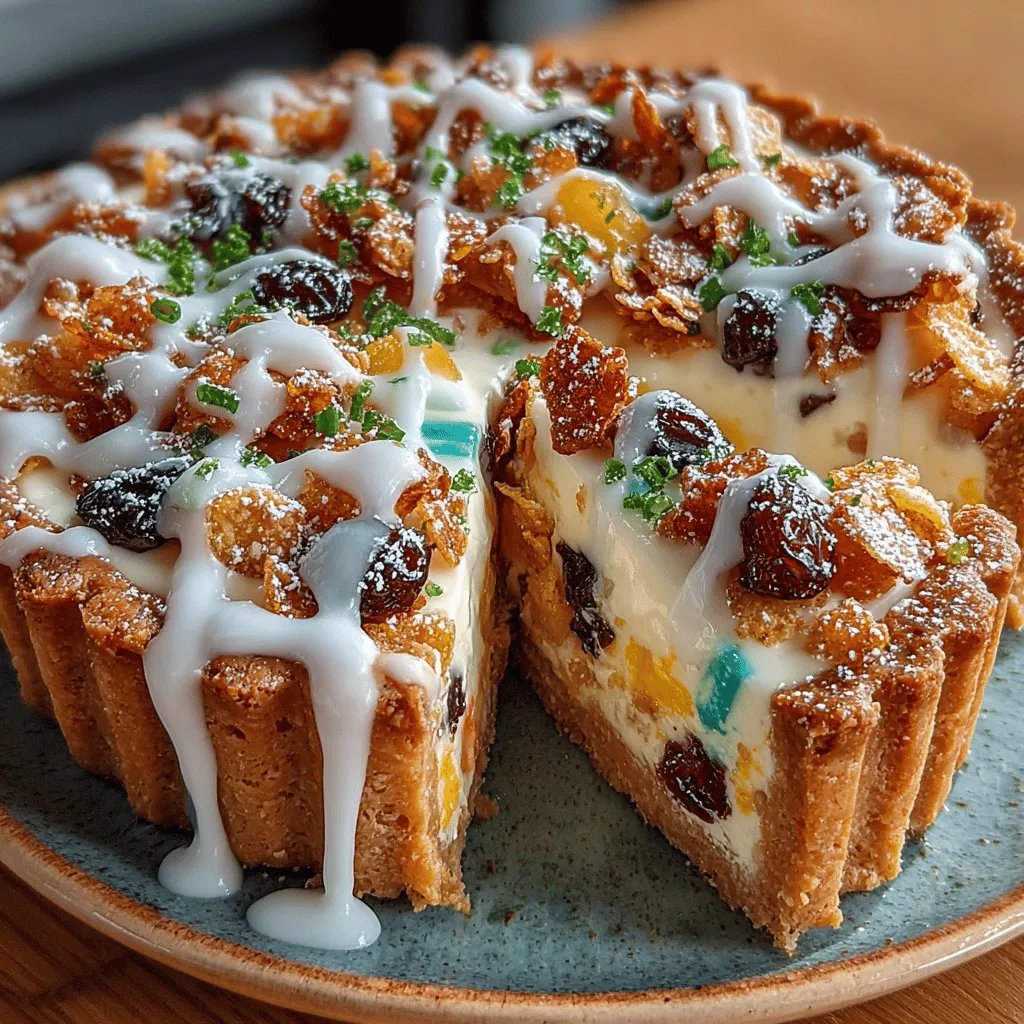
– Cornflakes: The star of the show, cornflakes provide the essential crunch that defines this tart. Their light and airy texture helps create a satisfying bite, making every piece enjoyable.
– Desiccated Coconut: Adding a chewy texture and a hint of tropical flavor, desiccated coconut complements the other ingredients beautifully. It also enhances the tart’s overall richness.
– Raisins or Sultanas: These dried fruits introduce natural sweetness and a chewy contrast to the crunchiness of the cornflakes. They also add a pop of color, making the tart visually appealing.
– Mixed Nuts (optional): For those who enjoy a bit of extra crunch and flavor, mixed nuts can be added to the filling. They bring a delightful nuttiness that pairs well with the other ingredients.
– Icing Sugar: Used for creating a smooth, sweet topping, icing sugar gives the tart a polished finish. It can also be dusted over the top for extra sweetness.
– Water and Vanilla Extract: Essential for the icing, water helps achieve the right consistency, while vanilla extract adds depth and enhances the overall flavor of the tart.
Step-by-Step Instructions for Making Cornflake Tart
Now that we’ve covered the ingredients, let’s dive into the step-by-step instructions for creating your very own Nostalgic Cornflake Tart. The process is straightforward and perfect for bakers of all skill levels.
Preparing the Base
1. Preheat the Oven: Begin by preheating your oven to 180°C (350°F). Preheating is crucial as it ensures an even baking temperature, helping to achieve a perfectly crisp crust. While your oven warms up, you can prepare the tart base.
2. Crushing the Digestive Biscuits: Take your digestive biscuits and place them in a large, resealable plastic bag. Using a rolling pin, crush the biscuits into fine crumbs. Aim for a texture similar to sand, as this will help create a solid base for your tart. Alternatively, you can use a food processor for a quicker method.
3. Mixing the Base: In a mixing bowl, combine the crushed digestive biscuits with melted unsalted butter. Stir the mixture until all the biscuit crumbs are thoroughly coated in butter. The mixture should hold together when pressed, indicating it’s ready for the next step.
4. Pressing the Biscuit Mixture into the Tin: Choose a tart tin or a fluted pie dish (approximately 9 inches in diameter). Spoon the biscuit mixture into the base of the tin, spreading it evenly across the bottom. Using a flat-bottomed glass or your hands, firmly press the mixture down to create an even layer. Make sure to press the mixture up the sides of the tin as well, forming a crust that will hold the filling.
Forming the Tart Base
5. Baking the Crust: Place the tart tin in the preheated oven and bake for about 10-12 minutes, or until the crust turns a light golden brown. Keep an eye on it, as baking times can vary slightly depending on your oven. You’ll know the crust is ready when it’s firm to the touch and has a lovely golden hue.
6. Cooling the Crust: Once baked, remove the tart from the oven and allow it to cool in the tin for a few minutes. This step is essential, as it will help the crust firm up further. After a brief cooling period, you can transfer the tart base to a wire rack to cool completely before adding the filling.
With the tart base prepared, you’re well on your way to creating a delightful dessert that not only satisfies your sweet tooth but also brings back cherished memories of childhood. Stay tuned for the next part of this article, where we will delve into the delicious filling and the final steps to complete your Nostalgic Cornflake Tart Delight.
Cooling the Tart Base
Once you’ve baked your tart base to a golden perfection, it’s essential to allow it to cool completely before proceeding with the filling. Cooling is a critical step as it helps the tart base firm up, making it easier to handle and preventing the filling from becoming overly soggy. A properly cooled crust will also provide a delightful contrast to the sweet and sticky filling, enhancing the overall texture of the tart.
Allow the tart base to cool at room temperature for at least 30 minutes. If you’re in a hurry, placing it in the refrigerator can expedite the process, but be careful not to leave it too long, as it may become overly firm.
Mixing the Filling
Combining Ingredients
To create the filling for your Nostalgic Cornflake Tart, start by gathering the key ingredients: cornflakes, golden syrup, butter, and sugar. Each component plays a vital role in achieving the perfect flavor and texture.
1. Butter: Melt the butter in a saucepan over low heat until it becomes liquid. This will help the sugar dissolve more effectively.
2. Sugar: Once the butter has melted, stir in the sugar. This combination will create a sweet, rich base for your filling.
3. Golden Syrup: Next, add the golden syrup. It’s crucial to warm this gently, ensuring it doesn’t boil, as overheating can alter its flavor and consistency. Stir continuously until the mixture is smooth and well-combined.
Significance of Each Ingredient
The buttery mixture creates a luscious base that not only binds the cornflakes together but also adds a rich flavor. The sugar enhances sweetness, while the golden syrup adds a unique depth and stickiness that is characteristic of a classic Cornflake Tart. The cornflakes themselves provide a crunchy texture that contrasts beautifully with the gooey filling, making each bite a delightful experience.
Adding Sweetness
Warming the Golden Syrup
To warm the golden syrup, place it in a small saucepan over low heat. It should be just warm enough to blend seamlessly with the melted butter and sugar. Avoid overheating, as this can make the syrup too runny and affect the final texture of your filling. You want it fluid enough to coat the cornflakes but thick enough to hold them together once set.
Coating the Cornflakes
Once your golden syrup mixture is ready, pour it over the cornflakes in a large mixing bowl. Use a spatula to gently fold the cornflakes into the syrup mixture, ensuring that each flake is evenly coated. Be cautious during this process to avoid crushing the cornflakes; the goal is to maintain their shape for maximum crunch.
Filling the Tart Base
Compacting the Filling
With the cornflakes thoroughly coated, it’s time to fill your tart base. Begin by spooning the mixture into the cooled tart shell. Spread it evenly across the base using the back of the spoon or a spatula. To compact the filling without crushing the cornflakes, use a light pressing motion. This will help the filling hold together when sliced while preserving the delightful texture of the cornflakes.
Even Distribution
Ensure that the filling is evenly distributed throughout the tart base. This not only contributes to a beautiful presentation but also guarantees that each slice will have a consistent flavor and texture. Take your time with this step; an even filling enhances the overall eating experience.
Making the Icing
Creating the Icing
To add the finishing touch to your Cornflake Tart, prepare a simple icing. You will need icing sugar and a small amount of water or lemon juice. In a mixing bowl, combine the icing sugar with just enough liquid to achieve a thick but pourable consistency. Aim for a smooth texture that will easily drizzle over the tart.
Icing Consistency Tips
If your icing is too thick, gradually add more liquid until you reach the desired consistency. Conversely, if it’s too runny, add more icing sugar to thicken it up. Once your icing is ready, drizzle it over the cooled tart. This not only adds sweetness but also elevates the visual appeal, making the tart more enticing.
Chilling and Serving the Tart
Importance of Chilling
After icing the tart, it’s crucial to chill it in the refrigerator for at least an hour. This chilling time allows the tart to set properly, ensuring that the filling firms up and the icing hardens slightly. A well-chilled Cornflake Tart is easier to slice and serves beautifully, with clean edges for each piece.
Serving Suggestions
When ready to serve, use a sharp knife to cut the tart into squares or wedges. For an elegant presentation, consider garnishing each slice with a sprinkle of extra icing sugar or a few additional cornflakes on top. Pair the tart with a dollop of whipped cream or a scoop of vanilla ice cream for added indulgence. This is a dessert that is perfect for gatherings, picnics, or simply a cozy night in.
Nutritional Information
The Nostalgic Cornflake Tart is a delightful treat, but like many desserts, it should be enjoyed in moderation. Each serving (approximately 1/12th of the tart) contains around 200 calories, with a good balance of carbohydrates and sugars primarily from the cornflakes and syrup. It’s important to note that this recipe does contain butter and sugar, which may not align with certain dietary preferences.
Dietary Considerations
For those with dietary restrictions, consider making the following substitutions:
– Butter: Use a dairy-free alternative or coconut oil for a vegan-friendly option.
– Sugar: Substitute with a natural sweetener like agave syrup or a sugar substitute if desired.
– Cornflakes: Choose gluten-free cornflakes for a gluten-free version of this tart.
Variations of Cornflake Tart
While the traditional Cornflake Tart recipe is delicious on its own, you can easily customize it to suit your taste preferences. Here are some fun variations to try:
– Dried Fruits: Add chopped dried fruits such as apricots, cranberries, or raisins to the filling for a fruity twist. This not only enhances the flavor but also adds a chewy texture that contrasts nicely with the crunch of the cornflakes.
– Chocolate Cornflakes: For a chocolaty version of the tart, use chocolate-flavored cornflakes instead of regular ones. This variation provides a rich, decadent flavor that chocolate lovers will adore.
– Spices: Introduce spices like cinnamon or nutmeg into the filling for added warmth and depth. A teaspoon of ground cinnamon can transform the tart into a cozy dessert perfect for fall or winter gatherings.
Conclusion
The Nostalgic Cornflake Tart is more than just a dessert; it’s a journey back to simpler times filled with sweet memories. This recipe not only captures the essence of childhood but also provides a delightful treat for people of all ages. Whether you’re reminiscing about your own childhood or sharing this tart with the next generation, it’s sure to be a hit. By following this comprehensive guide, you can recreate this beloved dessert and perhaps even spark new memories to cherish for years to come. Dive into this delightful recipe, and let every bite take you on a sweet adventure!

