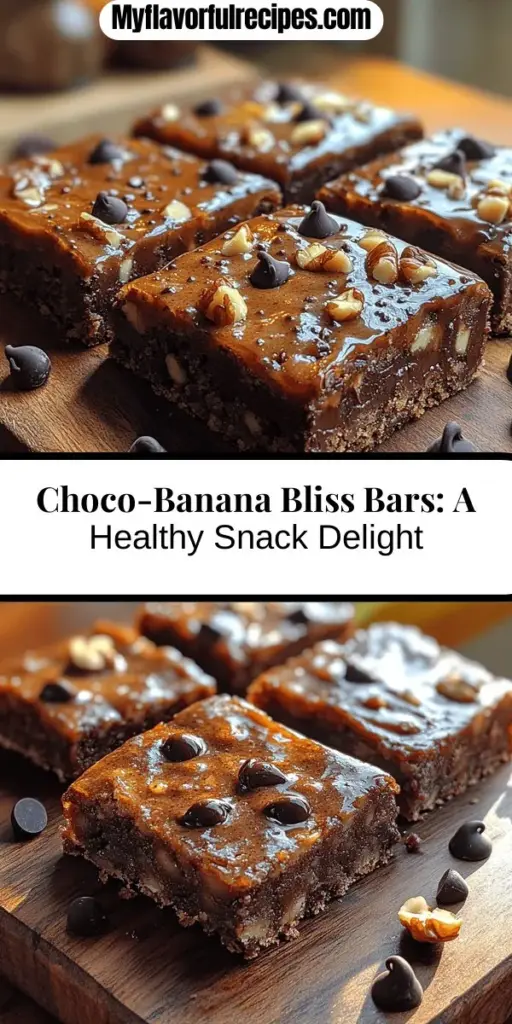
In the realm of healthy snacking, few treats can rival the delightful combination of chocolate and banana. Choco-Banana Bliss Bars are not just a delicious indulgence; they are also a nutritious option packed with wholesome ingredients. These bars are crafted to satisfy your sweet tooth while providing the energy and nourishment you need throughout your day. Whether you’re looking for a quick breakfast, a post-workout snack, or a guilt-free dessert, these bars have got you covered.
In this article, we will guide you through the process of making these decadent bars, ensuring you understand each step while also providing insights into the benefits of the ingredients used. The result? You’ll end up with a treat that not only pleases your palate but also aligns with your health goals.
Understanding the Health Benefits of Choco-Banana Bliss Bars
Before we dive into the recipe, it’s essential to appreciate the nutritional powerhouses behind the Choco-Banana Bliss Bars. Each ingredient has its unique benefits that contribute to your overall well-being.
Nutritional Overview of Key Ingredients
– The Benefits of Ripe Bananas: Bananas are not just a convenient snack; they are loaded with potassium, which is crucial for maintaining heart health and proper muscle function. The fiber content in bananas aids in digestion, while their natural sweetness makes them an excellent alternative to refined sugars in baked goods.
– Rolled Oats: Often considered a superfood, rolled oats are a fantastic source of whole grains. They are rich in soluble fiber, which can help reduce cholesterol levels and promote heart health. Additionally, oats provide long-lasting energy, making them a great base for our bliss bars.
– Almond Butter: Known for its creamy texture and nutty flavor, almond butter is packed with healthy fats and protein. It supports muscle recovery and keeps you satiated longer. This nut butter also contains vitamin E, an antioxidant that helps protect your cells from damage.
– Dark Chocolate: Dark chocolate is not only a delicious addition but also a source of antioxidants, which can help combat oxidative stress in the body. It’s also known for its mood-boosting properties, making it a perfect complement to the other ingredients in our bars.
– Honey vs. Maple Syrup: Both honey and maple syrup are natural sweeteners that offer more health benefits than refined sugar. Honey has antibacterial properties and can soothe sore throats, while maple syrup is rich in minerals like manganese and zinc, which are important for immune function.
Ingredient Breakdown for Choco-Banana Bliss Bars
To make these Choco-Banana Bliss Bars, you’ll need to gather a few simple ingredients. Understanding each component not only enhances the final product but also allows you to appreciate the nutritional value of the bars.
Exploring Each Ingredient in Detail
– Mashed Bananas: When selecting bananas for this recipe, go for the ones that are fully ripe. They should have a few brown spots on their skin; this indicates that they are sweet and will provide the best flavor for your bars. The more ripe the bananas, the less additional sweetener you may need.
– Nut Butters: While almond butter is a fantastic choice for this recipe, you can also experiment with other nut butters. Peanut butter adds a classic flavor, while cashew butter offers a creamier texture. If allergies are a concern, sunflower seed butter is an excellent nut-free alternative that still provides healthy fats and protein.
– Sweeteners: The sweetener you choose can significantly impact the flavor of your bliss bars. Honey lends a distinct floral sweetness, while maple syrup offers a more robust taste. Both are natural options that pair well with the bananas and chocolate, so feel free to choose based on your preference.
– Cocoa Powder: For this recipe, you’ll want to use unsweetened cocoa powder to keep the sugar content in check. Unsweetened cocoa powder is rich in antioxidants and has a deep chocolate flavor that enhances the overall taste of the bars without adding unnecessary sweetness.
– Adding Texture: To make your Choco-Banana Bliss Bars even more enjoyable, consider adding chopped nuts or seeds. Walnuts, pecans, or even pumpkin seeds can introduce a crunchy texture that contrasts beautifully with the soft, chewy bars.
Step-by-Step Instructions to Create Choco-Banana Bliss Bars
Now that you understand the health benefits and ingredient breakdown, it’s time to get hands-on with the recipe. We will walk through the essential steps required to create these Choco-Banana Bliss Bars, ensuring you have a smooth cooking experience.
Prepping Your Kitchen for Success
Before diving into the recipe, it’s crucial to prepare your kitchen. This means gathering all the necessary tools and ingredients to streamline the cooking process.
Essential Tools and Equipment Needed
– Mixing Bowls: You’ll need at least two mixing bowls—one for the dry ingredients and one for the wet ingredients. A larger bowl for combining everything will be helpful as well.
– Measuring Cups and Spoons: Accurate measurements are key to successful baking, so have your measuring cups and spoons ready.
– Spatula or Wooden Spoon: For mixing the ingredients together, a spatula or wooden spoon will help you combine everything without overmixing.
– Baking Pan: A square or rectangular baking pan lined with parchment paper will make it easy to lift out the bars once they are baked.
– Oven: Preheating your oven is essential, as it ensures even baking. For Choco-Banana Bliss Bars, you’ll want to set your oven to 350°F (175°C).
Importance of Preheating the Oven
Preheating your oven is a crucial step in baking, as it allows for even cooking from the moment you place your bars inside. If the oven is not preheated, the bars may bake unevenly, leading to inconsistent texture and flavor. Aim to preheat your oven while you prepare the batter to save time.
Mixing Wet Ingredients for Optimal Flavor
Now that your kitchen is prepped and your oven is preheating, let’s get started with mixing the wet ingredients.
1. Mash the Bananas: In one of your mixing bowls, take the ripe bananas and mash them well using a fork or potato masher. Aim for a smooth consistency with minimal lumps; this will help the bananas integrate fully into the batter.
2. Add Nut Butter: Once your bananas are mashed, add the almond butter to the bowl. Mix well until the nut butter and bananas are fully combined. The almond butter will add creaminess and richness to the mixture.
3. Incorporate Sweetener: Next, drizzle in your chosen sweetener—honey or maple syrup—and continue mixing until everything is well blended. This step is key, as it ensures that the sweetness is evenly distributed throughout the bars.
4. Mix in Cocoa Powder: Sift the unsweetened cocoa powder into the wet mixture to avoid any lumps. Stir until the cocoa powder is fully integrated for a rich chocolate flavor.
With the wet ingredients prepared, you’re ready to move on to combining them with the dry ingredients, which will be detailed in the next section.
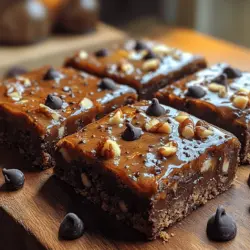
As you embark on the journey of making Choco-Banana Bliss Bars, remember that each step is not just about following a recipe; it’s about understanding the elements that contribute to the delicious outcome. Stay tuned as we delve deeper into the mixing process and the baking techniques that will lead you to create these wholesome treats.
{{image_1}}
Techniques for Achieving a Smooth Mixture
Creating Choco-Banana Bliss Bars starts with the right techniques for mixing your ingredients. Achieving a smooth and well-blended mixture is critical for the texture and flavor of your bars.
Combining Dry Ingredients: Tips for Perfect Texture
Before you dive into mixing your dry ingredients, it’s essential to measure them accurately. Use a kitchen scale for precision or the spoon-and-level method if you’re using measuring cups. This ensures that you don’t end up with too much flour or cocoa powder, which can lead to dense bars.
1. Sifting: Always sift your dry ingredients, especially flour and cocoa powder. This breaks up any lumps and aerates the ingredients, allowing for a lighter texture in the final product. Sifting also helps to evenly distribute leavening agents like baking powder or baking soda.
2. Whisking: After sifting, whisk your dry ingredients together thoroughly. This ensures that all components are evenly combined, preventing clumps that can affect the texture of your bliss bars. You want a uniform mix before incorporating wet ingredients.
The Importance of Whisking and Sifting
Whisking and sifting serve multiple purposes. They not only enhance texture but also improve the mixing process. When you whisk, you introduce air into the mixture, which helps in creating a lighter final product. This is particularly important in baked goods, where too much density can yield disappointing results.
Bringing It All Together: The Mixture Process
Once your dry ingredients are well mixed, it’s time to incorporate the wet ingredients. In a separate bowl, mash your ripe bananas until smooth. The riper the bananas, the sweeter your bars will be. Combine the mashed bananas with melted coconut oil, honey or maple syrup, and vanilla extract. Stir until the mixture is uniform.
1. Combining Wet and Dry: Slowly add your wet ingredients to the dry mixture. Use a spatula or a wooden spoon to mix gently. Avoid overmixing, as this can lead to tough bars. The goal is to combine until just incorporated; it’s okay if there are a few lumps.
2. Incorporating Add-ins: If you’re adding chocolate chips, nuts, or dried fruits, fold them in at the end. This ensures they are evenly distributed without breaking apart during the mixing process.
Ensuring a Uniform Blend for Even Baking
A uniform blend is key to ensuring that your Choco-Banana Bliss Bars bake evenly. Uneven mixtures can lead to some parts being dry while others are overly moist. To avoid this, always mix just until combined and ensure that no dry pockets remain.
Baking: Mastering the Time and Temperature
The baking process is where the magic happens. For Choco-Banana Bliss Bars, preheat your oven to 350°F (175°C). This temperature is essential for achieving that perfect soft yet firm texture.
Tips on Checking for Doneness
To check for doneness, insert a toothpick into the center of the bars. If it comes out clean or with just a few moist crumbs, your bars are ready. Remember that they will continue to cook slightly after being removed from the oven due to residual heat.
Understanding the Science of Baking
Baking is as much a science as it is an art. The heat from the oven activates the leavening agents, causing the mixture to rise. The bananas add moisture, while the cocoa powder provides flavor and color. Understanding how these ingredients interact can help you to adjust the recipe in the future to suit your taste.
Cooling and Cutting: Techniques for Perfect Bars
Once your bliss bars are out of the oven, it’s crucial to let them cool completely in the pan before cutting. This helps them set properly and makes cutting easier without crumbling.
The Importance of Allowing Bars to Cool Completely
Cooling your bars allows the structure to stabilize. If you cut them too soon, they may fall apart. Allow at least 30 minutes to an hour for cooling before transferring them to a cutting board.
1. Cutting Technique: Use a sharp knife and cut in straight lines for even portions. Clean the knife between cuts to ensure neat edges.
Serving Suggestions and Pairing Ideas
Choco-Banana Bliss Bars are incredibly versatile and can be enjoyed in various ways. Here are some delightful serving suggestions to enhance your experience.
Breakfast: Pairing Ideas with Yogurt and Fruits
Start your day with a nutritious breakfast by pairing your bliss bars with a dollop of Greek yogurt and fresh fruits. The yogurt adds protein and creaminess, while fruits like berries or sliced bananas enhance the flavor profile and provide additional vitamins.
Snack Time: Perfect with a Cup of Tea or Coffee
For a midday pick-me-up, enjoy your Choco-Banana Bliss Bars alongside a warm cup of tea or coffee. The rich chocolate complements the bitterness of coffee, while the sweetness of the bars balances the herbal notes of tea. It’s a satisfying and energizing snack that will keep you fueled throughout the day.
Dessert: Serving Suggestions with Ice Cream or Whipped Cream
Transform your bliss bars into an indulgent dessert by serving them warm with a scoop of vanilla ice cream or a dollop of whipped cream. The contrast of warm and cold, along with the rich flavors, elevates the experience and makes for a delightful treat after dinner.
Storage Tips for Freshness and Longevity
Proper storage is essential to maintain the freshness and quality of your Choco-Banana Bliss Bars.
Optimal Storage Conditions: Airtight Containers and Refrigeration
To keep your bars fresh, store them in an airtight container. This prevents moisture from entering and keeps them from drying out. If you live in a warm climate or plan to keep them for more than a few days, consider refrigerating them. This will extend their shelf life and help maintain their texture.
Shelf Life: Understanding Freshness and Quality Over Time
When stored properly, Choco-Banana Bliss Bars can last for up to a week at room temperature and up to two weeks in the refrigerator. If you want to keep them longer, consider freezing them. Wrap each bar in plastic wrap and then place them in a freezer-safe bag. They can last up to three months in the freezer. When ready to enjoy, simply thaw them at room temperature or warm them in the microwave for a few seconds.
Conclusion
Choco-Banana Bliss Bars are a delicious, nutrient-dense treat that can be enjoyed at any time of day. With their easy preparation and wholesome ingredients, they not only satisfy your sweet tooth but also contribute positively to your diet. Whether you’re a busy professional, a fitness enthusiast, or simply someone who enjoys tasty snacks, these bars offer a satisfying solution that nourishes the body and delights the taste buds.
Embrace the joy of healthy baking and discover the bliss of these delightful bars in your kitchen. Your journey to a delicious and nutritious snack is just a simple recipe away. Enjoy the delightful flavors and the wholesome goodness of Choco-Banana Bliss Bars, and share them with family and friends for a truly rewarding experience.