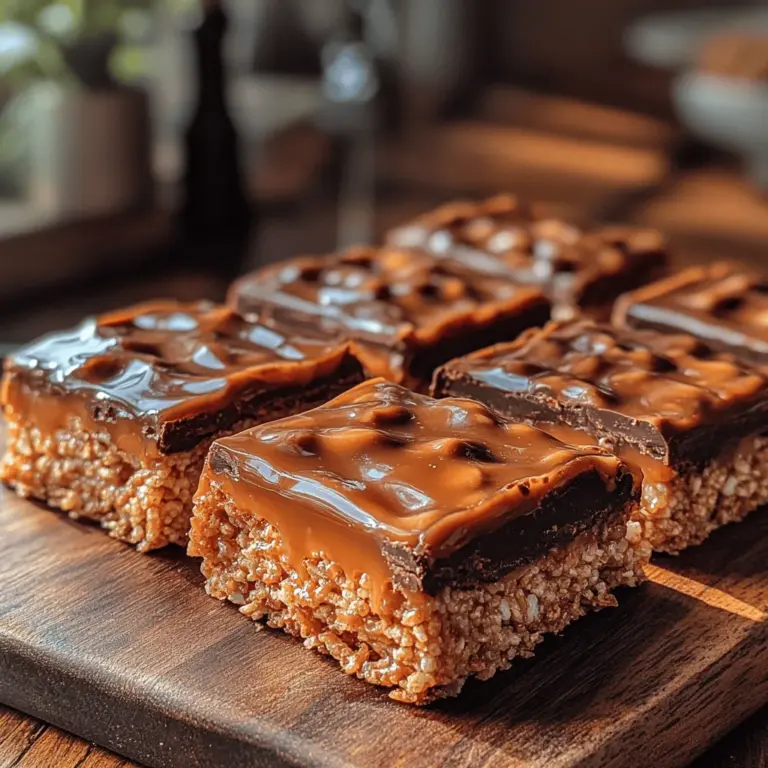
In the world of desserts, few treats can compete with the delightful combination of caramel and chocolate. The marriage of these two flavors creates an irresistible harmony that tantalizes the taste buds and warms the heart. Enter Caramel Chocolate Crunch Bars—an indulgent dessert that not only satisfies a sweet tooth but also brings a delightful crunch to every bite. These bars feature layers of crunchy graham cracker, gooey caramel, and smooth, rich chocolate, making them a favorite among dessert lovers of all ages.
Whether you’re preparing for a festive gathering, looking for a sweet treat to enjoy at home, or simply want to impress your friends and family, Caramel Chocolate Crunch Bars are the perfect choice. In this blog post, we will provide a detailed recipe for these indulgent bars, breaking down each step to ensure your success in the kitchen. We’ll explore the essential ingredients used, their roles in creating the perfect texture and flavor, as well as some helpful tips along the way.
Understanding the Ingredients
Before diving into the recipe, it’s important to understand the key components that contribute to the deliciousness of Caramel Chocolate Crunch Bars. Each ingredient plays a crucial role in achieving the desired taste and texture, and using quality ingredients can make all the difference.
The Essential Components of Caramel Chocolate Crunch Bars
1. Graham Crackers: The foundation of our crunch bars, graham crackers provide a sweet, slightly nutty flavor and a satisfying crunch. When crushed and combined with butter, they form a sturdy base that holds everything together.
2. Unsalted Butter: This ingredient binds the graham cracker crumbs and adds richness to the base. Using unsalted butter allows for better control over the overall saltiness of the bars.
3. Sweetened Condensed Milk: A key player in the caramel layer, sweetened condensed milk enhances the creaminess and sweetness of the caramel. It helps in creating that gooey texture that will contrast beautifully with the crunchy base.
4. Granulated Sugar: Sugar is essential for caramelization. It caramelizes when heated, creating that golden-brown color and deep flavor we associate with caramel. The right balance of sugar is critical for the perfect caramel consistency.
5. Vanilla Extract: A splash of vanilla extract elevates the flavor profile of the caramel, adding warmth and depth. It’s a simple addition that makes a significant impact on the overall taste.
6. Sea Salt: A pinch of sea salt enhances the sweetness of the caramel and chocolate. The contrast between sweet and salty will delight your senses, making each bite even more enjoyable.
7. Chocolate Chips: The top layer of our Caramel Chocolate Crunch Bars, chocolate chips bring richness and smoothness. You can choose semi-sweet, dark, or even milk chocolate, depending on your preference.
8. Optional Toppings: To elevate these bars even further, consider adding crushed nuts, sprinkles, or even a drizzle of additional chocolate on top for presentation.
Importance of Quality Ingredients for Optimal Taste and Texture
When it comes to baking, the quality of your ingredients can greatly affect the final product. For instance, using high-quality chocolate can enhance the richness of your bars, while fresh butter can contribute to a better texture. Investing in good ingredients may require slightly higher costs, but the payoff in flavor is worth it. Additionally, consider using organic graham crackers and natural sweeteners for a more wholesome dessert.
Variations in Ingredient Substitutions for Dietary Preferences
For those with dietary restrictions or preferences, there are several substitutions you can make while still achieving delicious results. For example, gluten-free graham crackers can replace traditional ones for a gluten-free version. If you’re looking to reduce sugar intake, you may experiment with natural sweeteners such as maple syrup or coconut sugar, although this may alter the caramel’s consistency slightly. Dairy-free options are also available; you can use coconut cream instead of sweetened condensed milk and dairy-free chocolate chips for a vegan-friendly treat.
Step-by-Step Guide to Making Caramel Chocolate Crunch Bars
Now that we’ve explored the essential ingredients and their roles, it’s time to dive into the preparation process. Follow these steps carefully to ensure your Caramel Chocolate Crunch Bars turn out perfectly.
Preparation of the Baking Pan
Before you start mixing your ingredients, it’s essential to prepare your baking pan. This step is crucial for easy removal of the bars once they’re set.
1. Choose the Right Pan: A 9×9-inch square baking pan is ideal for this recipe. If you want thinner bars, a larger pan can be used, but keep in mind you’ll need to adjust the cooking time.
2. Line the Pan: To prevent sticking, line the bottom and sides of your baking pan with parchment paper. Leave some overhang on the sides, which will make it easier to lift the entire batch out once they are set.
3. Grease the Parchment: While the parchment paper helps with sticking, it’s a good idea to lightly grease the parchment with a bit of butter or cooking spray. This extra precaution ensures that your bars release smoothly and retain their beautiful shape.
Creating the Graham Cracker Base
The first layer of our Caramel Chocolate Crunch Bars is the graham cracker base. This layer provides the crunch and structure needed to support the creamy caramel and chocolate layers.
1. Crush the Graham Crackers: In a food processor or by hand, crush the graham crackers until they reach a fine crumb consistency. The finer the crumbs, the better the texture of your base.
2. Mix with Butter: In a mixing bowl, combine the crushed graham crackers with melted unsalted butter. Use a spatula or wooden spoon to mix until all the crumbs are evenly coated with butter. The mixture should be moist but crumbly, resembling wet sand.
3. Press into the Pan: Transfer the graham cracker mixture into your prepared baking pan. Using the back of a measuring cup or your hands, firmly press the mixture into an even layer across the bottom of the pan. It’s important to compact it well to ensure the base holds together once baked.
4. Bake the Base: Preheat your oven to 350°F (175°C) and bake the graham cracker base for 8-10 minutes, or until it’s lightly golden. This step helps to set the base and adds a bit of toasty flavor.
Cooking the Caramel Layer
Now that your base is ready, it’s time to create that luscious caramel layer that defines these bars. The process of making caramel can be a bit daunting, but with patience and precision, you can master it.
1. Combine Ingredients: In a medium saucepan, combine the sweetened condensed milk, granulated sugar, and a pinch of sea salt over medium heat. Stir continuously until the sugar is dissolved.
2. Heat Slowly: Once the sugar is dissolved, increase the heat slightly and bring the mixture to a gentle boil. This is where the magic happens. Continue stirring frequently to prevent burning. The caramel will start to thicken as it cooks.
3. Watch for Color Change: As the mixture heats, keep an eye on the color. You want it to turn a rich golden brown; this usually takes about 10-15 minutes. If you have a candy thermometer, the ideal temperature for caramel is around 240°F (115°C).
4. Infuse Flavor into the Caramel: As soon as the caramel reaches the desired color and consistency, remove it from the heat. Stir in the vanilla extract for added flavor and mix until well combined.
5. Pour Over the Base: Carefully pour the hot caramel mixture over the baked graham cracker base. Use a spatula to spread it evenly, ensuring every corner is covered. Allow the caramel to cool slightly while you prepare the next layer.
Melting the Chocolate
The final step before assembling the bars is to melt the chocolate. This layer will add richness and a smooth finish to your Caramel Chocolate Crunch Bars.
1. Choose Your Chocolate: Depending on your preference, select chocolate chips—semi-sweet, dark, or milk chocolate. You can also chop a chocolate bar if you prefer larger chunks.
2. Melt the Chocolate: To melt the chocolate, you can use a microwave or a double boiler. If using a microwave, place the chocolate chips in a microwave-safe bowl and heat in 30-second intervals, stirring in between until fully melted and smooth.
3. Pour Over the Caramel: Once melted, pour the chocolate over the cooled caramel layer. Use a spatula to spread it evenly, ensuring full coverage.
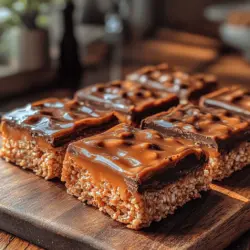
With these initial steps completed, you’re well on your way to creating a batch of Caramel Chocolate Crunch Bars that will leave everyone craving more. Stay tuned for the next part of this guide, where we will cover additional tips for best results, storage recommendations, and answers to common questions about this scrumptious dessert.
{{image_1}}
Best Practices for Melting Chocolate Without Seizing
Melting chocolate is a crucial step in creating your Caramel Chocolate Crunch Bars. However, it’s essential to do so carefully to avoid seizing, which can ruin your chocolate’s silky texture. Here are some best practices that will help ensure a smooth melting process:
1. Use a Double Boiler: A double boiler provides gentle, even heat. Fill a pot with a few inches of water and place a heatproof bowl on top, ensuring the bowl doesn’t touch the water. This method prevents direct heat from scorching the chocolate.
2. Microwave Melting: If you prefer using a microwave, place the chocolate chips in a microwave-safe bowl. Heat in 20-30 second intervals, stirring after each interval until the chocolate is almost fully melted. The residual heat will continue to melt any remaining chunks.
3. Avoid Moisture: Water is the enemy of chocolate. Ensure that all your equipment is completely dry, as even a small amount of moisture can seize the chocolate.
4. Temperature Control: Keep the heat low and steady. If chocolate is overheated (above 120°F or 50°C), it can become grainy. Aim for a target temperature of around 90°F (32°C) for semi-sweet chocolate.
5. Stir Constantly: Whether using a double boiler or microwave, continually stirring while melting helps distribute the heat and helps avoid hot spots that can burn the chocolate.
The Significance of Using Semi-Sweet Chocolate Chips and Caramel Bits
Choosing the right ingredients is crucial in any recipe, and for these Caramel Chocolate Crunch Bars, semi-sweet chocolate chips and caramel bits play a vital role.
– Semi-Sweet Chocolate Chips: This type of chocolate strikes the perfect balance between sweetness and bitterness. The richness of semi-sweet chocolate enhances the overall flavor of the bars without being overwhelmingly sweet. It also melts beautifully, making it ideal for coating the bars.
– Caramel Bits: Caramel bits are specifically designed for baking, offering convenience and consistency. They melt smoothly and provide a gooey texture that complements the chocolate. Using caramel bits instead of traditional caramel sauce prevents the bars from becoming overly sticky and helps achieve a perfect consistency.
Assembling the Bars
Once your chocolate is melted and your caramel is prepared, it’s time to assemble your Caramel Chocolate Crunch Bars. Here’s how to do it effectively:
Techniques for Pouring and Spreading the Chocolate Layer Evenly
1. Prepare Your Pan: Line a 9×9-inch pan with parchment paper, leaving some overhang for easy removal later. This step ensures that your bars come out cleanly without breaking.
2. Pouring the Chocolate: Once the chocolate is melted, pour it into the prepared pan. Start in the center and let it flow outwards to reduce the risk of splashing.
3. Spreading the Chocolate: Use an offset spatula or the back of a spoon to gently spread the chocolate evenly across the pan. Aim for a uniform thickness to ensure even setting and a consistent texture throughout.
Importance of Tapping the Pan to Remove Air Bubbles
After spreading the chocolate, gently tap the pan on the countertop. This action helps release trapped air bubbles that may have formed underneath the chocolate layer. Removing these bubbles ensures a smooth finish and enhances the presentation of your bars.
Chilling and Setting the Bars
Now that your layers are assembled, it’s time to chill them properly. This step is crucial for achieving the right texture and consistency.
Discussing the Chilling Time and Its Impact on Texture
Chill the assembled bars in the refrigerator for at least 30 minutes, or until the chocolate and caramel layers are set. The cooling process allows the chocolate to harden completely, creating a satisfying crunch when bitten into. If you have the time, letting them chill for an hour or two can enhance the firmness and make cutting them easier.
Signs to Look for to Ensure the Bars Are Fully Set
To check if your bars are fully set, gently press the surface with your fingertip. If it feels firm and doesn’t leave an imprint, they are ready to be cut. The chocolate should also appear glossy and smooth, indicating that it has properly cooled and hardened.
Cutting and Serving Suggestions
Cutting your Caramel Chocolate Crunch Bars with precision can be the difference between a polished presentation and a crumbled mess. Here’s how to do it right:
Techniques for Cutting the Bars Without Crumbling
1. Use a Sharp Knife: A sharp, non-serrated knife will give you the cleanest cuts. Avoid using a serrated knife, as it can pull and tear the chocolate layer.
2. Warm the Knife: For an even smoother cut, warm the knife by running it under hot water. Wipe it dry before making your cuts. This technique helps melt the edges slightly, creating a cleaner slice.
3. Cutting Technique: Start by cutting the bars into quarters, then slice those quarters into smaller pieces. This method ensures that you maintain control and avoid breaking the bars.
Serving Options to Elevate the Dessert Experience
There are various ways to serve your Caramel Chocolate Crunch Bars to impress your guests:
– Garnish with Sea Salt: A sprinkle of flaky sea salt on top of the chocolate layer adds an appealing contrast to the sweetness and enhances the overall flavor.
– Pair with Ice Cream: Serve the bars alongside a scoop of vanilla ice cream for a delightful dessert duo. The creaminess of the ice cream balances the richness of the chocolate and caramel.
– Drizzle with Chocolate Sauce: Drizzle additional melted chocolate over the top for an extra decadent touch.
– Presentation: Arrange the bars on a decorative platter or cake stand to make them visually appealing. You can also add fresh berries or mint leaves for a pop of color.
Nutritional Information
Creating indulgent desserts like Caramel Chocolate Crunch Bars often raises questions about their nutritional value. Understanding the macronutrient breakdown can help you enjoy these treats mindfully.
Breakdown of Macronutrients Per Serving
While exact nutritional values can vary based on specific ingredients and portion sizes, here’s a general estimation for one bar (assuming 16 bars from the recipe):
– Calories: Approximately 200-220 calories
– Fat: 10-12 grams
– Carbohydrates: 27-30 grams
– Protein: 2-3 grams
– Sugar: 15-18 grams
Discussion on Portion Control and Indulgence
Caramel Chocolate Crunch Bars, while delicious, are best enjoyed in moderation. Practicing portion control can help satisfy your sweet tooth without overindulging. Consider cutting smaller bars or serving them as part of a dessert platter alongside fresh fruits or lighter options.
Variations and Customizations
One of the joys of baking is the ability to customize recipes to suit different tastes and dietary needs. Here are some ideas for variations and customizations to your Caramel Chocolate Crunch Bars.
Suggestions for Incorporating Nuts, Dried Fruits, or Other Flavors
– Nuts: Add a handful of chopped nuts, such as pecans, walnuts, or almonds, into the chocolate layer for added crunch and flavor. Toasting the nuts beforehand enhances their nuttiness.
– Dried Fruits: Incorporate dried fruits like cranberries, cherries, or apricots for a chewy texture and a burst of flavor.
– Flavor Variations: Experiment with different types of chocolate, such as dark or milk chocolate, to alter the flavor profile. You can also add a splash of vanilla extract or a pinch of espresso powder to intensify the chocolate flavor.
How to Adjust the Recipe for Gluten-Free or Dairy-Free Alternatives
– Gluten-Free: Ensure that all your ingredients, especially chocolate and caramel bits, are labeled gluten-free. This recipe is naturally gluten-free as it does not contain flour.
– Dairy-Free: Substitute semi-sweet chocolate chips with dairy-free chocolate chips and use dairy-free caramel bits to make the recipe suitable for a dairy-free diet.
Conclusion
Caramel Chocolate Crunch Bars are a delightful treat that brings together an array of flavors and textures in each bite. This comprehensive recipe offers a straightforward approach to creating these delicious bars with minimal fuss. With a few simple ingredients and steps, anyone can enjoy homemade caramel chocolate crunch bars that are sure to impress friends and family. Whether you indulge in them yourself or share them at gatherings, this recipe is a guaranteed hit for any dessert lover.
The combination of gooey caramel, rich chocolate, and crunchy layers creates a memorable dessert experience that resonates with both children and adults. So gather your ingredients, follow the steps, and get ready to savor every bite of your homemade Caramel Chocolate Crunch Bars!