Introduction
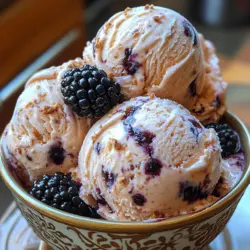
Homemade ice cream is a delightful treat that brings joy to people of all ages. The process of making ice cream from scratch allows you to experiment with flavors, ensuring that every scoop is tailored to your taste preferences. One such irresistible flavor combination is the pairing of fresh blackberries with the aromatic richness of vanilla bean. This Blackberry Bliss Vanilla Bean Ice Cream recipe promises to enchant your palate with its creamy texture and vibrant taste, truly embodying the essence of summer.
The use of fresh ingredients is paramount in this recipe. When you opt for seasonal, ripe blackberries, the natural sweetness and tartness can elevate your homemade ice cream to gourmet status. Paired with the luxurious notes of vanilla bean, this ice cream becomes more than just a dessert; it transforms into a culinary experience that encapsulates the flavors of warm, sun-drenched days.
In this article, we will delve into the details of creating this sumptuous Blackberry Bliss Vanilla Bean Ice Cream, covering the essential ingredients, their significance, and the step-by-step preparation process. We will also provide serving suggestions that will make your homemade ice cream the highlight of any gathering.
Understanding the Ingredients
Fresh Blackberries
Blackberries are the star of this ice cream recipe, showcasing their unique flavor and vibrant color. Rich in antioxidants, vitamins C and K, and dietary fiber, these berries not only taste delicious but also contribute to your health. When selecting blackberries, it is crucial to choose ripe, in-season fruit, as they are at their sweetest and most flavorful. Look for berries that are plump, firm, and deep purple-black in color, avoiding any that appear dull or mushy.
To enhance the flavor of your ice cream, wash the blackberries gently and remove any stems or leaves. You can also taste them before cooking; this will help you determine if you need to adjust the amount of sugar in the recipe based on their natural sweetness.
Sweeteners
Granulated sugar plays an essential role in this ice cream recipe, affecting both the flavor and texture. Sugar not only sweetens the mixture but also helps lower the freezing point, which results in a smoother ice cream. However, if you seek alternatives to granulated sugar, options such as honey, agave syrup, or maple syrup can be used. Keep in mind that each sweetener has a unique flavor profile and sweetness level, so adjustments may be necessary to achieve the desired taste and consistency.
Dairy Components
The creamy texture of this Blackberry Bliss Vanilla Bean Ice Cream relies heavily on the dairy components: heavy cream and whole milk. Heavy cream, with its high fat content, contributes to the luxurious mouthfeel and richness of the ice cream. Whole milk complements this by providing a lighter texture while still adding creaminess.
When choosing your dairy products, opt for high-quality, fresh cream and milk. The fat content in these ingredients is crucial; higher fat content yields a creamier, smoother texture, while lower fat options may lead to a more icy, less palatable result.
Vanilla Bean vs. Extract
Vanilla bean is a key player in this recipe, offering a depth of flavor that vanilla extract simply cannot match. The tiny seeds within the vanilla pod release aromatic oils that give the ice cream a rich, complex flavor. When using vanilla beans, split the pod lengthwise and scrape out the seeds, incorporating them directly into the mixture for maximum flavor.
While pure vanilla extract can be a convenient substitute, it often lacks the intensity and authenticity of using fresh vanilla beans. If you do opt for extract, ensure it is of high quality to achieve the best flavor profile. Additionally, store your vanilla beans in an airtight container in a cool, dark place to maintain their freshness and potency.
Additional Flavor Enhancers
In this recipe, a splash of lemon juice and a pinch of salt serve as essential flavor enhancers. Lemon juice adds a refreshing brightness that balances the sweetness of the blackberries, enhancing their natural flavor without overpowering it. A small amount of salt is equally important, as it helps to elevate the overall taste, making the sweet and tart notes of the blackberries pop.
Step-by-Step Instructions for Blackberry Bliss Vanilla Bean Ice Cream
Preparing the Blackberry Mixture
To begin the process of making your Blackberry Bliss Vanilla Bean Ice Cream, you will first need to prepare the blackberry mixture. This step is crucial for developing the flavor base of your ice cream.
1. Cook the Blackberries: In a medium saucepan, combine the fresh blackberries, granulated sugar, and lemon juice. Heat the mixture over medium heat, stirring gently. The goal is to soften the blackberries and allow them to release their juices. Cook for about 5-7 minutes or until the blackberries begin to break down and form a syrupy consistency.
2. Achieve the Right Consistency: As the mixture simmers, keep an eye on the consistency. You want the blackberries to be soft but not completely disintegrated. The aim is to create a sauce that has some texture, which will add an enjoyable fruitiness to your ice cream. If necessary, you can lightly mash the blackberries with a fork or potato masher to achieve your desired consistency.
3. Cool the Mixture: Once you have cooked the blackberries, remove the saucepan from the heat and allow the mixture to cool slightly. This step is essential, as adding hot ingredients directly to the cream mixture can affect the overall texture of your ice cream. Allow the mixture to cool for about 10-15 minutes before proceeding to the next step.
Straining the Mixture
After your blackberry mixture has cooled, it’s time to strain it to achieve a smooth, refined texture in your ice cream. Here’s how to do it:
1. Set Up Your Strainer: Place a fine-mesh strainer over a clean bowl or another saucepan. This will help catch the seeds and any larger pieces of blackberry that you may not want in your ice cream.
2. Strain the Blackberry Mixture: Pour the cooled blackberry mixture into the strainer. Using the back of a spoon, gently press down on the mixture to extract as much liquid as possible. This will leave you with a smooth puree that is free from seeds and pulp.
3. Save the Solids: Don’t discard the solids entirely! You can save them to use as a topping for your ice cream or mix them into your dessert for added texture and flavor.
4. Mix with Dairy Components: Once you have strained the mixture, combine it with your heavy cream, whole milk, and the scraped vanilla bean seeds in a mixing bowl. Whisk gently until everything is well incorporated.
As we move forward in this guide, we will elaborate on the next stages of creating your Blackberry Bliss Vanilla Bean Ice Cream, including churning, freezing, and serving suggestions that will make your homemade treat truly remarkable. Stay tuned for more delicious details!
{{image_1}}
Importance of Straining for a Smooth Texture
When creating your Blackberry Bliss Vanilla Bean Ice Cream, one crucial step in achieving a delightful, creamy texture is straining the blackberry juice. Straining removes any seeds and pulp that can create an undesirable grainy texture in your ice cream. This attention to detail ensures that each scoop is silky smooth and bursting with the pure flavor of fresh blackberries.
To strain effectively, simply pour your blackberry juice through a fine-mesh sieve or cheesecloth into a bowl, using the back of a spoon to press down on the solids. This technique maximizes juice extraction while ensuring that your ice cream remains indulgently creamy.
Techniques for Maximizing Juice Extraction
To extract the maximum amount of juice from your blackberries, consider the following techniques:
1. Choose Ripe Berries: The juiciness of your blackberries is directly related to their ripeness. Select plump, dark berries for the best flavor and juice yield.
2. Maceration: Before blending the blackberries, sprinkle them with a little sugar and let them sit for about 15-30 minutes. This process, known as maceration, draws out the juices, making them easier to blend and strain.
3. Gentle Blending: When blending the blackberries, do so just until smooth. Over-blending can introduce air, which may lead to a frothy mixture that is harder to strain.
4. Pressing: After blending, use a spatula to press the mixture through the sieve. This will help extract as much juice as possible while leaving the seeds behind.
Creating the Ice Cream Base
Now that you have your smooth blackberry juice ready, it’s time to create the ice cream base. A rich, creamy ice cream base requires the right balance of cream, milk, sugar, and flavorings.
Step-by-Step Guide to Whisking the Cream, Milk, Sugar, and Flavorings
1. Gather Ingredients: You will need 2 cups of heavy cream, 1 cup of whole milk, 3/4 cup of granulated sugar, and 1 tablespoon of pure vanilla extract.
2. Combine Ingredients: In a large mixing bowl, combine the heavy cream, whole milk, and granulated sugar.
3. Whisk Thoroughly: Using a whisk, mix the ingredients together until the sugar is fully dissolved. This step is critical; undissolved sugar can lead to a grainy texture in your final product. You should see no visible sugar granules when you’re done whisking.
4. Add Flavorings: Once the sugar is dissolved, stir in the vanilla extract. If you’re using vanilla bean pods, split the pods and scrape the seeds into the mixture for an even richer flavor.
Importance of Fully Dissolving Sugar for a Creamy Texture
Dissolving the sugar fully is essential for achieving that luxurious, creamy texture we all crave in ice cream. When sugar is not completely dissolved, it can form ice crystals during the freezing process, leading to a grainy mouthfeel instead of the desired smoothness. Take your time with this step, and if necessary, warm the mixture slightly over low heat to help dissolve any stubborn sugar granules.
Combining the Mixtures
With your ice cream base prepared, it’s time to incorporate the luscious blackberry juice.
How to Incorporate Blackberry Juice into the Ice Cream Base
1. Pour the Juice: Gradually pour the strained blackberry juice into the ice cream base while gently whisking. This ensures that the juice is evenly distributed throughout the mixture.
2. Taste and Adjust: At this stage, taste the mixture to check if the sweetness is to your liking. Depending on the tartness of your blackberries, you may want to add a bit more sugar.
3. Achieving the Desired Swirl Effect: If you prefer a marbled effect rather than fully blending the blackberry juice, simply fold it into the base gently using a spatula. This will create beautiful swirls of blackberry throughout the ice cream, enhancing both the visual appeal and flavor.
Chilling the Mixture
Once your mixtures are combined, the next step is chilling, which is vital for the texture of your ice cream.
Explanation of the Chilling Process and Its Importance for Texture
Chilling the mixture before churning allows the flavors to meld and ensures that the ice cream base is cold enough to freeze properly in your ice cream maker. If the mixture is not sufficiently chilled, it can lead to a longer churning time, resulting in a less creamy texture.
Recommended Chilling Times and Conditions
Transfer your mixture to a covered container and refrigerate for at least 2 hours or overnight for best results. If you’re short on time, a quick chill in the freezer for about 30 minutes can also suffice, but be sure to monitor it closely.
Churning the Ice Cream
Now it’s time for the fun part: churning your ice cream!
Overview of Different Types of Ice Cream Makers
There are various types of ice cream makers available, including:
– Automatic Ice Cream Makers: These machines often come with a built-in compressor and can churn your ice cream without pre-freezing the bowl.
– Bowl Ice Cream Makers: These require you to freeze the bowl ahead of time. Make sure to follow the manufacturer’s instructions for optimal results.
– Hand-Crank Ice Cream Makers: A classic option that requires a bit of elbow grease but can be a fun family activity.
Tips for Achieving the Perfect Soft-Serve Texture
1. Churn Time: Follow the instructions for your ice cream maker, but typically, you’ll want to churn for about 20-25 minutes until the mixture reaches a soft-serve consistency.
2. Monitor Consistency: Keep an eye on the ice cream as it churns. It should thicken and expand, indicating air incorporation, which is essential for a light texture.
3. Tasting: A little taste test during churning can help you gauge the flavor and texture. Feel free to adjust sweetness or flavorings at this point, but remember that it will taste less sweet once frozen.
Freezing to Firm Up
After churning, your ice cream will have a soft-serve consistency, perfect for immediate enjoyment. However, for the best flavor and texture, it’s essential to freeze it to firm up.
Best Practices for Transferring and Storing Churned Ice Cream
1. Transfer to a Container: Use a spatula to transfer the churned ice cream into an airtight container. Spread it evenly and smooth the top for even freezing.
2. Cover with Plastic Wrap: To prevent ice crystals from forming, place a piece of plastic wrap directly on the surface of the ice cream before sealing the container with the lid.
Explanation of the Freezing Process for Optimal Firm Texture
Freeze the ice cream for at least 4 hours or until it reaches your desired firmness. The longer you freeze it, the firmer it will become. For the best texture, let it sit at room temperature for a few minutes before scooping, making it easier to serve.
Serving Suggestions
Your Blackberry Bliss Vanilla Bean Ice Cream is now ready to delight your taste buds! Here are some creative ways to serve this delicious treat:
1. Classic Bowls and Cones: Serve in chilled bowls or waffle cones for a nostalgic touch.
2. Toppings: Enhance your ice cream experience by adding toppings such as crushed graham crackers, chocolate chips, whipped cream, or fresh blackberries.
3. Sundaes: Create a delicious sundae by layering the ice cream with toppings like hot fudge, caramel sauce, or fresh fruit.
4. Pairings: This ice cream pairs beautifully with baked goods like brownies or chocolate cake, offering a delightful contrast of flavors and textures.
The Joy of Homemade Ice Cream
Making ice cream at home is not just about satisfying your sweet tooth; it’s an enjoyable activity that brings people together. The joy of creating something from scratch using fresh, seasonal ingredients is unparalleled.
Personalization: Ways to Modify the Recipe for Different Flavors
One of the best parts of making ice cream at home is the ability to experiment with flavors. Try substituting blackberries with other fruits like strawberries or peaches, or incorporate mix-ins like nuts or cookie crumbles. The possibilities are endless!
The Satisfaction of Using Fresh, Seasonal Ingredients
Using fresh, seasonal ingredients not only enhances the flavor but also supports local farmers and reduces your ecological footprint. When you make ice cream at home, you can feel good about what you’re serving your family and friends.
Conclusion
In summary, the process of creating Blackberry Bliss Vanilla Bean Ice Cream is both rewarding and delicious. From straining the blackberry juice for a smooth consistency to churning the mixture to perfection, each step contributes to the delightful outcome of this indulgent dessert.
I encourage you to experiment with the recipe, explore new flavor combinations, and share this homemade treat with your loved ones. Making ice cream from scratch is not just about the end product; it’s about the memories created in the kitchen and the joy of enjoying something truly special. So roll up your sleeves, gather your ingredients, and dive into the wonderful world of homemade ice cream!