Introduction
If you’re on the lookout for a dessert that combines the rich, caramelized flavor of Biscoff cookies with the creamy indulgence of cheesecake, look no further than Biscoff Bliss Cheesecake Bars. This delightful treat is a perfect fusion of two beloved desserts that will leave your guests craving more. Biscoff cookies, known for their unique spiced flavor and crunchy texture, form a delicious foundation for this no-bake cheesecake, enhancing the creamy filling with their distinctive taste.
No-bake desserts have gained immense popularity in recent years, and for good reason. They offer a simpler approach to satisfying your sweet tooth without requiring an oven, making them ideal for gatherings, celebrations, or just a cozy night in. With Biscoff Bliss Cheesecake Bars, you can impress your friends and family with a visually stunning dessert that tastes as good as it looks. Whether you’re celebrating a special occasion or simply treating yourself, these cheesecake bars are guaranteed to be a hit.
Understanding the Ingredients
Creating the perfect Biscoff Bliss Cheesecake Bars begins with understanding the key ingredients that contribute to their luxurious flavor and texture. Each component plays a vital role in crafting this delectable treat.
Biscoff Cookies
At the heart of this recipe are Biscoff cookies, also known as speculoos. These cookies are characterized by their crisp texture and a deep caramel flavor, enhanced by hints of cinnamon, nutmeg, and ginger. Their unique taste makes them an excellent base for the crust, adding both flavor and texture to the cheesecake bars. When selecting Biscoff cookies, opt for the original brand to ensure you get the authentic taste that complements the cheesecake filling.
Cream Cheese
The next crucial ingredient is high-quality cream cheese. This ingredient is the star of the cheesecake filling, providing a rich and creamy texture that is essential for any cheesecake recipe. Using full-fat cream cheese will yield the best results, as it contributes to a smoother filling and a more indulgent flavor. To achieve the perfect consistency, it’s important to let the cream cheese come to room temperature before mixing. This prevents clumping and ensures a silky-smooth filling.
Butter
Butter is another key ingredient that brings richness to the crust. Melted butter combines with crushed Biscoff cookies to bind the crust together, creating a firm and flavorful base. Using unsalted butter allows you to control the overall saltiness of the dessert, ensuring a balanced flavor profile.
Sugar
Granulated sugar is used to sweeten both the crust and the cheesecake filling. It enhances the natural sweetness of the Biscoff cookies while providing the necessary sweetness to the cream cheese mixture. For a more complex flavor, consider using brown sugar in the crust for an extra layer of caramel notes.
Optional Ingredients
While the basic recipe is delicious on its own, there are optional ingredients that can elevate your Biscoff Bliss Cheesecake Bars. Adding a splash of vanilla extract to the filling can enhance the overall flavor. Additionally, consider folding in whipped cream for a lighter texture or incorporating a layer of melted Biscoff spread on top for a decorative and delicious finish.
Step-by-Step Guide to Making Biscoff Bliss Cheesecake Bars
Now that you understand the ingredients, it’s time to dive into the step-by-step process of making Biscoff Bliss Cheesecake Bars. This recipe is straightforward and perfect for both novice and experienced bakers alike.
Preparing the Crust
1. Crush the Biscoff Cookies: Start by finely crushing the Biscoff cookies. You can do this using a food processor for a quick and efficient method, or place the cookies in a resealable plastic bag and crush them with a rolling pin if you prefer a more hands-on approach. Aim for a sand-like consistency to ensure a cohesive crust.
2. Combine with Melted Butter: In a mixing bowl, combine the crushed cookies with melted butter. Mix thoroughly until the cookie crumbs are evenly coated. The mixture should resemble wet sand and hold together when pressed.
3. Pressing the Crust Firmly: Transfer the cookie mixture into a parchment-lined baking pan. Using the back of a measuring cup or your fingers, firmly press the mixture into an even layer across the bottom of the pan. This step is crucial for ensuring the crust holds together when the bars are sliced.
Achieving the Perfect Texture
For the best results, make sure to press the crust firmly and evenly. An uneven crust can lead to some areas being too soft or crumbling when you cut the bars. After pressing, place the crust in the refrigerator to set while you prepare the cheesecake filling.
Crafting the Cheesecake Filling
1. Mixing the Cream Cheese: In a large mixing bowl, add the room temperature cream cheese. Using an electric mixer, beat the cream cheese until it’s smooth and creamy. Be careful not to overmix, as this can incorporate too much air into the filling and lead to cracks in the cheesecake.
2. Incorporate Sugar: Gradually add the granulated sugar to the cream cheese while continuing to mix. Scrape down the sides of the bowl to ensure all sugar is fully incorporated.
3. Add Optional Ingredients: If you’re using vanilla extract or whipped cream, gently fold these into the cream cheese mixture. If you choose to add Biscoff spread, you can do so at this stage, either mixing it in for a marbled effect or spreading it on top later.
4. Pour Over the Crust: Once the filling is well combined, pour it over the prepared crust in the baking pan. Spread it evenly with a spatula to ensure a smooth, uniform layer.
Setting the Cheesecake Bars
After assembling your cheesecake bars, they will need time to set. Place the pan in the refrigerator for at least 4 hours, or preferably overnight, to allow the filling to firm up. The longer the cheesecake bars chill, the easier they will be to cut into neat squares.
This detailed step-by-step guide sets the foundation for creating your Biscoff Bliss Cheesecake Bars. With a little patience and attention to detail, you will create a dessert that is not only visually appealing but also bursting with flavor.
Ideal Baking Temperature and Time
When you’re ready to bake your Biscoff Bliss Cheesecake Bars, preheat your oven to 325°F (160°C). This moderate temperature ensures even baking, allowing the cheesecake to develop a creamy texture without overcooking. Pour your prepared cheesecake mixture over the crust, then slide it into the preheated oven. Bake for approximately 40 to 45 minutes. The edges should look set, while the center may still have a slight jiggle. This slight wobble is a good sign that the cheesecake is not overcooked, which is crucial for maintaining its rich, velvety texture.
Signs of Doneness to Look For in the Cheesecake Bars
Determining the perfect doneness for your cheesecake bars is vital for achieving that ideal creamy consistency. Here are the key signs to look for:
1. Edges Set: The edges should be firm and slightly puffed up, while the center remains soft.
2. Slight Jiggle: When you gently shake the pan, the center of the cheesecake should have a very slight jiggle. This indicates that it will continue to set as it cools, preventing it from becoming overly dry.
3. Color: The top should have a light golden hue, indicating that it has been baked just enough without burning.
By keeping an eye on these signs, you can ensure your Biscoff Bliss Cheesecake Bars turn out perfectly each time.
Cooling and Chilling Process
Once your cheesecake bars are baked to perfection, the cooling process begins. It’s crucial to cool them gradually to avoid cracking. Here’s how to do it:
1. Cooling in the Oven: After the baking time is up, turn off the oven and crack the door open. Leave the cheesecake bars inside for about an hour. This slow cooling helps to prevent sudden temperature changes that can cause cracks in the surface of your cheesecake.
2. Room Temperature: After an hour, remove the cheesecake from the oven and allow it to cool at room temperature for another hour.
3. Chilling in the Refrigerator: Once cooled, cover the pan with plastic wrap or aluminum foil and transfer it to the refrigerator. Chill for at least 4 hours, or ideally overnight. This chilling process is essential for the flavors to meld and for the texture to set properly.
Explanation of Why Cooling in the Oven is Beneficial
Allowing your cheesecake to cool in the oven has several benefits. Firstly, it helps to stabilize the structure of the cheesecake, minimizing the risk of cracks. The residual heat in the oven gently continues to cook the cheesecake, allowing it to set evenly without overbaking. Additionally, this method helps maintain moisture within the cheesecake, ensuring it stays creamy and delicious.
Importance of Chilling for the Perfect Texture
Chilling your cheesecake bars is not just a recommendation; it’s a crucial step. During the chilling period, the flavors intensify, and the texture transforms from a soft batter to a creamy, sliceable dessert. The cooling allows the fats in the cream cheese to solidify slightly, resulting in a firmer structure while still being rich and indulgent. This step also ensures that the bars will hold their shape when cut, allowing for clean, beautiful slices that are perfect for serving.
Finishing Touches for Presentation
Now that your Biscoff Bliss Cheesecake Bars are cooled and set, it’s time to give them a stunning presentation. Here are some creative finishing touches that will elevate your dessert:
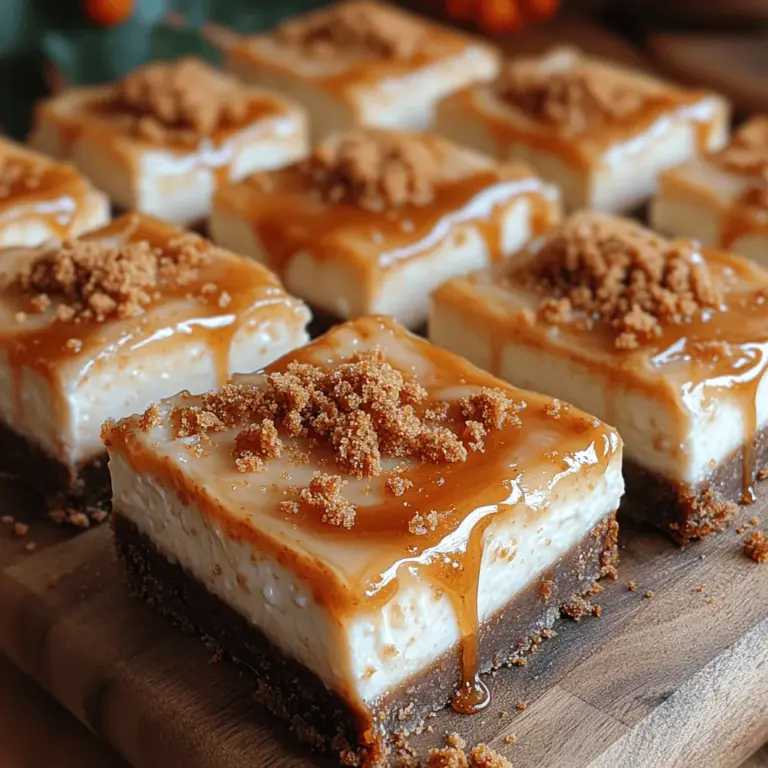
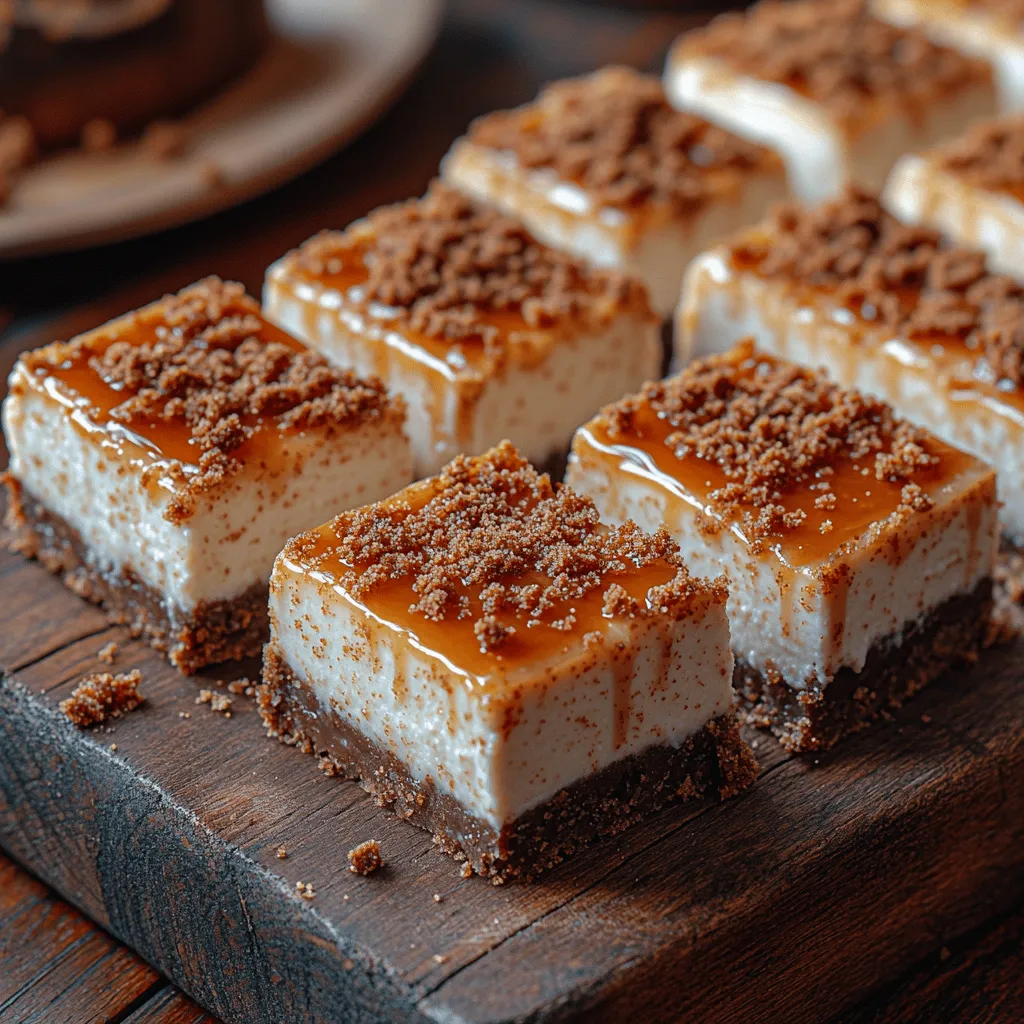
Creative Ways to Drizzle Biscoff Spread
A simple yet effective way to enhance your cheesecake bars is to drizzle them with melted Biscoff spread. To do this, place a small amount of Biscoff spread in a microwave-safe bowl and heat it for about 15-20 seconds until it’s pourable. Using a spoon or a squeeze bottle, create beautiful drizzles over the top of your cheesecake bars. This not only adds to the visual appeal but also amplifies the Biscoff flavor.
Options for Toppings
To add more texture and flavor, consider topping your cheesecake bars with:
– Crushed Biscoff Cookies: Sprinkle some crushed Biscoff cookies over the top. This adds a delightful crunch and reinforces the Biscoff theme.
– Whipped Cream: A dollop of freshly whipped cream can add a light and airy contrast to the creamy cheesecake. You can also pipe it for a more elegant look.
– Chocolate Shavings: If you want to introduce a chocolate element, dark or white chocolate shavings can complement the flavors beautifully.
Ideas for Serving and Presentation at Gatherings
When serving your cheesecake bars at gatherings, presentation matters. Cut the bars into uniform squares or rectangles and place them on a decorative platter. You can garnish the platter with fresh fruit, mint leaves, or even a sprinkle of cocoa powder for an elegant touch. If you want to create an interactive dessert station, provide toppings such as extra Biscoff spread, whipped cream, and crushed cookies in small bowls, allowing guests to customize their bars.
Pairing Suggestions
To enhance your dessert experience, consider pairing your Biscoff Bliss Cheesecake Bars with complementary beverages and desserts:
Recommended Beverages
– Coffee: A rich cup of coffee, whether it’s brewed, espresso, or a latte, pairs wonderfully with the flavors of the Biscoff bars.
– Tea: A robust black tea or a chai latte can also complement the spiced flavors of the Biscoff cookies.
– Dessert Wines: For a more sophisticated pairing, consider a sweet dessert wine, such as a late harvest Riesling or a caramel-flavored liqueur.
Other Desserts that Complement This Recipe
If you’re planning a dessert spread, consider serving your Biscoff Bliss Cheesecake Bars alongside:
– Chocolate Mousse: The rich and creamy texture of chocolate mousse creates a delightful contrast.
– Fruit Tart: A light fruit tart can balance the richness of the cheesecake.
– Ice Cream: Vanilla or caramel ice cream can be a perfect accompaniment, offering a cold, sweet contrast to the warm flavors of the Biscoff.
Storage and Shelf Life
To keep your Biscoff Bliss Cheesecake Bars fresh, proper storage is essential. Here are some best practices:
Best Practices for Storing Cheesecake Bars
– Refrigeration: Always store your cheesecake bars in the refrigerator if they are not being served right away. Place them in an airtight container or cover them tightly with plastic wrap to prevent them from absorbing any odors from the fridge.
– Freezing: If you want to keep your cheesecake bars for longer, they can also be frozen. Cut them into squares and wrap each piece tightly in plastic wrap, then place them in a freezer-safe container. They can be stored in the freezer for up to 2 months.
How Long They Can Be Kept and Tips for Maintaining Freshness
In the refrigerator, Biscoff Bliss Cheesecake Bars can last for about 5 to 7 days. If frozen, they can maintain their quality for up to two months. To thaw frozen cheesecake bars, simply transfer them to the refrigerator for several hours or overnight. Avoid thawing at room temperature, as this can lead to a change in texture.
Conclusion
In summary, Biscoff Bliss Cheesecake Bars are a delightful treat that combines the irresistible flavors of Biscoff cookies with the creamy richness of cheesecake. The ease of preparation and the stunning presentation make these bars perfect for any occasion, whether you’re hosting a gathering or simply treating yourself at home. With the right baking techniques, cooling methods, and finishing touches, you can create a dessert that is sure to impress. Don’t hesitate to whip up a batch of these delectable bars for your next celebration or as a sweet indulgence during your downtime. Enjoy every creamy, spiced bite!

