Introduction
In the delightful world of homemade treats, few desserts can match the rich, indulgent flavors of peanut butter eggs. As we dive into the art of creating these delectable confections, you’ll discover how simple ingredients can transform into a delightful experience for your palate and a cherished memory for your loved ones. The beauty of making your own treats lies not just in the taste but also in the ability to control what goes into them. By using wholesome ingredients, you can craft a dessert that is both satisfying and nourishing, making it a fantastic option for those mindful of their health.
Peanut butter eggs have gained immense popularity, especially during festive seasons like Easter, where they evoke nostalgia and joy. However, these treats aren’t just seasonal; they can be enjoyed year-round as a delicious snack or dessert. The rich, creamy texture of peanut butter paired with the sweet, smooth blanket of chocolate creates a perfect harmony that’s hard to resist. In this article, we’ll explore the process of making delightful peanut butter eggs at home, ensuring that you have all the tips and tricks needed to create a batch that your family and friends will adore.
Understanding the Ingredients
To create these delightful peanut butter eggs, it’s essential to understand the key ingredients that contribute to their taste and texture. Each component plays a role not only in flavor but also in the nutritional profile of your homemade treats.
Natural Peanut Butter: Health Benefits and Varieties
At the heart of our recipe is natural peanut butter, which is not only delicious but also offers numerous health benefits. Unlike conventional peanut butter, which often contains added sugars and hydrogenated oils, natural peanut butter is made from just peanuts and sometimes a pinch of salt. This means you get all the nutrients from the peanuts without unnecessary additives. Rich in protein, healthy fats, and essential vitamins and minerals, natural peanut butter can help keep you feeling full and satisfied.
When selecting peanut butter for this recipe, you have a few options. You can choose creamy or crunchy varieties, depending on your texture preference. Creamy peanut butter will provide a smooth filling, while crunchy peanut butter can add a delightful crunch to your eggs.
Honey vs. Maple Syrup: Sweeteners Explained
Next, we turn our attention to sweeteners. In this recipe, you can use either honey or maple syrup. Honey, a natural sweetener, has been used for centuries not just for its sweetness but also for its medicinal properties. It contains antioxidants and has antibacterial qualities. However, if you’re looking for a vegan alternative, pure maple syrup is an excellent choice. It also offers a unique flavor profile and comes with its own set of health benefits, including essential minerals like manganese and zinc.
When choosing between honey and maple syrup, consider the flavor you desire and any dietary restrictions. Both options can enhance the sweetness of your peanut butter filling, creating a delicious balance.
The Role of Vanilla Extract in Enhancing Flavors
Vanilla extract is another essential ingredient that elevates the flavor profile of your peanut butter eggs. It adds a warm, sweet aroma that complements the nuttiness of peanut butter. When selecting vanilla extract, opt for pure vanilla extract rather than imitation. Pure vanilla extract is derived from vanilla beans and contains no artificial flavors, providing a richer and more authentic taste.
Importance of Salt in Balancing Sweetness
While it may seem counterintuitive, a pinch of salt is crucial in balancing the sweetness of your peanut butter eggs. Salt enhances flavors, making the sweetness more pronounced while also preventing the filling from tasting overly sugary. It’s a small addition that makes a significant difference in the overall taste.
Health Benefits of Rolled Oats
Incorporating rolled oats into your peanut butter mixture not only adds a unique texture but also boosts the nutritional value of your treats. Rolled oats are a good source of fiber, which can help regulate digestion and keep you feeling full longer. They also contain essential vitamins and minerals, including B vitamins, iron, and magnesium. When combined with peanut butter, rolled oats can create a hearty filling that’s both satisfying and nutritious.
Dark Chocolate: Choosing the Right Type and Its Health Benefits
Coating your peanut butter eggs in chocolate is what makes these treats truly indulgent. Dark chocolate is the ideal choice for this recipe due to its rich flavor and health benefits. It contains a higher percentage of cocoa solids compared to milk chocolate, which means it’s packed with antioxidants known as flavonoids. These compounds can help improve heart health and reduce inflammation. When selecting dark chocolate, look for varieties with at least 70% cocoa content for maximum health benefits and a deeper flavor.
Coconut Oil: Benefits and Its Role in Melting Chocolate
Lastly, we have coconut oil, which serves a dual purpose in this recipe. Not only does it help in melting the chocolate to a smooth consistency, but it also adds a hint of richness. Coconut oil is known for its healthy fats, particularly medium-chain triglycerides (MCTs), which can provide a quick source of energy. Using coconut oil can also help the chocolate coating to harden properly, giving your peanut butter eggs a beautiful finish.
Step-by-Step Guide to Making Delightful Peanut Butter Eggs
Now that we have a clear understanding of the ingredients and their benefits, let’s dive into the step-by-step process of making delightful peanut butter eggs. This hands-on guide will walk you through the preparation, ensuring that you achieve the perfect treats.
Preparation of the Peanut Butter Mixture
Begin by gathering all your ingredients. You’ll need natural peanut butter, your choice of sweetener (honey or maple syrup), vanilla extract, salt, rolled oats, and perhaps a small bowl to mix them all in. In a mixing bowl, combine one cup of natural peanut butter with half a cup of your chosen sweetener, one teaspoon of vanilla extract, and a pinch of salt. The sweetener will enhance the flavor and provide the necessary sweetness to balance the peanut butter’s natural saltiness.
Techniques for Achieving the Perfect Creamy Texture
To achieve a creamy texture, it’s important to mix thoroughly. Use a spatula or wooden spoon to stir the ingredients until they are well combined. You want the mixture to be smooth and cohesive, with no lumps of peanut butter remaining. This creamy texture will ensure that your filling is easy to shape into the egg form later on.
Incorporating Rolled Oats
Once your peanut butter mixture is smooth, it’s time to fold in the rolled oats. Start with one cup of rolled oats and mix them into the peanut butter blend. The oats will add texture and help bind the mixture, making it easier to shape into eggs. Mix until the oats are evenly distributed throughout the peanut butter mixture, ensuring that every bite will have that delightful chewy texture.
Importance of Mixing for Texture and Taste
The mixing process is crucial, not just for the texture but also for the flavor. Take your time to ensure that every ingredient is evenly incorporated. This step is essential because it allows the flavors to meld together, resulting in a more delicious final product. A well-mixed peanut butter filling will provide a balanced taste, with the sweetness from the sweetener and the nuttiness from the peanut butter shining through.
Shaping the Eggs
Now that your peanut butter mixture is ready, it’s time to shape them into eggs. Take a small amount of the mixture and roll it between your palms to form an egg shape. The size of each egg is up to you, but aim for uniformity to ensure even coating later on. A general guideline is to make each egg about the size of a golf ball. Place the shaped eggs on a parchment-lined baking sheet to prevent sticking and to make the chilling process easier.
Tips for Creating Uniform Shapes for Even Coating
To create uniform shapes, consider using a cookie scoop or measuring spoon to portion out the mixture before rolling it into eggs. This method will help you achieve consistent sizes, ensuring that all your peanut butter eggs will have the same cooking and cooling times. Additionally, having uniformly shaped eggs will create a more aesthetically pleasing final product.
Chilling the Eggs
Once all the eggs are shaped, place the baking sheet in the refrigerator. Chilling is a crucial step that allows the peanut butter filling to firm up, making it easier to coat with chocolate later. Let the eggs chill for at least 30 minutes, or until they are firm to the touch. This step not only helps hold their shape but also enhances the overall texture and flavor of the peanut butter eggs.
Explanation of the Chilling Process and Its Significance
The chilling process is significant for a couple of reasons. First, it allows the oils in the peanut butter to solidify slightly, which prevents the filling from becoming too soft when coated in chocolate. Second, it helps the flavors meld together, resulting in a more cohesive and delicious treat. By taking the time to chill your eggs, you’ll ensure that they have the perfect texture and flavor when they’re finally coated in chocolate.
Melting the Chocolate
Once your peanut butter eggs have chilled, it’s time to melt the chocolate for coating. This step is essential to ensuring that your eggs are covered in a smooth, glossy layer of chocolate.
How to Melt Chocolate Correctly
To melt chocolate, you can either use a microwave or a double boiler. If you choose the microwave method, place your dark chocolate in a microwave-safe bowl. Microwave the chocolate in 30-second intervals, stirring in between each interval. This method prevents the chocolate from burning and allows you to achieve a smooth consistency.
Importance of Microwaving in Intervals
Microwaving in intervals is critical for maintaining the integrity of the chocolate. Chocolate can easily seize or burn if overheated, leading to a grainy texture that is undesirable for coating. By melting in short bursts and stirring frequently, you can achieve a perfectly melted chocolate that will coat your peanut butter eggs beautifully.
In the next part of this article, we will discuss the process of coating your chilled peanut butter eggs in melted chocolate and provide additional tips to ensure your treats are a hit. Stay tuned for more delicious insights into creating these delightful confections!
{{image_1}}
Tips for Avoiding Overheating Chocolate
When it comes to melting chocolate, maintaining the right temperature is crucial. Overheating chocolate can lead to a grainy texture and undesirable taste. To avoid this, here are some practical tips:
1. Use a Double Boiler: This method allows for gentle heating. Fill a saucepan with a couple of inches of water and place a heatproof bowl on top, ensuring it doesn’t touch the water. This indirect heat helps to melt the chocolate evenly.
2. Microwave in Intervals: If you prefer using a microwave, place the chocolate in a microwave-safe bowl and heat it in 20 to 30-second bursts. Stir after each interval until the chocolate is nearly melted, then let it sit for a minute to finish melting with residual heat.
3. Watch the Temperature: For milk and white chocolate, aim for a maximum temperature of 104°F (40°C). Dark chocolate can go a bit higher, around 120°F (49°C). Using a candy thermometer can help you keep track of the temperature.
Combining Chocolate with Coconut Oil
Incorporating coconut oil into your chocolate can enhance both its texture and flavor. Coconut oil is a versatile ingredient that not only adds a subtle richness but also helps achieve a smoother consistency.
How Coconut Oil Helps in Achieving a Smooth Texture
Coconut oil has a low melting point, which means it can help create a thinner chocolate coating that glides beautifully over your peanut butter eggs. The addition of coconut oil provides the following benefits:
– Improved Fluidity: Chocolate mixed with coconut oil becomes more fluid, making it easier to dip your eggs and achieve an even coat.
– Glossy Finish: The oil contributes to a lovely sheen once the chocolate sets, giving your treats a professional look.
– Enhanced Flavor: Coconut oil has a mild sweetness that complements the rich taste of chocolate without overpowering it.
Dipping Technique for Perfect Chocolate Coating
Dipping your peanut butter eggs in chocolate requires a bit of technique to ensure an even coat. Here’s a step-by-step process:
1. Prepare Your Dipping Station: Set up your melted chocolate (with or without coconut oil) in a bowl and have your peanut butter eggs ready on a wire rack or parchment paper.
2. Use a Fork or Dipping Tool: Gently place a peanut butter egg onto a fork or a dipping tool. This will help you submerge the egg without damaging it.
3. Dip and Coat: Lower the egg into the melted chocolate, ensuring it is fully submerged. Use the fork to lift it out, allowing excess chocolate to drip off.
4. Tap Off Excess: Lightly tap the fork against the edge of the bowl to remove any remaining chocolate. This step is crucial for avoiding thick clumps on your eggs.
5. Place on Cooling Surface: Carefully transfer the coated egg back to the wire rack or parchment paper. Repeat the process for the remaining eggs.
Adding Finishing Touches
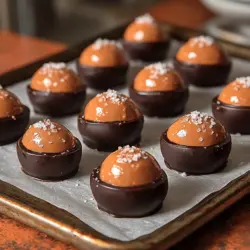
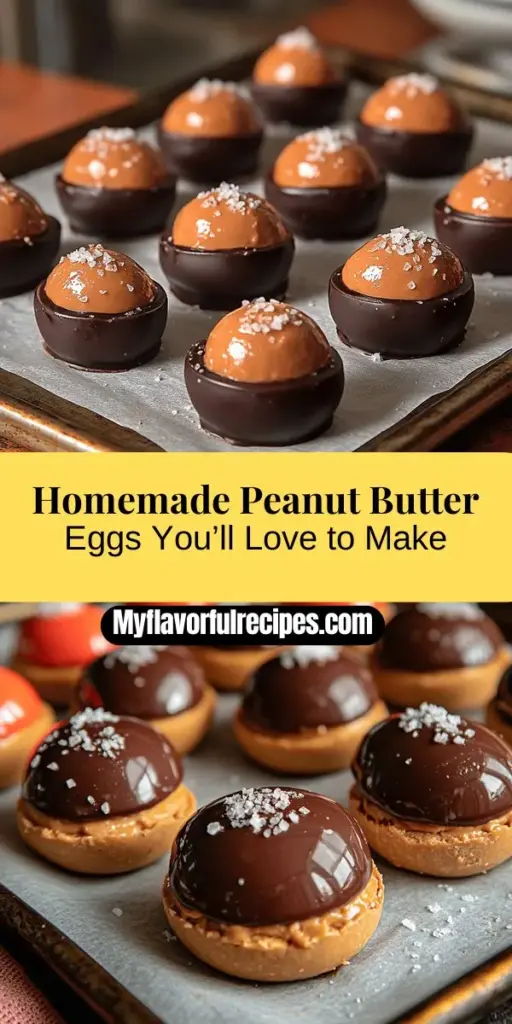
To elevate your peanut butter eggs, consider adding a sprinkle of sea salt or other toppings:
– Optional Sea Salt Topping: A light sprinkle of flaky sea salt on top of the chocolate adds a delightful contrast to the sweetness of the peanut butter filling. It not only enhances the flavor profile but also adds visual appeal to your treats.
– Timing is Key: To ensure the sea salt sticks well, sprinkle it onto the chocolate while it’s still wet. This timing allows the salt to adhere properly, creating a beautiful and tasty finish.
Setting the Chocolate
After dipping your peanut butter eggs, they need to set properly to achieve the right texture.
– Second Chilling Process: Place the dipped eggs in the refrigerator for about 30 minutes to an hour. This secondary chilling process helps the chocolate harden, ensuring a satisfying snap when you bite into them.
– Texture and Taste Impact: Allowing the chocolate to set completely not only improves the texture but also intensifies the flavors, as the chocolate and peanut butter filling meld together beautifully.
Serving Suggestions
When it comes to presentation, a little creativity can go a long way. Here are some ideas for serving your delightful peanut butter eggs:
– Presentation Platter: Arrange the eggs on a decorative plate or platter. You can garnish with fresh fruit or nuts for a pop of color and added texture.
– Pairing with Beverages: These treats pair wonderfully with a variety of beverages. Consider serving them with a glass of cold milk, a cup of coffee, or even a warm cup of hot chocolate for a comforting experience.
– Gift Ideas: Package your peanut butter eggs in a decorative box or jar for a thoughtful homemade gift. They make great treats for holidays or special occasions.
Storage and Shelf Life
To keep your peanut butter eggs fresh and delicious, proper storage is essential.
– Best Storage Practices: Store the eggs in an airtight container at room temperature if you plan to consume them within a week. If you want to keep them longer, refrigerate them to extend their shelf life.
– Maintaining Freshness: When stored properly, peanut butter eggs can last up to two weeks in the refrigerator. To preserve the texture of the chocolate, allow them to come to room temperature before enjoying them.
Nutritional Information
Understanding the nutritional benefits of your treats can enhance your enjoyment. Here’s a breakdown of what’s in your peanut butter eggs:
– Healthy Fats: The combination of peanut butter and coconut oil provides a source of healthy fats that can help with satiety and energy.
– Protein Source: Peanut butter is also rich in protein, making these treats a more satisfying option than traditional candies.
– Moderate Sugar Content: While these eggs do contain sugar, using dark chocolate can help reduce the overall sugar content while still delivering a sweet treat.
Conclusion
The delightful peanut butter eggs recipe offers a fantastic way to enjoy a homemade treat that is both easy to make and satisfying. With its rich peanut butter filling and smooth chocolate coating, these eggs are perfect for any occasion—whether it’s a holiday, a special gathering, or simply a sweet craving.
Making these treats at home allows for customization, whether you prefer to adjust the sweetness or experiment with toppings. The joy of creating delicious desserts is not only in the final product but also in the process itself. So, gather your ingredients, follow the steps, and indulge in the satisfying experience of crafting your homemade peanut butter eggs. Enjoy the flavors, share them with loved ones, and relish the pride that comes with presenting your delightful creations.