Grilled School Lunch Sandwich Melt Recipe
The grilled sandwich melt is a classic that evokes a sense of nostalgia for many who remember their school lunch trays filled with a warm, melty delight. This beloved dish has stood the test of time, making it a staple in lunchboxes across the country. Not only does it remind us of carefree school days, but it also brings a smile to the faces of kids and adults alike. In today’s fast-paced world, the grilled sandwich melt continues to be a go-to option for busy parents looking to whip up something nutritious and satisfying for their little ones.
This recipe for a Grilled School Lunch Sandwich Melt is designed with convenience, nutrition, and taste in mind. It offers a perfect balance between a quick meal solution and a hearty, wholesome option that kids will love. With just a few simple ingredients and minimal preparation time, you can transform an ordinary lunch into an extraordinary feast that appeals to even the pickiest of eaters.
Understanding the Ingredients
The foundation of any great sandwich lies in its ingredients, and this grilled sandwich melt is no exception. Each component has been carefully chosen not just for flavor but also for the health benefits it provides.
Whole Grain Bread
The choice of bread is crucial, and opting for whole grain bread elevates this sandwich melt to a healthier level. Whole grain bread is packed with fiber, which aids digestion and helps keep children full and satisfied throughout their school day. Unlike white bread, which is often stripped of its nutrients, whole grain varieties retain the bran, germ, and endosperm, making them a more nutritious option. Plus, whole grain bread adds a delightful nuttiness and texture that complements the other ingredients beautifully.
Cheddar Cheese
Cheddar cheese is the star of this sandwich when it comes to flavor and texture. Its rich, creamy taste melts perfectly, creating a gooey interior that pairs wonderfully with the bread. Additionally, cheddar is a good source of calcium and protein, which are essential for growing kids. While sharp cheddar provides a more intense flavor, mild cheddar can be a great choice for those who prefer a subtler taste. You can even experiment with different types of cheese to find your family’s favorite combination.
Protein Options
A sandwich melt wouldn’t be complete without protein, and shredded chicken is a popular choice that adds heartiness to the dish. Shredded rotisserie chicken is not only convenient but also packed with flavor and nutrients. For those looking for alternatives, consider using turkey, ham, or even plant-based proteins like hummus or grilled vegetables. The versatility of this recipe allows you to cater to various dietary preferences without compromising on taste.
Spices and Condiments
To take your sandwich melt to the next level, the right spices and condiments are essential. A simple mix of mayonnaise and mustard creates a delicious spread that enhances the overall flavor profile. You can also play around with spices like garlic powder, paprika, or even a dash of hot sauce to add a little kick. Don’t underestimate the impact that a well-seasoned spread can have on your sandwich experience.
Optional Ingredients
While the core ingredients are key to success, optional additions like lettuce and tomatoes can provide extra nutrition and crunch. Leafy greens are an excellent source of vitamins and minerals, while tomatoes add a juicy freshness that brightens the dish. These ingredients are not only good for your health but also help to create a more balanced meal that incorporates a variety of food groups.
Preparing the Spread
Creating the perfect spread is an essential step in making your Grilled School Lunch Sandwich Melt. A well-crafted mayonnaise and mustard mixture not only enhances flavor but also ensures that each bite is bursting with taste.
Ingredients for the Spread
To start, gather your ingredients:
– 1/4 cup mayonnaise
– 1 tablespoon mustard (yellow or Dijon, depending on your taste)
– Optional: a dash of hot sauce, garlic powder, or chopped herbs like dill or parsley
Mixing It Up
In a small bowl, combine the mayonnaise and mustard. Use a whisk or fork to blend the two ingredients until they are fully integrated and smooth. The mixture should be creamy with a slight tang from the mustard. If you want to kick it up a notch, add a dash of hot sauce for heat or sprinkle in some garlic powder for an extra layer of flavor. Fresh herbs can also be a fantastic way to personalize your spread, adding freshness and aroma to the sandwich.
Benefits of Homemade Spreads
Making your own spreads at home not only allows for customization but also helps you avoid the preservatives and additives often found in store-bought options. Homemade spreads can be tailored to accommodate dietary restrictions or flavor preferences, giving you complete control over what goes into your family’s meals. Additionally, they are often fresher and tastier than their commercial counterparts.
Assembling the Sandwich
With your ingredients and spread ready, it’s time to assemble your Grilled School Lunch Sandwich Melt. Proper assembly is key to ensuring the flavors meld together beautifully and the sandwich holds up during cooking.
Step-by-Step Assembly Guide
1. Prepare Your Workspace: Start by laying out your ingredients on a clean surface. Have your whole grain bread, shredded chicken, cheddar cheese, and optional veggies like lettuce and tomatoes ready to go.
2. Spread the Mixture: Take one slice of whole grain bread and generously spread your homemade mayonnaise and mustard mixture on one side. Be sure to cover the entire surface for maximum flavor.
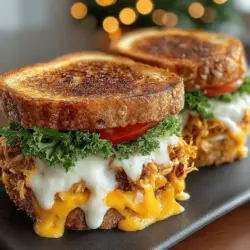
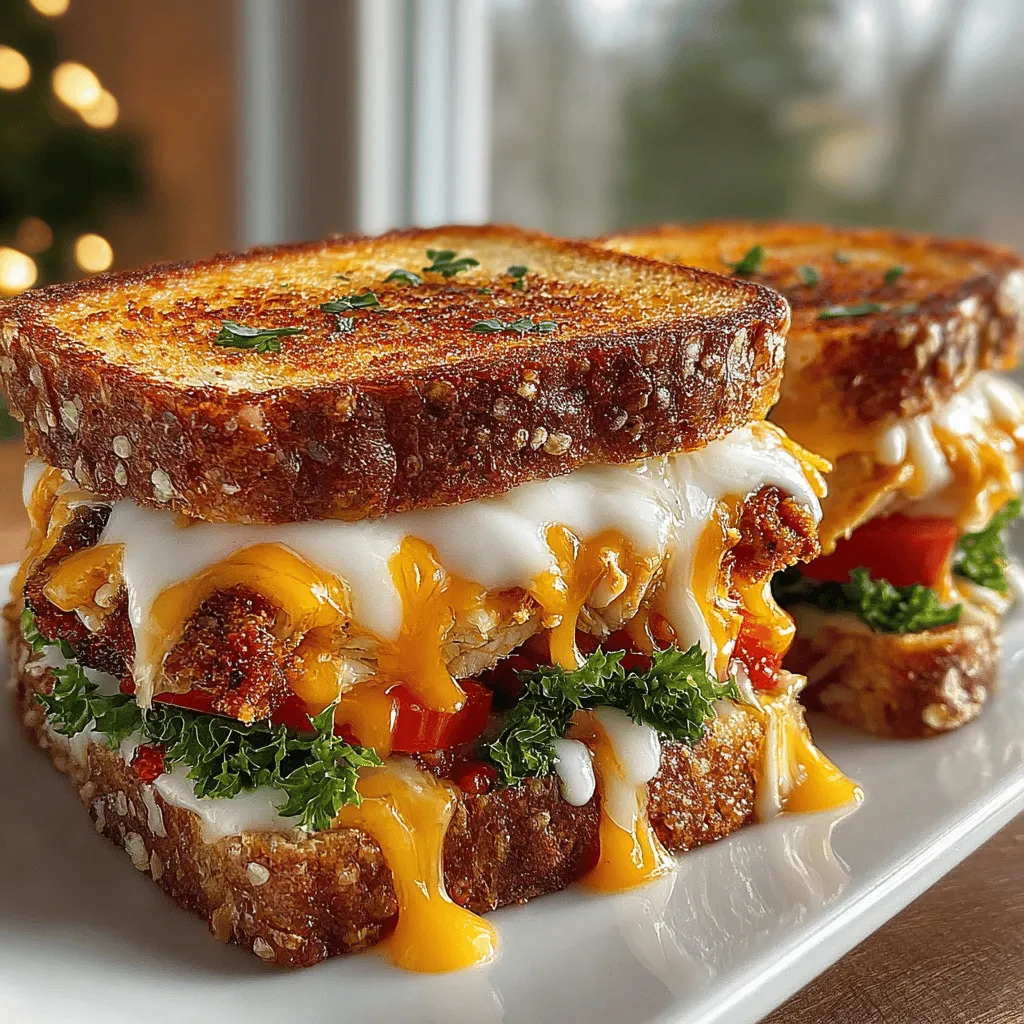
3. Layer the Ingredients: On the unspread side of the bread, layer a generous amount of shredded chicken, followed by a slice or two of cheddar cheese. If you’re using optional ingredients like lettuce or tomato, add them on top of the cheese.
4. Top it Off: Place another slice of whole grain bread on top, spread side down, to create a sandwich. Press down gently to help the layers adhere to one another.
5. Repeat: If you’re making multiple sandwiches, repeat the process for additional sandwiches, ensuring each one is filled with the same delicious components.
By following these steps, you’ll create a layered masterpiece that is not only visually appealing but also packed with flavor and nutrition. The Grilled School Lunch Sandwich Melt is about to become a family favorite, offering warmth, satisfaction, and a dash of nostalgia with every bite. As you prepare to grill your creations, you’ll be well on your way to enjoying a delightful meal that brings everyone together.
Suggestions for Layering Ingredients to Prevent Sogginess
When crafting the perfect Grilled School Lunch Sandwich Melt, proper layering of ingredients is key to preventing sogginess. To achieve this, start with a solid foundation of bread that can hold up to moisture. Here are some tips for layering:
1. Choose the Right Bread: Opt for denser bread, such as sourdough or whole grain, which provides better structural integrity than lighter varieties like white bread.
2. Start with Condiments: If you are using condiments, spread them directly on the top piece of bread. This keeps the moisture away from the bread touching the sandwich fillings, reducing sogginess.
3. Add Cheese First: Place a layer of cheese directly onto the bread, acting as a barrier between the moisture from meats and vegetables. This helps to lock in flavors and keep the bread from getting wet.
4. Layer Proteins and Vegetables: Add your choice of proteins (like turkey, ham, or chicken) next, followed by your vegetables. If using tomatoes or other juicy ingredients, consider drying them slightly with a paper towel before adding them to the sandwich to limit excess moisture.
5. Top with Cheese Again: For an even melt and to seal in the fillings, add another layer of cheese on top of the vegetables before placing the final slice of bread.
By following these layering strategies, you can enjoy a perfectly structured sandwich that remains crunchy and flavorful.
Importance of Cheese Placement for Even Melting
Cheese is the star ingredient in a Grilled School Lunch Sandwich Melt. Its placement can significantly impact the final result. For optimal melting:
1. Use a Combination of Cheeses: Mixing cheeses can enhance flavor and texture. For instance, combining sharp cheddar for flavor with mozzarella for meltiness yields a creamy, gooey center.
2. Layer Strategically: As mentioned earlier, start and finish with cheese. This method ensures that the inner ingredients heat up and melt evenly, while the outer layers form a crispy, golden crust.
3. Grate Your Cheese: Shredded cheese melts more evenly and quickly than slices, allowing for better coverage and a more uniform consistency.
By paying attention to cheese placement and using the right types, you can achieve that quintessential melt that makes grilled sandwiches irresistible.
Butter and Grilling Techniques
Why Buttering the Bread is Crucial for a Golden, Crispy Crust
Buttering the bread is a classic technique that elevates the flavor and texture of your sandwich. Here’s why it matters:
– Flavor Enhancement: Butter adds richness and depth to the sandwich, enhancing the overall taste.
– Crispiness: The fat in butter helps achieve that desirable golden-brown crust by promoting even browning during grilling.
– Moisture Barrier: Butter also acts as a barrier that helps keep the bread from absorbing moisture from the fillings, maintaining that perfect crunch.
For the best results, use softened, unsalted butter for spreading. This makes it easier to coat the bread evenly without tearing it.
Grilling Methods: Skillet vs. Grill Pan vs. Panini Press
When it comes to grilling your sandwich, the method you choose can significantly affect the outcome. Here are some popular options:
1. Skillet: A non-stick skillet is ideal for making grilled sandwiches. Heat the skillet over medium heat, place the sandwich in, and cover it with a lid. This helps the cheese melt while the bread browns evenly. Flip the sandwich after about 3-4 minutes.
2. Grill Pan: Similar to a skillet but with ridges, a grill pan imparts a beautiful char to your sandwich. Preheat it for a few minutes before placing your sandwich inside. The ridges allow excess moisture to escape, helping the bread crisp up nicely.
3. Panini Press: A panini press is a convenient option for achieving perfectly grilled sandwiches with minimal effort. Preheat the press, place your sandwich inside, and close it. The even heat from both sides ensures that the cheese melts thoroughly while the bread gets crispy.
Regardless of the method you choose, maintaining a moderate heat is essential to avoid burning the bread while ensuring the cheese melts properly.
Tips on Achieving the Perfect Grilled Cheese Texture
To achieve that perfect grilled cheese texture without burning, consider the following tips:
– Use Medium Heat: Cooking on medium heat allows the bread to brown evenly without charring.
– Monitor Cooking Time: Keep an eye on your sandwich, flipping it as soon as golden brown. This usually takes about 3-4 minutes per side, depending on your heat source.
– Press Down Gently: Use a spatula to press down gently on the sandwich while grilling. This promotes even melting and browning.
– Avoid Overstuffing: While it’s tempting to load your sandwich with fillings, overstuffing can lead to uneven cooking and spills. A balanced approach ensures a deliciously cohesive melt.
Serving Suggestions
Pairing your Grilled School Lunch Sandwich Melt with the right sides can enhance the meal experience. Here are some delightful serving suggestions:
1. Vegetable Sides: Carrot sticks or cucumber slices provide a refreshing crunch that balances the richness of the sandwich. You could also include cherry tomatoes or bell pepper strips for added color and nutrition.
2. Fruits: Apple slices or grapes serve as a sweet complement to the savory flavors of the sandwich. Consider serving with a small dish of almond or peanut butter for a protein boost.
3. Salads: A simple green salad dressed lightly with vinaigrette can add freshness and a dose of nutrients. Try mixing arugula, spinach, cherry tomatoes, and shredded carrots for a colorful side.
4. Occasional Serving: The Grilled School Lunch Sandwich Melt is versatile enough for various occasions. Serve it as a hearty lunch option, a quick snack after school, or even as a light dinner. It pairs well with a warm bowl of tomato soup or a side of crispy sweet potato fries.
Nutritional Benefits of the Grilled Sandwich Melt
Understanding the nutritional value of your meals is essential for maintaining a balanced diet. Here’s a breakdown of the Grilled School Lunch Sandwich Melt:
Nutritional Breakdown per Serving
– Calories: Approximately 350-450, depending on ingredients and portion sizes.
– Protein: 20-25 grams, depending on the type and amount of cheese and meat used.
– Fiber: Around 3-5 grams, particularly if using whole grain bread and adding vegetables.
– Fat: 15-25 grams, depending on butter and cheese choices.
Making the Sandwich Healthier
To elevate the health profile of your Grilled School Lunch Sandwich Melt, consider these options:
– Low-Fat Alternatives: Use low-fat cheese or mayonnaise to reduce overall fat content while maintaining flavor.
– Add More Vegetables: Incorporate spinach, kale, or bell peppers for added vitamins and minerals. These ingredients also enhance flavor and texture.
– Whole Grain Bread: Opt for whole grain or whole wheat bread to increase fiber content, promoting better digestion and longer satiety.
Importance of Balanced Meals
For both children and adults, balanced meals play a crucial role in overall health. A well-structured sandwich provides a combination of protein, carbohydrates, and fats, ensuring that you have the energy needed to tackle the day. Incorporating a variety of food groups helps meet essential nutritional needs, supports growth in children, and sustains energy levels in adults.
Conclusion
The Grilled School Lunch Sandwich Melt is a delightful, quick meal option that appeals to both kids and adults alike. With its gooey cheese, flavorful fillings, and crispy crust, it is a comforting dish that can be easily customized to suit individual tastes.
We encourage you to try this recipe, experimenting with different fillings, cheeses, and sides to create your perfect sandwich. Incorporating simple, wholesome recipes like this into your daily routine can improve nutrition and bring joy to meal times. Enjoy this delicious sandwich melt as a part of your family meals, and watch as it becomes a favorite in your household.