Frozen Raspberry Yogurt Tarts Recipe
As the temperature rises and the days grow longer, the allure of frozen desserts becomes irresistible. Whether you’re lounging by the pool, hosting a backyard barbecue, or simply seeking a delightful treat to enjoy after dinner, there’s something uniquely satisfying about enjoying a chilled dessert on a warm day. Frozen Raspberry Yogurt Tarts are the perfect combination of refreshment and indulgence, offering a deliciously cool experience that doesn’t compromise on health.
Frozen desserts have a universal appeal, and for good reason. They provide a satisfying way to beat the heat while indulging in flavors that tantalize the taste buds. Among the plethora of options available, Frozen Raspberry Yogurt Tarts stand out as a particularly enticing choice. Not only do they promise a burst of refreshing raspberry flavor with every bite, but they also boast a healthy profile that makes them suitable for a variety of dietary preferences.
The key ingredients in this recipe – yogurt and raspberries – are not just delicious; they also offer numerous health benefits. Yogurt, particularly Greek yogurt, is known for its high protein content, probiotics, and ability to support digestive health. Raspberries, on the other hand, are packed with antioxidants, vitamins, and fiber, making them a powerhouse of nutrition. Combining these two ingredients creates a dessert that feels indulgent while still being nutritious, allowing you to satisfy your sweet tooth without guilt.
In this article, we will guide you through the process of making Frozen Raspberry Yogurt Tarts from scratch. This refreshing dessert is not only simple to prepare but also visually stunning, making it an excellent choice for gatherings or special occasions. Let’s dive into the recipe, starting with an understanding of the essential ingredients and the initial steps to create a perfect tart.
Understanding the Ingredients
Crust Ingredients:
The foundation of any great tart is its crust, and in this recipe, we use a simple yet delicious graham cracker crust. Here’s a closer look at the ingredients that contribute to the perfect crust:
– Graham Cracker Crumbs: These provide the primary texture and flavor for the crust. Their subtle sweetness and crumbly texture create a delightful contrast to the creamy filling. When crushed finely, graham crackers form a sturdy base that holds the tart together nicely.
– Unsalted Butter: The role of butter in the crust cannot be overstated. Not only does it bind the crumbs together, but it also adds richness and flavor. Using unsalted butter allows you to control the overall saltiness of the tart and enhances the natural sweetness of the other ingredients.
– Sugar and Salt: Sugar contributes to the sweetness of the crust, balancing the flavors of the tart, while a pinch of salt enhances the overall taste, bringing out the sweetness of the graham crackers and the tartness of the filling.
Filling Ingredients:
The filling of the Frozen Raspberry Yogurt Tarts is where the magic truly happens. Here’s a breakdown of the key components:
– Greek Yogurt: This ingredient is a star in its own right. Packed with protein and probiotics, Greek yogurt elevates the nutritional profile of the dessert. Its creamy texture creates a decadent mouthfeel, while its tangy flavor pairs beautifully with the sweetness of the raspberries.
– Fresh Raspberries: These vibrant berries not only add a burst of color but also provide a bright, tart flavor that complements the creamy filling. Raspberries are rich in antioxidants, vitamins C and K, and dietary fiber, making them a healthy addition to this dessert.
– Natural Sweeteners (Honey or Maple Syrup): To sweeten the filling, you can choose between honey and maple syrup. Both options are natural sweeteners that not only add sweetness but also impart unique flavors. Honey brings a floral note, while maple syrup offers a warm, earthy sweetness. Depending on your dietary preferences, you can select the one that best suits your taste.
– Vanilla Extract and Lemon Juice: A splash of vanilla extract enhances the overall flavor profile, adding depth and warmth. Meanwhile, a touch of lemon juice brightens the filling, balancing the sweetness and complementing the raspberries perfectly.
Step-by-Step Instructions
Preparing the Crust:
1. Mixing the Ingredients:
Begin by combining the graham cracker crumbs, melted unsalted butter, sugar, and salt in a mixing bowl. It’s essential to ensure that the butter is fully incorporated into the crumbs for a cohesive mixture. The texture should be similar to wet sand, which allows it to hold together when pressed into the tart pan.
2. Pressing the Crust:
Once the mixture is ready, transfer it into a tart pan. Use your fingers or the bottom of a measuring cup to press the crust evenly across the bottom and up the sides of the pan. This step is crucial for ensuring that the crust is firm and will hold the filling without crumbling. Take your time to make sure the crust is compact and evenly distributed.
3. Chilling the Crust:
After pressing the crust into the tart pan, place it in the refrigerator for about 15-20 minutes. Chilling will help the butter firm up, creating a sturdy base that will hold its shape once baked. This step is essential for achieving the right texture and preventing the crust from becoming too soft when filled.
Making the Filling:
1. Blending the Ingredients:
In a mixing bowl, combine the Greek yogurt, fresh raspberries, your choice of sweetener (honey or maple syrup), vanilla extract, and lemon juice. Using a blender or food processor, blend the ingredients until smooth. However, to maintain a bit of raspberry texture, consider pulsing the mixture rather than blending it completely.
2. Achieving the Desired Consistency:
The goal is to create a smooth, creamy filling while still leaving some whole raspberry pieces for texture. This contrast will enhance the overall eating experience, providing bursts of fresh flavor in each bite.
With the crust chilled and the filling ready, you are well on your way to creating a delightful dessert that will impress your family and friends. Stay tuned for the next part of this article, where we will explore how to assemble the tarts and the final steps to achieve a deliciously refreshing Frozen Raspberry Yogurt Tart that is sure to become a favorite in your dessert repertoire.
Substituting Ingredients for Dietary Needs
When crafting your Frozen Raspberry Yogurt Tarts, it’s essential to consider dietary restrictions or preferences. For those following a vegan lifestyle, there are simple substitutions to ensure everyone can enjoy this refreshing dessert. Instead of traditional dairy yogurt, opt for almond, coconut, or soy yogurt, which can provide a creamy texture and a delightful flavor. Additionally, for the sweetener, maple syrup or agave nectar can be used in place of honey, ensuring the recipe remains plant-based.
If you’re looking to make these tarts gluten-free, consider using almond flour or a gluten-free baking blend for the crust. This not only caters to dietary needs but also adds a unique flavor and texture to your dessert. These substitutions allow you to tailor the recipe to fit various dietary requirements without compromising on taste.
Assembling the Tarts
Once your crust has been prepared and has cooled, it’s time to assemble the tarts. Start by preparing your yogurt filling. In a mixing bowl, combine the yogurt of your choice with the sweetener and vanilla extract. Use a whisk to mix until smooth and creamy.
Pouring and Spreading the Filling
When pouring the yogurt filling into the prepared crusts, it’s important to do so gently to avoid disturbing the crust. Use a spatula to spread the filling evenly across the top of the crust, ensuring that it reaches the edges. The filling should be smooth and level, creating a beautiful surface for presentation.
Tapping the Pan to Remove Air Bubbles
After filling the tart shells, gently tap the pan on the counter a few times. This technique helps to release any trapped air bubbles in the filling, which is crucial for achieving a smooth texture. If air bubbles remain, they can create unsightly holes or uneven surfaces once the tarts are frozen.
Freezing the Tarts
Now that your tarts are filled and ready, it’s time to freeze them. Place the tarts in the freezer and allow them to set. The recommended freezing time is at least 4 to 6 hours, or until the filling is completely firm. For best results, overnight freezing is ideal, allowing the flavors to meld beautifully.
How Freezing Affects the Texture of Yogurt Desserts
Freezing not only solidifies the tarts but also affects the texture of the yogurt. As it freezes, the water content in the yogurt forms ice crystals, which can alter its creamy consistency. However, using full-fat yogurt or a high-quality alternative can mitigate this effect, resulting in a delightfully creamy dessert even after freezing. This is why selecting the right yogurt is crucial to the final texture of your tarts.
Serving the Tarts
Once your tarts are thoroughly frozen, it’s time to serve them. To remove the tarts from the pan without damage, run a butter knife around the edge of the tart to loosen it. Then, carefully push the base of the tart pan up to release the tart from the sides. If you encounter resistance, you can briefly dip the bottom of the pan in warm water to help loosen it further.
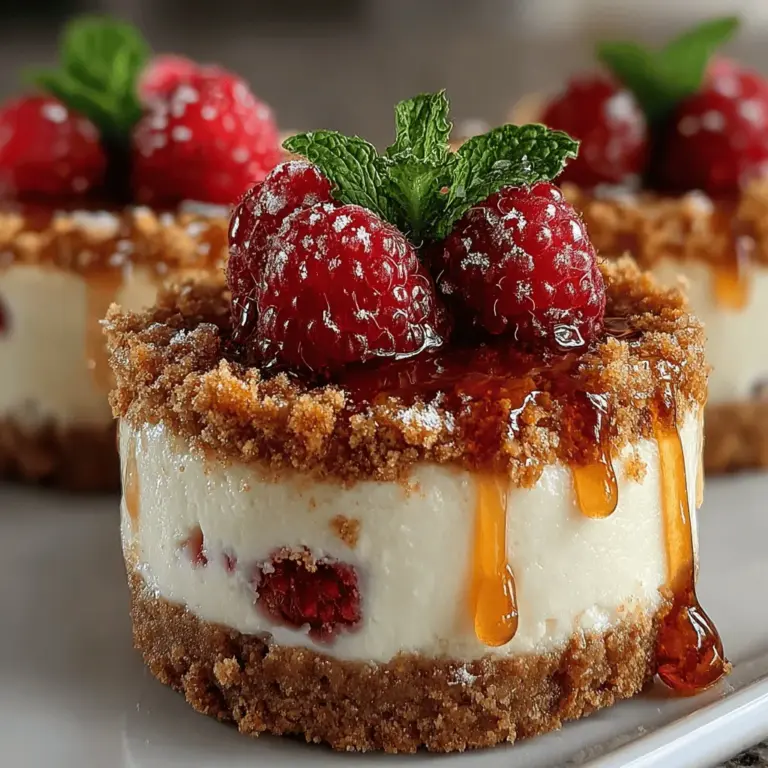
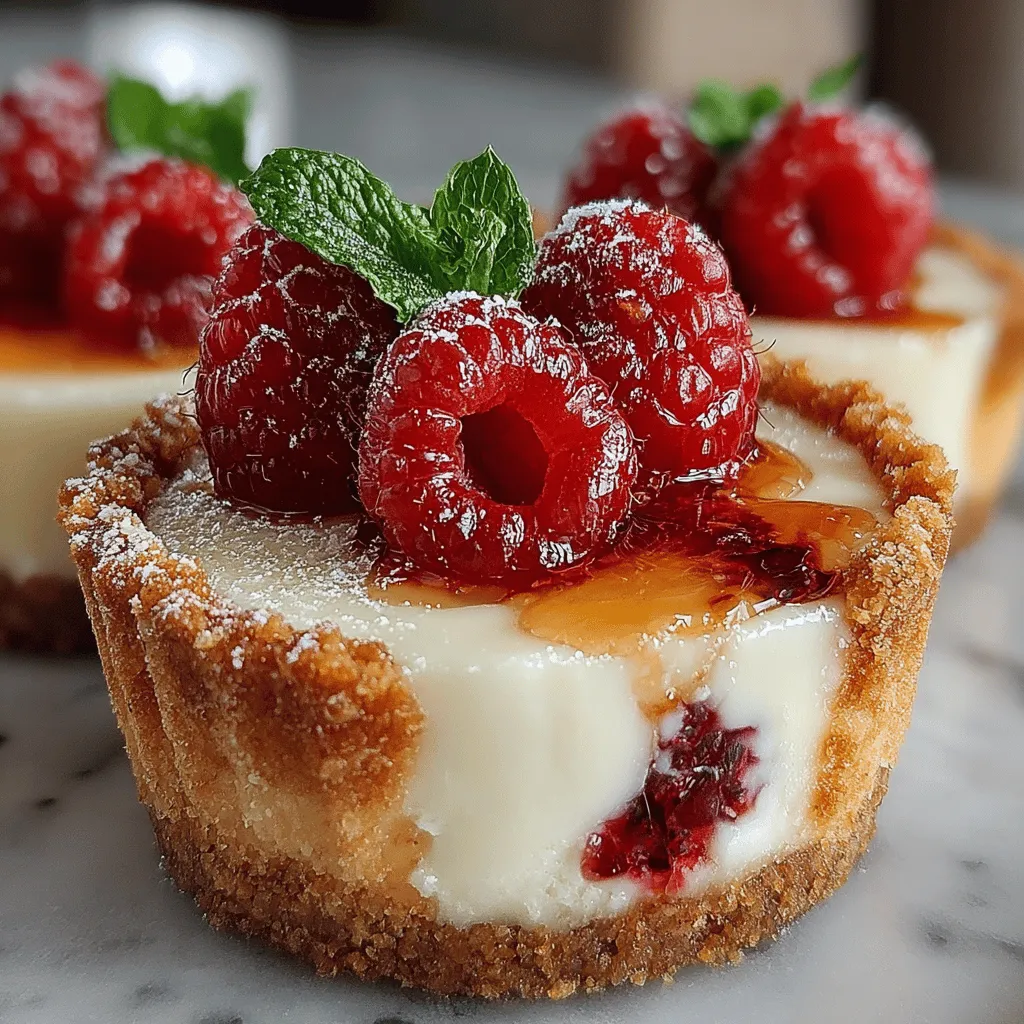
Presentation Tips for Garnishing
For an appealing presentation, consider garnishing your tarts with fresh raspberries and mint leaves. Arrange the raspberries artistically on top of each tart, and place a few mint leaves for a pop of color. This not only enhances the visual appeal but also adds a fresh flavor contrast to the creamy filling. If you desire, a light dusting of powdered sugar can add a touch of elegance.
Health Benefits of Frozen Raspberry Yogurt Tarts
Nutritional Profile of the Main Ingredients
Frozen Raspberry Yogurt Tarts are not just delicious; they are also packed with health benefits. Raspberries are rich in antioxidants, vitamins, and dietary fiber. They provide essential nutrients and can aid in digestive health. Yogurt, particularly when made from whole milk or a dairy alternative, is an excellent source of probiotics, which support gut health.
Comparison to Traditional Options
When compared to traditional desserts, such as cakes or ice creams, these tarts are significantly lower in calories and sugar. For instance, a typical slice of cake can contain upwards of 300 calories, while a serving of these tarts can be around 150 calories. This makes them a guilt-free option for satisfying your sweet tooth.
Benefits of Incorporating Fruit and Yogurt
Including fruit and yogurt in desserts elevates their nutritional value. The natural sugars in fruit provide a sweet flavor without the need for excessive added sweeteners. Additionally, yogurt contributes beneficial bacteria that can enhance your overall health. By choosing frozen yogurt tarts, you’re not just indulging your cravings; you’re also making a healthier choice.
Variations and Customizations
Flavor Variations
One of the beauties of this tart recipe is its versatility. While raspberry is a delightful choice, you can easily customize the flavor profile. Consider using blueberries, strawberries, or blackberries for a berry medley. For a unique twist, incorporate spices like cinnamon or nutmeg to add warmth and depth to the flavor.
Alternative Crusts
If you’re looking for alternatives to the traditional graham cracker crust, nut-based crusts are a fantastic option, especially for those needing gluten-free solutions. A crust made from crushed almonds or walnuts combined with dates and coconut oil can create a nutritious and flavorful base that pairs beautifully with the yogurt filling.
Different Toppings
Experimenting with toppings can further enhance your Frozen Raspberry Yogurt Tarts. Consider adding granola for a crunchy texture, coconut flakes for a tropical twist, or even a drizzle of dark chocolate for a decadent touch. These additions not only improve the flavor but also make the dessert visually appealing.
Conclusion
In summary, Frozen Raspberry Yogurt Tarts are a delightful combination of flavor and nutrition. With their creamy yogurt filling and vibrant raspberry taste, these tarts are perfect for family gatherings, parties, or simply as a refreshing treat for yourself. The health benefits of incorporating yogurt and fruit make this dessert a smart choice that balances indulgence with nutrition.
So why not try making these Frozen Raspberry Yogurt Tarts at home? They are not only easy to prepare but also customizable to suit your tastes and dietary needs. Embrace the joy of creating a dessert that is both delicious and health-conscious, and share it with your loved ones. Enjoy the perfect blend of flavors and textures in every bite of your homemade Frozen Raspberry Yogurt Tarts.

