As the warm months roll in, the craving for cold, refreshing treats intensifies. Frozen desserts have long been a staple during summertime, providing a sweet escape from the heat. However, not all frozen treats are created equal. Enter the Peanutty Banana Bliss Pops—a delightful balance of health and indulgence that makes for the perfect summer snack. This nutritious option is not only simple to prepare but also guarantees satisfaction for both kids and adults alike.
These bliss pops are an excellent alternative to traditional ice creams and popsicles, loaded with natural ingredients that promote better health. The combination of ripe bananas, Greek yogurt, peanut butter, and a touch of honey or maple syrup results in a creamy, satisfying treat that will keep you cool while nourishing your body. Whether you’re looking for a guilt-free dessert or a quick snack to fuel your day, Peanutty Banana Bliss Pops are sure to become a favorite in your household.
Understanding the Ingredients
To create these blissful pops, it’s essential to understand the benefits of each ingredient that contributes to both flavor and nutrition. Let’s break down the core components of this recipe:
– Ripe Bananas: The star of the show, ripe bananas provide natural sweetness and serve as a powerhouse of potassium. This essential mineral is crucial for heart health, muscle function, and maintaining proper hydration. The natural sugars in ripe bananas also mean that fewer sweeteners are needed in the recipe.
– Plain Greek Yogurt: This ingredient is a nutritional powerhouse, packed with protein and probiotics. Greek yogurt aids digestion and promotes gut health, making it a fantastic addition to any diet. Its creamy texture enhances the overall mouthfeel of the pops, creating a satisfying treat that feels indulgent without the added calories of typical desserts.
– Creamy Peanut Butter: Rich in healthy fats and protein, peanut butter adds a delightful nuttiness and creaminess to the pops. It not only enhances the flavor profile but also helps keep you full longer, making it an ideal choice for a snack or dessert.
– Honey or Maple Syrup: Both of these natural sweeteners can be used to customize the sweetness of your Peanutty Banana Bliss Pops. Honey is known for its antioxidant properties, while maple syrup offers a unique flavor and is packed with minerals. You can adjust the amount to your taste preference, allowing for a personalized touch.
– Vanilla Extract: A splash of vanilla extract elevates the flavor of these pops, lending a warm and aromatic note that complements the other ingredients beautifully. Quality matters, so opt for pure vanilla extract for the best taste.
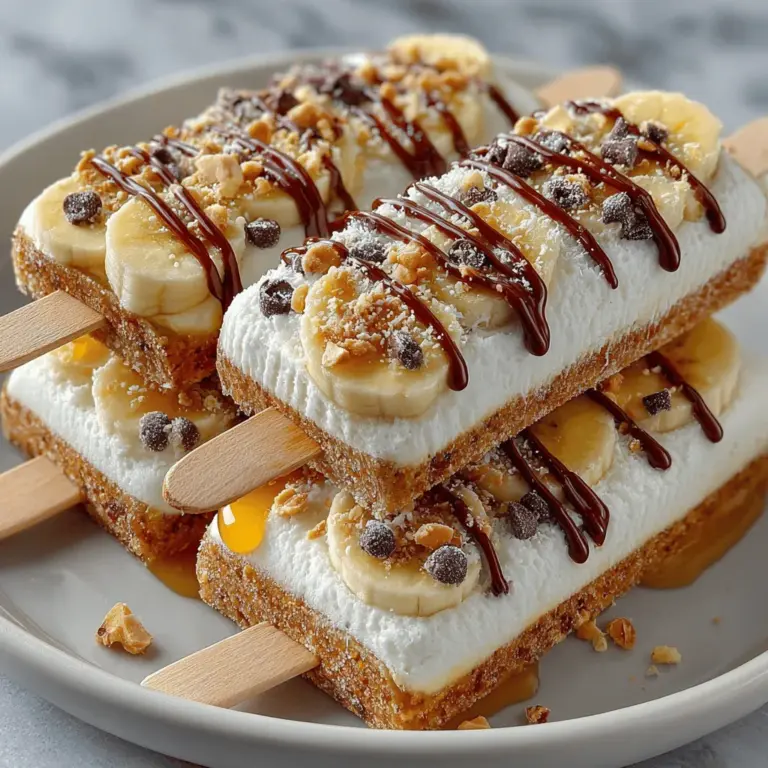
– Optional Toppings: For those looking to add a little extra flair, mini chocolate chips or crushed nuts make excellent toppings. These options not only enhance the visual appeal of your pops but also add texture and an additional layer of flavor.
Step-by-Step Guide to Making Peanutty Banana Bliss Pops
Now that we’ve covered the ingredients, let’s dive into the step-by-step process of creating these delectable frozen treats. The following instructions will guide you through the initial stages of crafting your Peanutty Banana Bliss Pops.
Preparing the Bananas
Choosing the right bananas is crucial for achieving the perfect sweetness and texture in your pops. Ripe bananas—those that are freckled and slightly soft to the touch—are ideal for this recipe. They provide the natural sweetness that will make your pops a hit.
1. Peel the Bananas: Start by peeling your ripe bananas and placing them on a clean cutting board.
2. Cutting the Bananas: Depending on the desired size of your pops, you can cut the bananas into either half or quarter sections. For a classic popsicle shape, cutting them into 1- to 1.5-inch thick pieces works best. This size not only allows for even freezing but also makes them easy to coat in the yogurt mixture.
3. Skewering: If you plan to use popsicle sticks, insert them into the cut pieces before freezing. This will make it easier to handle the pops when it’s time to enjoy them. Ensure that the sticks are inserted deep enough to support the weight of the banana pieces once coated.
Crafting the Yogurt Mixture
The yogurt mixture is what binds all the flavors together, creating the creamy base for your pops. Follow these steps to achieve the perfect consistency:
1. In a Mixing Bowl: Combine plain Greek yogurt, creamy peanut butter, honey or maple syrup, and vanilla extract. Start with 1 cup of yogurt and 1/2 cup of peanut butter for a balanced flavor.
2. Mixing Thoroughly: Using a whisk or an electric mixer, blend the ingredients together until smooth. Ensure there are no lumps, allowing the mixture to become creamy and homogenous. This step is crucial for achieving that velvety texture that will envelop the bananas.
3. Taste and Adjust: Before proceeding, taste the mixture. If you prefer a sweeter treat, add more honey or maple syrup to your liking. Remember that the bananas will add sweetness as well, so adjust according to your preference.
Coating the Bananas
Now that you have your banana pieces and yogurt mixture ready, it’s time to coat the bananas for that delightful peanutty flavor.
1. Even Coverage: Dip each banana piece into the yogurt mixture, ensuring that it is evenly coated. You can use a spoon or a spatula to help spread the mixture around the banana. Make sure each piece is thoroughly covered for maximum flavor and creaminess.
2. Placing on a Baking Sheet: After coating, place each yogurt-covered banana piece on a parchment-lined baking sheet. This will prevent them from sticking and make for easy removal once frozen.
3. Optional Toppings: If you’re adding toppings like mini chocolate chips or crushed nuts, now is the time to sprinkle them over the coated banana pieces before they go into the freezer. This adds an extra crunch and enhances the overall flavor experience.
These initial steps lay the groundwork for creating the Peanutty Banana Bliss Pops, ensuring that each bite is packed with flavor and nutrition. The combination of ripe bananas, creamy yogurt, and nutty peanut butter not only satisfies your sweet tooth but also nourishes your body. Stay tuned for the next part, where we’ll cover the freezing process and how to serve your delightful frozen treats.
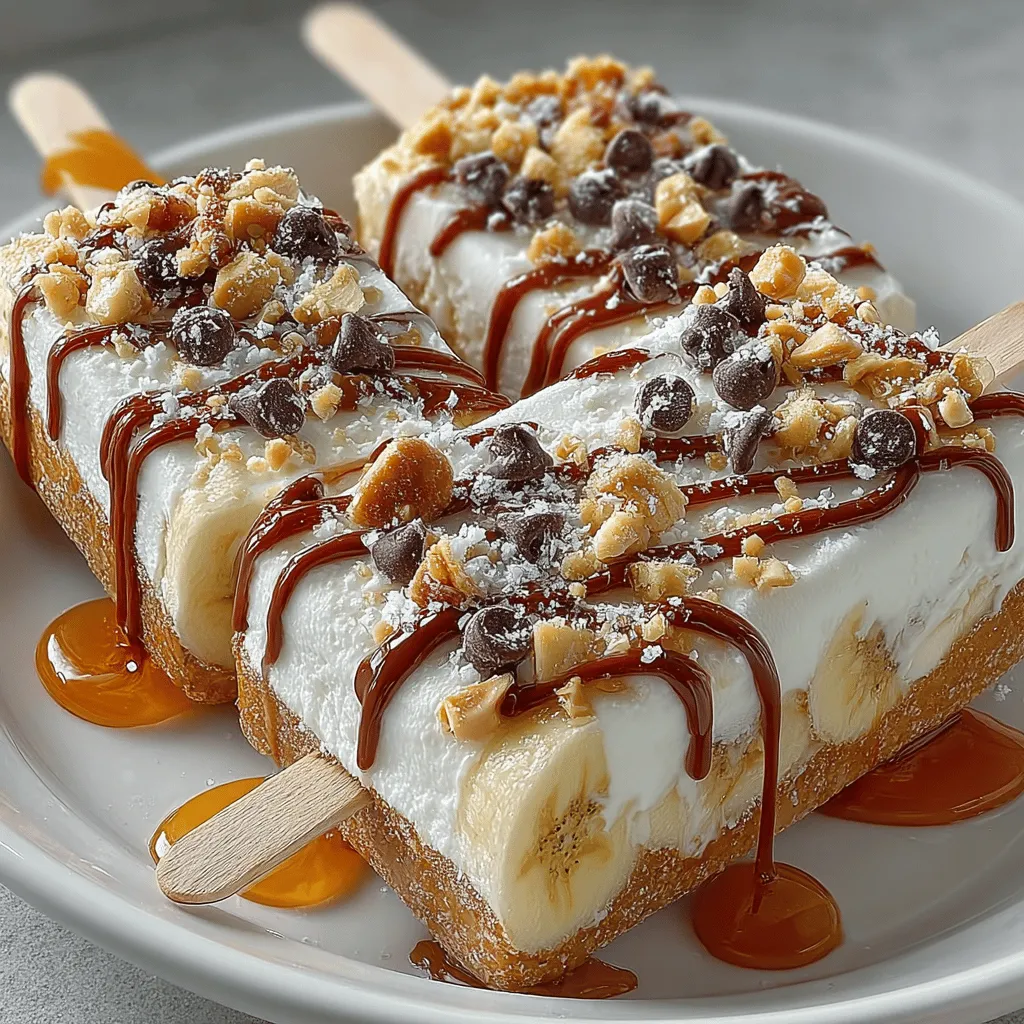
Adding Toppings for Extra Flavor and Texture
To elevate your Peanutty Banana Bliss Pops, consider adding a variety of toppings that not only enhance flavor but also contribute to an exciting texture. While chocolate chips and chopped nuts are popular options, the possibilities are virtually endless. Here are some creative ideas to get you started:
– Granola: Sprinkle crunchy granola over the banana and peanut butter mixture for a delightful crunch in every bite.
– Coconut Flakes: Shredded or toasted coconut adds a tropical twist and pairs beautifully with the banana’s natural sweetness.
– Dried Fruits: Chopped dried cranberries, apricots, or raisins can introduce a chewy texture and an extra layer of flavor.
– Spices: A dusting of cinnamon or nutmeg can add warmth and complexity to the pops. Consider mixing a little vanilla extract into the peanut butter mixture for an aromatic touch.
– Seeds: Chia seeds or flaxseeds can enhance the nutritional profile, providing omega-3 fatty acids and fiber without overpowering the main flavors.
Finding the right balance of flavors and textures is key. Aim for a mix of creamy, crunchy, and chewy elements that make each bite interesting and satisfying.
Molding the Pops
To ensure that your Peanutty Banana Bliss Pops come out perfectly shaped and easy to enjoy, pay careful attention to how you insert the sticks into the molds. Here’s how to do it properly:
1. Choose Your Molds: Silicone molds are ideal because they make it easier to release the pops once frozen. Alternatively, traditional plastic molds work well, but ensure they are flexible enough for easy removal.
2. Fill the Molds: Pour the banana and peanut butter mixture into the molds, filling them to about three-quarters full to leave enough space for expansion as they freeze.
3. Insert Sticks: Insert the popsicle sticks into the center of each mold, ensuring they are straight and centered. If the mixture is too runny, you may need to freeze the molds for about 30 minutes before inserting the sticks to ensure they hold their position.
4. Recommended Molds: For the best results, look for molds that are designed specifically for popsicles, such as those with built-in lids to prevent spills. Some molds even come with removable bases, making the pops easier to release.
Freezing Process
Once your molds are filled and the sticks are securely in place, it’s time to freeze them. The freezing process is crucial for achieving the perfect consistency in your Peanutty Banana Bliss Pops:
1. Freezing Time: Allow the pops to freeze for at least 4-6 hours, or until they are completely solid. For optimal results, freezing them overnight is recommended.
2. Check Doneness: To determine if the pops are ready to serve, gently wiggle one of the sticks. If it moves freely and the pop feels solid, they are ready to be removed. If they feel soft or mushy, they need more time in the freezer.
Removing the Pops from Molds
Removing frozen treats from molds can be tricky, but there are techniques to ensure your Peanutty Banana Bliss Pops come out intact:
1. Warming the Molds: If you’re having trouble releasing the pops, run the molds under warm water for about 10-15 seconds. This will slightly melt the outer layer, making it easier to pull the pops out.
2. Gentle Pulling: Hold the stick and gently twist it while pulling. This motion can help loosen the pop from the sides of the mold without breaking it.
3. Silicone Molds Advantage: If you use silicone molds, gently flex the sides to create some space between the pop and the mold. This usually allows for easy removal without any damage.
Serving Suggestions and Storage
Now that your Peanutty Banana Bliss Pops are perfectly molded and ready to serve, consider these ideas on how to present them for gatherings or snacks:
– Presentation: Serve the pops on a decorative platter. You can also place them in a glass filled with ice for a fun and festive display.
– Pairings: These pops pair well with fresh fruit, yogurt, or a drizzle of honey for added sweetness. They also make a great addition to a healthy dessert table alongside other homemade treats.
Storage Instructions
To maintain the freshness and flavor of your Peanutty Banana Bliss Pops, follow these storage tips:
– Freezing: Store any leftover pops in an airtight container or a resealable plastic bag with the air pressed out. This will prevent freezer burn and keep them tasting great.
– Duration: The pops can be stored in the freezer for up to 2 months. However, they are best enjoyed within the first few weeks for optimal flavor and texture.
Health Benefits of Peanutty Banana Bliss Pops
Creating your own Peanutty Banana Bliss Pops is not only a fun activity but also a health-conscious choice. Here are some benefits of these homemade frozen treats:
1. Nutritious Ingredients: Bananas are a great source of potassium, vitamin C, and dietary fiber, while peanut butter provides healthy fats, protein, and essential nutrients. Together, they create a balanced treat that can satisfy your sweet tooth without the guilt.
2. Control Over Ingredients: By making your own pops, you can control the ingredients and avoid the additives and sugars often found in store-bought frozen treats. This makes it easier to maintain a healthy lifestyle.
3. Healthy Alternatives for Snacks: Frozen treats like these can be a refreshing and nutritious alternative to high-calorie snacks and desserts, especially during the warmer months. They provide a sweet fix while still being beneficial to your diet.
Conclusion
In summary, making Peanutty Banana Bliss Pops is an easy and enjoyable way to create a delicious, guilt-free treat that everyone will love. With simple ingredients and minimal preparation, you can whip up these frozen delights in no time. Not only do they offer a perfect balance of flavors and textures, but they also contribute to a healthy lifestyle, making them a fantastic choice for snacks or desserts.
Encourage your family and friends to join you in this fun cooking project, turning the process into a memorable experience. The joy of enjoying a homemade frozen treat that’s both satisfying and nutritious is unmatched. So gather your ingredients, get creative with toppings, and dive into the delightful world of Peanutty Banana Bliss Pops!

