Introduction
There’s something undeniably comforting about the aroma of freshly baked cinnamon rolls wafting through your kitchen. These delightful pastries have earned their place as a cherished breakfast and dessert item, bringing joy to family gatherings, holiday brunches, and lazy Sunday mornings alike. Among the countless variations of cinnamon rolls, the addition of cream cheese icing transforms these sweet rolls into an indulgent treat that elevates the traditional recipe to new heights.
The concept of homemade cinnamon rolls might seem daunting to some, but the satisfaction of creating these fluffy, warm rolls from scratch is well worth the effort. Imagine biting into a perfectly swirled roll, the soft dough giving way to a rich, gooey filling of cinnamon and sugar, all topped with a luscious cream cheese icing that perfectly balances sweetness with a tangy kick. This recipe for Heavenly Cream Cheese Cinnamon Rolls is designed to guide you through each step, ensuring that the process is as enjoyable as the end result.
As you embark on this baking adventure, you’ll discover not only the joy of crafting these rolls but also the rich history and tradition behind them. Cinnamon rolls have been a beloved staple in many cultures, from the classic Scandinavian kanelbullar to the American-style roll we know today. By incorporating a cream cheese icing, we take a classic recipe and add a unique twist that enhances both flavor and texture, making each bite a heavenly experience.
Understanding the Ingredients
Before we dive into the step-by-step instructions, it’s essential to understand the role each ingredient plays in creating these delectable cinnamon rolls. Each component contributes to the overall flavor, texture, and success of the recipe.
Exploring the Dough Ingredients
1. All-Purpose Flour: The backbone of our cinnamon roll dough, all-purpose flour provides the necessary structure. The protein content in the flour helps develop gluten, which gives the rolls their characteristic chewy texture. When measuring flour, be sure to spoon it into the measuring cup and level it off for accuracy.
2. Active Dry Yeast: This ingredient is crucial for achieving that fluffy, airy texture we all love in cinnamon rolls. Active dry yeast ferments the sugars present in the dough, producing carbon dioxide gas that causes the dough to rise. Make sure to check the expiration date on your yeast for optimal results.
3. Warm Milk: The warmth of the milk plays a dual role; it activates the yeast and enriches the dough. The ideal temperature for warm milk is around 110°F (43°C)—too hot, and you’ll kill the yeast; too cold, and it won’t activate properly.
4. Sugar: Not only does sugar sweeten the dough, but it also provides food for the yeast, helping it to rise. Additionally, sugar contributes to the browning of the rolls during baking, giving them a beautiful golden hue.
5. Butter: Butter adds richness and flavor to the dough, while also helping to create a tender texture. For the best results, use unsalted butter so you can control the salt content in your recipe.
6. Eggs: Eggs are essential for binding the ingredients together and adding moisture. They also contribute to the overall richness and flavor of the rolls.
7. Salt: While salt is often used sparingly in baking, it plays an important role in enhancing the flavors of the other ingredients and regulating yeast activity.
Diving into the Filling Ingredients
Now that we’ve covered the dough, let’s move on to the filling that makes these cinnamon rolls truly irresistible.
1. Butter: Just like in the dough, butter is a key component in the filling. It helps to bind the other filling ingredients together and creates a luscious, gooey texture.
2. Brown Sugar: Brown sugar is preferred over white sugar in the filling for its deeper flavor profile. The molasses content in brown sugar adds a hint of caramel, enhancing the sweetness and richness of the filling.
3. Cinnamon: This warm spice is the star of the show in our filling. Its sweet and slightly spicy notes are what give cinnamon rolls their signature flavor. Be sure to use fresh ground cinnamon for the best taste.
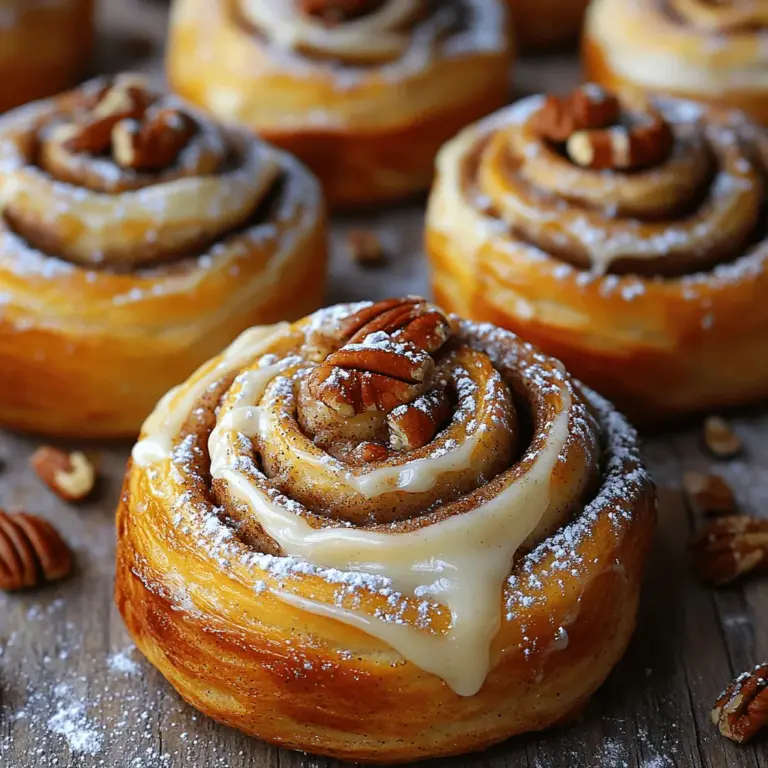
4. Optional Nuts: While not necessary, adding chopped nuts such as pecans or walnuts can provide a delightful crunch and additional flavor. If you choose to include nuts, be sure to chop them finely for even distribution throughout the filling.
Unpacking the Cream Cheese Icing
Finally, we arrive at the pièce de résistance—the cream cheese icing. This icing is what truly sets these cinnamon rolls apart, and here’s why:
1. Cream Cheese: The creamy, tangy flavor of cream cheese creates a perfect contrast to the sweetness of the rolls. Its unique texture ensures that the icing is spreadable yet thick enough to hold its shape.
2. Vanilla Extract: A splash of vanilla extract enhances the flavor of the icing, adding a warm, aromatic note that complements the sweet rolls beautifully.
3. Powdered Sugar: Powdered sugar, also known as confectioners’ sugar, is used to sweeten the icing while providing a smooth, velvety texture. It dissolves easily, resulting in a creamy consistency that spreads effortlessly over the rolls.
With a clear understanding of the ingredients that will come together to create these Heavenly Cream Cheese Cinnamon Rolls, we can now dive into the step-by-step instructions that will guide you through the baking process.
Step-by-Step Instructions
Activating the Yeast
Begin by activating the yeast, a crucial first step in making your cinnamon rolls. In a small bowl, combine 1/4 cup of warm milk (approximately 110°F or 43°C) with 1 packet of active dry yeast (about 2 1/4 teaspoons) and 1 tablespoon of sugar. Give the mixture a gentle stir to combine, then let it sit for about 5-10 minutes. During this time, the yeast will begin to bubble and foam, indicating that it’s alive and ready to work its magic in your dough.
Making the Dough
Once your yeast is activated, it’s time to make the dough. In a large mixing bowl, combine 4 cups of all-purpose flour, 1/4 cup of sugar, and 1 teaspoon of salt. Create a well in the center of the flour mixture, then add the activated yeast mixture, 1/2 cup of melted unsalted butter, 1 large egg, and the remaining warm milk.
Using a wooden spoon or dough whisk, mix the ingredients together until a shaggy dough forms. If the dough feels too sticky, you can gradually add more flour, one tablespoon at a time, until it reaches the desired consistency.
Next, transfer the dough to a lightly floured surface and knead for about 5-7 minutes. Kneading helps to develop the gluten, which is essential for achieving a fluffy, airy texture. The dough should be smooth and elastic when it’s ready.
First Rise
After kneading, place the dough in a lightly greased bowl and cover it with a clean kitchen towel or plastic wrap. Allow it to rise in a warm, draft-free area for about 1 to 1.5 hours, or until it has doubled in size. This first rise is crucial, as it allows the yeast to ferment and produce carbon dioxide, which gives the rolls their light and fluffy texture.
To create an ideal rising environment, consider placing the bowl in a slightly warm oven (turn it on for a minute or two and then turn it off) or near a warm stovetop.
Preparing the Filling
While the dough is rising, you can prepare the filling. In a small bowl, combine 1/2 cup of softened butter, 1 cup of brown sugar, and 2 tablespoons of ground cinnamon. Mix until you have a smooth paste. If you’re adding nuts, fold them into the mixture at this stage. The filling should be spreadable but not too runny—if it’s too soft, you can refrigerate it for a few minutes to firm it up.
Rolling Out the Dough
Once the dough has completed its first rise, punch it down gently to release any air bubbles. Turn the dough out onto a lightly floured surface and roll it into a rectangle, approximately 16×24 inches. Aim for an even thickness of about 1/4 inch.
As you roll out the dough, use a rolling pin and apply light pressure to prevent sticking. If you find that the dough is sticking to your work surface or rolling pin, sprinkle a little more flour as needed.
Shaping the Rolls
With the dough rolled out, spread the prepared filling evenly across the surface, leaving a small border around the edges. Starting from one long side, carefully roll the dough into a tight log, ensuring the filling stays inside. Once rolled, pinch the seam to seal the edge.
Using a sharp knife or dental floss, slice the log into 12 equal pieces. A serrated knife works well for this task, ensuring clean cuts without squishing the rolls. Place the cut rolls in a greased baking dish, ensuring they’re spaced evenly for optimal rising.
As we continue this baking journey, the anticipation builds. The next steps will see these rolls rise again before they are baked to golden perfection, topped with a luscious cream cheese icing that ties everything together. The process may require patience, but the reward of indulging in these heavenly cream cheese cinnamon rolls is well worth the effort. Stay tuned for the final steps that will lead you to your delicious destination!

Heavenly Cream Cheese Cinnamon Rolls
Second Rise
After shaping your cinnamon rolls, it’s time for the second rise, a crucial step that contributes to the lightness and fluffiness of the rolls. This rise allows the gluten structure to relax and expand further, letting the yeast do its magic. During this period, the dough ferments, developing complex flavors and a tender crumb.
For the second rise, cover the rolls with a clean kitchen towel or plastic wrap to keep the moisture in and prevent a crust from forming. Place them in a warm, draft-free environment; an ideal spot could be near your oven if it’s preheating or in a slightly warmed oven turned off. Allow the rolls to rise until they have doubled in size, which typically takes about 30 to 45 minutes. The dough should feel airy and light when gently pressed with a finger.
Baking the Rolls
Baking your heavenly cream cheese cinnamon rolls is where the magic truly happens. Preheat your oven to 350°F (175°C) and bake the rolls for 25 to 30 minutes. To know when they are perfectly baked, look for a golden brown top and an irresistible aroma filling your kitchen. The rolls should spring back lightly to the touch; if they feel too soft or doughy, they might need a few more minutes in the oven.
Keep an eye on them during the last few minutes of baking to prevent over-browning. If the tops are browning too quickly, lightly cover them with aluminum foil. Once baked, remove them from the oven and allow them to cool in the pan for about 10 minutes before icing. This resting step helps the rolls maintain their moisture while allowing the flavors to settle.
Preparing the Cream Cheese Icing
The cream cheese icing is what elevates these cinnamon rolls from delicious to divine. To make the icing, you will need softened cream cheese, unsalted butter, powdered sugar, vanilla extract, and a splash of milk.
1. In a mixing bowl, beat the cream cheese and butter together until creamy and smooth.
2. Gradually add the powdered sugar, mixing on low until combined. This prevents a cloud of sugar from forming.
3. Add the vanilla extract and milk, mixing until the icing reaches a thick yet pourable consistency. If it’s too thick, add a little more milk, one teaspoon at a time, until you achieve your desired texture. The icing should be spreadable but not runny.
Once your rolls are baked and slightly cooled, it’s time to generously slather the cream cheese icing over the top. The warmth of the rolls will gently melt the icing, allowing it to seep into the crevices and enhance every bite.
Icing and Serving
To maximize flavor and presentation, it’s essential to ice the rolls while they are still warm. This allows the icing to melt into the nooks and crannies of the rolls, creating a deliciously sweet and creamy experience. Use a spatula or a table knife to spread the icing evenly over the top of each roll, ensuring every piece gets its fair share of the rich cream cheese goodness.
For added flair, consider a sprinkle of cinnamon on top of the icing or a dusting of finely chopped nuts like pecans or walnuts. Not only do these toppings enhance the visual appeal, but they also add a delightful crunch that contrasts beautifully with the soft, gooey rolls.
Tips for Perfect Cinnamon Rolls
Achieving the ultimate cinnamon rolls requires some tips and tricks that can make all the difference:
Creating a Warm Environment for Rising
Dough rises best in a warm, draft-free area. If your kitchen is cool, consider preheating your oven to the lowest setting for a few minutes, then turning it off and placing your dough inside. Alternatively, you could use a proofing drawer, which maintains a consistent temperature perfect for yeast activity.
Kneading Techniques
Proper kneading is essential for developing gluten, which gives your rolls structure. Knead the dough for about 8 to 10 minutes until it becomes smooth and elastic. You can test if it’s ready by performing the “windowpane test”—take a small piece of dough and stretch it gently; if it forms a thin membrane without tearing, your dough is well-kneaded.
Using Quality Ingredients
The flavor of your cinnamon rolls is heavily influenced by the quality of your ingredients. Use high-quality unsalted butter for richness, fresh ground cinnamon for an aromatic flavor, and full-fat cream cheese for the icing. These simple choices can elevate your rolls from good to extraordinary.
Variations and Customizations
Once you master the basic heavenly cream cheese cinnamon roll recipe, don’t hesitate to experiment with variations:
Incorporating Different Fillings
While the traditional cinnamon and sugar filling is delightful, consider adding other ingredients to create unique flavor profiles. Diced apples or pears can add a fruity sweetness, while chocolate chips can bring a rich, indulgent touch. For a nutty flavor, incorporate finely chopped pecans or walnuts into the filling for added texture and crunch.
Experimenting with Icing Flavors
While the cream cheese icing is a classic choice, you can explore other flavors to complement your rolls. A maple-flavored icing can introduce a warm, cozy taste, while a chocolate ganache could satisfy any chocolate lover’s cravings. Simply replace the vanilla extract in the icing recipe with your flavor of choice for a fun twist.
Storing and Reheating Cinnamon Rolls
To keep your heavenly cream cheese cinnamon rolls fresh and delicious, proper storage is key:
Best Practices for Storage
If you have leftovers (though they are unlikely!), allow the rolls to cool completely before storing. Place them in an airtight container in the refrigerator for up to 5 days. For longer storage, you can freeze the rolls. Wrap each roll tightly in plastic wrap and then place them in a freezer-safe bag. They can be frozen for up to 3 months.
Reheating Techniques
To enjoy your cinnamon rolls warm again, you can use a microwave or an oven. For microwave reheating, place a roll on a microwave-safe plate and heat for 15 to 20 seconds. If using an oven, preheat it to 350°F (175°C), then wrap the rolls in aluminum foil and heat for about 10 to 15 minutes until warmed through. This method will help maintain their softness and prevent them from drying out.
Conclusion
Creating heavenly cream cheese cinnamon rolls from scratch is not just about the end product; it’s about the joy of baking and sharing delightful treats with family and friends. From the warm, sweet aroma wafting through your kitchen to the satisfaction of pulling a pan of golden rolls from the oven, this baking adventure brings comfort and happiness.
Cinnamon rolls are versatile enough to be enjoyed at breakfast, brunch, or as a sweet afternoon snack. With the possibilities for variations and adaptations, you can make these rolls your own while still enjoying the comforting, classic flavor. Embrace the baking process and treat yourself and your loved ones to these delicious homemade cinnamon rolls that are bound to be a hit every time.

