Introduction
Comfort food often evokes feelings of nostalgia, warmth, and satisfaction. It’s the kind of food that brings us back to our childhoods, reminding us of family gatherings and cozy evenings spent around the dinner table. One of the quintessential comfort foods is mac and cheese, with its creamy texture and rich flavors. But what if we could elevate this classic dish into something even more delightful? Enter Hatch Chili Mac and Cheese Bombs—an inventive twist on a beloved favorite.
These bite-sized treats combine the familiar, creamy goodness of traditional macaroni and cheese with the smoky, zesty kick of Hatch green chiles. Originating from the Hatch Valley in New Mexico, these chiles are renowned for their unique flavor, which adds a depth of taste that can transform ordinary dishes into extraordinary culinary experiences. Whether you’re hosting a party, gearing up for game day, or simply looking for a unique snack to impress your family and friends, these mac and cheese bombs are sure to steal the show.
In this article, we will guide you through the delightful journey of creating these irresistible bites. You will learn about the key ingredients that make up this dish, the preparation steps involved, and the techniques for shaping the bombs. Get ready to indulge in a comforting and flavorful treat that’s as fun to make as it is to eat.
Understanding the Ingredients
Before diving into the preparation process, it’s essential to understand the key ingredients that contribute to the unique flavor and texture of Hatch Chili Mac and Cheese Bombs. Each element plays a crucial role in creating the perfect balance of creaminess, spice, and crunch.
Elbow Macaroni
Elbow macaroni serves as the foundation of this dish, providing a familiar texture that perfectly complements the creamy cheese. The curved shape of elbow macaroni allows the cheese sauce to cling to each piece, ensuring that every bite is bursting with flavor. When cooked correctly, the pasta achieves an al dente texture, which is critical for maintaining its shape during the baking process.
Cheeses
The choice of cheese is paramount in crafting the ultimate mac and cheese experience. For this recipe, sharp cheddar and Monterey Jack are the stars. Sharp cheddar adds a bold, tangy flavor that contrasts beautifully with the creaminess of the Monterey Jack. Together, these cheeses create a luscious cheese sauce that envelops the macaroni, resulting in a rich and satisfying bite.
Hatch Green Chiles
What sets these mac and cheese bombs apart is the addition of Hatch green chiles. Known for their distinct flavor profile—a blend of mild and medium heat with a slightly sweet undertone—Hatch chiles elevate the dish with their smoky essence. Sourced from the Hatch Valley, these chiles are available fresh during the harvest season or can be found roasted and canned year-round. Their unique flavor not only enhances the mac and cheese but also adds a delightful kick that balances out the richness of the cheese.
Seasonings
To enhance the overall taste of the dish, a careful selection of seasonings is essential. Garlic powder and onion powder add depth and aroma, while smoked paprika introduces a subtle smokiness that complements the Hatch chiles. These seasonings work together to create a well-rounded flavor profile that is both comforting and exciting.
Panko Breadcrumbs
For that perfect crunch, we turn to panko breadcrumbs. Unlike regular breadcrumbs, panko is coarser and lighter, resulting in a crispier texture when baked. This added crunch provides a delightful contrast to the creamy interior of the mac and cheese bombs, making each bite even more enjoyable.
Eggs
Finally, eggs serve as the binding agent in this recipe. They help hold the mixture together, ensuring that the bombs maintain their shape during baking. This is particularly important when forming the bombs, as it allows for easy handling and shaping.
Preparation Process
With an understanding of the ingredients, it’s time to dive into the preparation process. Making Hatch Chili Mac and Cheese Bombs is a multi-step endeavor, but the results are well worth the effort.
Cooking the Macaroni
Start by cooking the elbow macaroni according to the package instructions. It’s crucial to achieve the perfect al dente texture—firm enough to hold its shape but soft enough to mix easily with the cheese sauce. Typically, this means cooking the pasta for about 7 to 8 minutes in boiling salted water. Once cooked, drain the macaroni and set it aside to cool slightly while you prepare the cheese sauce.
Making the Cheese Sauce
Next, it’s time to create the velvety cheese sauce that will coat the macaroni. In a medium saucepan over medium heat, melt 4 tablespoons of unsalted butter. Once melted, whisk in an equal amount of all-purpose flour to create a roux. Continue whisking for about 1-2 minutes until the mixture is golden and bubbly.
Gradually pour in 2 cups of milk while continuously whisking to prevent lumps from forming. Keep stirring until the mixture thickens and begins to bubble, which should take about 5-7 minutes. Once thickened, reduce the heat to low and stir in 2 cups of shredded sharp cheddar cheese and 1 cup of shredded Monterey Jack cheese. Continue stirring until the cheese is completely melted and the sauce is smooth. Season the cheese sauce with garlic powder, onion powder, smoked paprika, and salt to taste.
Incorporating the Chiles
When the cheese sauce is ready, it’s time to add the star ingredient—Hatch green chiles. If you’re using fresh chiles, roast them first for enhanced flavor, then chop them finely. If using canned chiles, drain them well and chop them if desired. Stir the chiles into the cheese sauce, ensuring they are evenly distributed. This step is crucial for achieving that signature flavor in every bite.
Cooling the Mixture
After incorporating the chiles, it’s important to let the mac and cheese mixture cool down before shaping the bombs. Allow the mixture to sit at room temperature for about 15-20 minutes, or transfer it to the refrigerator for a quicker cool-down. This step not only makes the mixture easier to handle but also helps it firm up, making it simpler to shape into bombs.
Shaping the Bombs
Once the mac and cheese mixture has cooled sufficiently, it’s time to shape the bombs. Using a cookie scoop or your hands, take a generous amount of the mixture and form it into a ball, about the size of a golf ball. Make sure to pack the mixture tightly, ensuring that it holds its shape when baked.
After shaping each ball, roll it in panko breadcrumbs to create a crispy coating. This step adds texture and flavor to the outside of the bombs, enhancing the overall eating experience. Place the coated bombs on a parchment-lined baking sheet, ensuring they are spaced evenly apart to allow for even cooking.
Stay tuned for the next part of our guide, where we’ll cover the baking process and some serving suggestions for these tasty Hatch Chili Mac and Cheese Bombs.
Portioning the Mixture
When preparing your Hatch Chili Mac and Cheese Bombs, proper portioning is key to achieving even cooking and delightful bites every time. Start by using a standard ice cream scoop or a tablespoon to measure out your mixture, ensuring consistency in size. Ideally, each bomb should be about 2-3 tablespoons of the mac and cheese mixture. This size allows them to cook thoroughly while maintaining a gooey, cheesy center.
After portioning, use your hands to shape each scoop into a ball. Make sure to compact the mixture slightly to avoid any gaps that could lead to a loss of filling during cooking. If the mixture feels too sticky, lightly moisten your hands with water or oil. This simple trick prevents the mixture from sticking to your palms and helps maintain the integrity of the bombs.
Using a Baking Sheet
Preparation is essential for a smooth cooking process. Line a baking sheet with parchment paper or a silicone baking mat before placing your shaped bombs on it. This preparation not only prevents sticking but also facilitates easier cleanup.
Make sure to space the bombs at least an inch apart to allow for even cooking and to prevent them from fusing together while frying. If you’re preparing a large batch, it’s wise to work in batches to maintain the quality and temperature of your cooking oil.
Breading and Frying
Setting Up the Breading Station
Creating an efficient breading station is crucial for ensuring that your Hatch Chili Mac and Cheese Bombs are perfectly coated. You’ll need three shallow bowls: one for seasoned flour, one for beaten eggs, and one for breadcrumbs.
1. Flour Bowl: In the first bowl, combine all-purpose flour with a pinch of salt, pepper, and any additional seasonings you prefer, such as garlic powder or paprika. This will enhance the overall flavor of the bombs.
2. Egg Bowl: In the second bowl, beat a couple of eggs until they are well mixed. If you’re looking for a vegan alternative, substitute with a mixture of ground flaxseed and water or aquafaba.
3. Breadcrumb Bowl: In the final bowl, add plain or seasoned breadcrumbs. For a crunchier texture, consider using panko breadcrumbs.
Organizing your setup in this manner streamlines the breading process, allowing you to coat the bombs quickly and efficiently.
Breading Techniques
To achieve an even coating, follow these steps:
1. Dredge in Flour: Start by taking a mac and cheese bomb and gently rolling it in the seasoned flour. Make sure it is fully coated, shaking off any excess.
2. Dip in Egg: Next, dip the floured bomb into the beaten eggs, ensuring that it is evenly covered. This step is crucial as it acts as the adhesive for the breadcrumbs.
3. Coat with Breadcrumbs: Finally, roll the bomb in the breadcrumbs, pressing gently to ensure an even coating. Make sure every side is covered to achieve that perfect crunch once fried.
Repeat this process for all bombs, and be sure to work efficiently to maintain the integrity of your breading station.
Frying Safety and Techniques
Frying can be intimidating, but with the right precautions and techniques, you can achieve crispy perfection. Use a deep skillet or a Dutch oven and fill it with enough oil to submerge the bombs halfway. Heat the oil to 350°F (175°C). A kitchen thermometer is invaluable here, as maintaining the right temperature is essential for achieving a crispy exterior without overcooking the filling.
Safety Tips:
– Always use long tongs or a slotted spoon to lower the bombs into the oil. This minimizes splatter and keeps your hands at a safe distance from hot oil.
– Fry in small batches to avoid overcrowding the pan, which can lower the oil temperature and result in soggy bombs.
– Keep a lid nearby to cover the pot in case of any oil splatter.
Achieving the Perfect Crisp
The key indicators that your Hatch Chili Mac and Cheese Bombs are perfectly fried are their golden-brown color and the bubbling of oil around them. Typically, frying takes about 3-4 minutes per batch. Use a slotted spoon to remove the bombs and place them on a paper towel-lined plate to drain excess oil. This step is crucial for maintaining the crisp texture.
Serving Suggestions
Your Hatch Chili Mac and Cheese Bombs are ready to impress not only in flavor but also in presentation. Here are some creative ideas to serve and enjoy them:
Dipping Sauces
Pair your bombs with a variety of dipping sauces to enhance their flavor. Here are a few delicious options:
– Ranch Dressing: A classic pairing that complements the cheesy goodness.
– Spicy Aioli: For those who enjoy a kick, a spicy aioli made with garlic, mayonnaise, and sriracha will elevate your bombs.
– Chipotle Yogurt Sauce: Mix Greek yogurt with chipotle in adobo for a creamy, smoky option.
Presentation Ideas
To create an eye-catching display, consider the following plating suggestions:
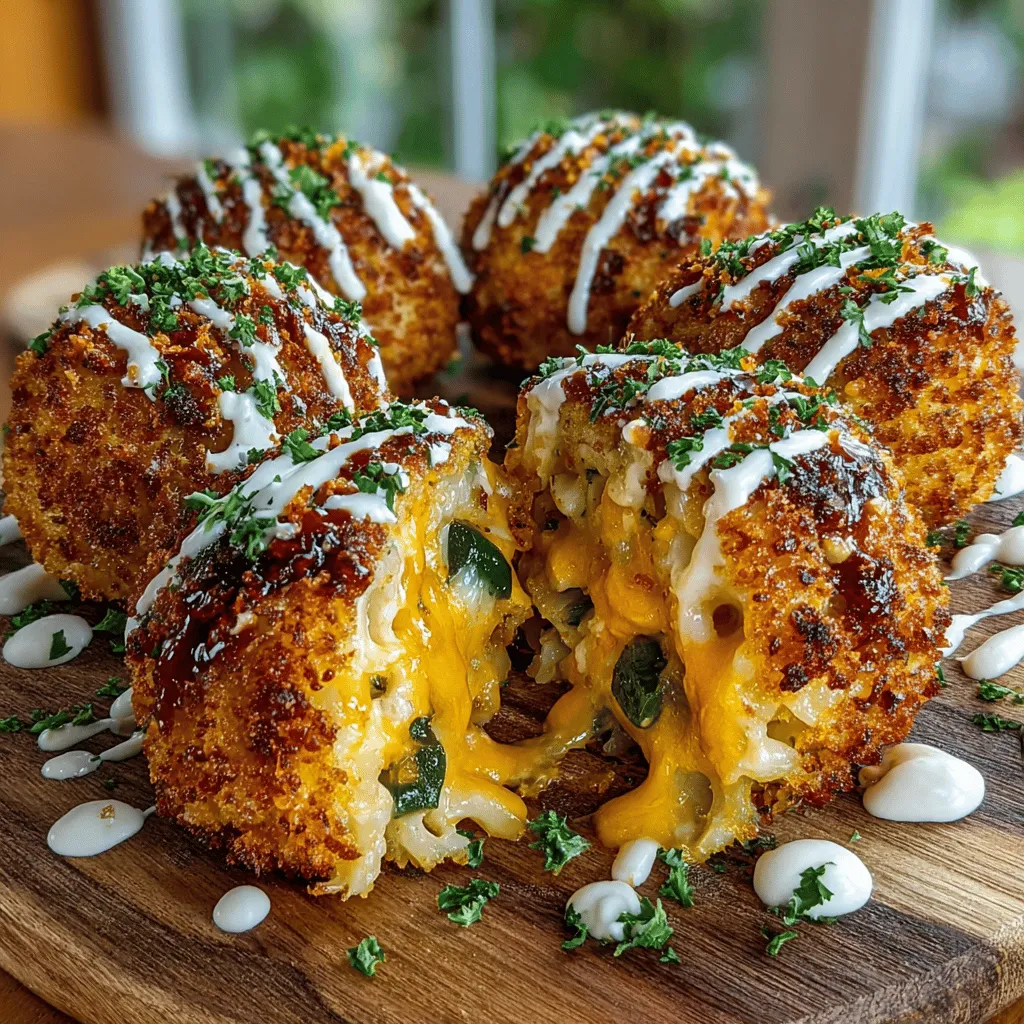
– Serving on a Wooden Board: Arrange the bombs on a rustic wooden board, garnished with fresh herbs for an inviting look.
– In a Basket: Serve the bombs in a small basket lined with parchment paper for a casual dining experience, perfect for game nights.
– Garnish with Fresh Ingredients: Consider garnishing your plate with sliced jalapeños, fresh cilantro, or a sprinkle of cheese to enhance the visual appeal.
Nutritional Information
Understanding the nutritional aspect of your Hatch Chili Mac and Cheese Bombs can help you make informed choices.
Caloric Breakdown
Each serving of these bombs contains approximately 200-250 calories, depending on the size and ingredients used. This makes them a satisfying snack that can be enjoyed in moderation.
Nutritional Benefits
These bombs offer a balanced mix of protein, carbohydrates, and healthy fats, thanks to the combination of cheese, pasta, and the frying process. While they are indulgent, incorporating ingredients like Hatch chiles adds a unique flavor profile and potential health benefits, such as improved metabolism and enhanced nutrient absorption.
Customization Options
If you or your guests have dietary restrictions, here are some customization options to consider:
– Gluten-Free: Substitute regular flour and breadcrumbs with gluten-free alternatives like almond flour and gluten-free breadcrumbs.
– Vegan: Use dairy-free cheese and replace eggs with flaxseed meal or aquafaba for binding.
– Low-Carb: Opt for cauliflower mac and cheese instead of pasta for a lower-carb option.
Conclusion
Hatch Chili Mac and Cheese Bombs are a delightful fusion of comfort food and innovation, perfect for any occasion. Their creamy interior and crispy exterior promise to satisfy cravings and impress guests alike. Whether enjoyed as a snack, appetizer, or part of a meal, these flavorful bites are sure to become a favorite in your culinary repertoire. Embrace the joy of cooking with this recipe, and indulge in the deliciousness that is Hatch Chili Mac and Cheese Bombs. The next time you’re hosting a gathering or simply craving a comforting treat, these bombs will be a hit on the table. Enjoy every cheesy, spicy bite!