Introduction
Cinnamon Roll Bliss Bars are a delightful twist on the classic cinnamon roll, seamlessly blending the beloved flavors of cinnamon, sugar, and buttery goodness into a convenient bar format. For both casual bakers and seasoned chefs, these bliss bars represent the perfect balance between indulgence and simplicity. Imagine the comforting aroma of cinnamon wafting through your kitchen as you prepare these treats—it’s enough to make anyone’s mouth water.
In this article, we will delve into the comprehensive recipe for Cinnamon Roll Bliss Bars, outlining every step you need for success. Additionally, we will explore some creative variations to tailor the bars to your personal taste and provide serving suggestions that will elevate your dessert game. Whether you’re hosting a brunch, planning a family gathering, or simply treating yourself to something sweet at home, these bars are an ideal choice.
Understanding Cinnamon Roll Bliss Bars
The traditional cinnamon roll has a rich history, stemming from various cultures that have embraced sweet, spiced baked goods. Originating in Sweden as the “kanelbullar,” cinnamon rolls have become a beloved breakfast and dessert item worldwide. Their warmth and sweetness evoke feelings of comfort and nostalgia, making them a popular choice for many occasions.
Cinnamon Roll Bliss Bars take this classic concept and reinterpret it in a way that’s both modern and accessible. While traditional cinnamon rolls can be labor-intensive, requiring dough preparation and careful rolling, these bars simplify the process without sacrificing flavor. By combining all the essential ingredients into a single batter, you can achieve that same delightful taste with minimal fuss.
These bars are incredibly versatile, making them suitable for various occasions. They shine at brunches, where guests appreciate a sweet treat alongside their coffee. They are perfect for family gatherings, serving as an easy-to-share dessert that pleases both kids and adults alike. Moreover, they can provide a cozy evening snack, paired with a cup of tea or hot chocolate while you unwind after a long day.
Ingredients Breakdown
Before diving into the recipe, let’s take a closer look at the essential ingredients that contribute to the rich flavor and texture of Cinnamon Roll Bliss Bars. Understanding the role of each component not only enhances your baking skills but also gives you insights for possible substitutions or variations.
– All-Purpose Flour: This is the foundational ingredient that provides structure and stability to the bars. It helps create a tender crumb, ensuring that each bite of the bliss bars is soft and satisfying.
– Rolled Oats: Adding rolled oats introduces a hearty texture and boosts the nutritional profile of the bars. Oats are also a great source of fiber, making these treats a bit more wholesome.
– Brown and Granulated Sugar: Both sugars play a crucial role in balancing sweetness and flavor. Brown sugar adds moisture and a hint of caramel flavor, while granulated sugar contributes to the overall sweetness of the bars.
– Unsalted Butter: This ingredient is vital for imparting richness and moisture. The fat from the butter helps to create a tender texture and enhances the overall flavor of the bars.
– Baking Soda and Baking Powder: These leavening agents ensure that the bars rise properly during baking, resulting in a light and fluffy texture.
– Ground Cinnamon: The star flavor of the bars, ground cinnamon, infuses the batter with its warm and aromatic qualities, making it synonymous with the experience of cinnamon rolls.
– Milk and Egg: These wet ingredients serve as binding agents that provide moisture and richness to the batter, helping to create a cohesive mixture.
– Pure Vanilla Extract: A key flavor enhancer, vanilla extract rounds out the sweetness and adds depth to the overall flavor profile.
– Cream Cheese: Used for the luscious frosting, cream cheese adds a tangy contrast to the sweetness of the bars, making each bite even more delightful.
– Powdered Sugar: This ingredient is crucial for sweetening and thickening the cream cheese drizzle, creating a beautiful and indulgent topping.
– Optional Nuts: Chopped nuts can be added for an extra layer of texture and flavor. Walnuts or pecans are excellent choices that complement the cinnamon and sweetness of the bars.
Step-by-Step Recipe Instructions
Now that you have a clear understanding of the ingredients, let’s move on to the step-by-step instructions for preparing Cinnamon Roll Bliss Bars. Each step is designed to ensure a smooth baking process and a delicious final product.
1. Prepping the Baking Pan: Start by preparing your baking pan. You can use an 8×8 inch or a 9×9 inch pan, depending on how thick you want your bars to be. Grease the pan with cooking spray or butter, or line it with parchment paper for easy removal after baking. If using parchment paper, leave some overhang to make lifting the bars out easier.
2. Mixing the Dry Ingredients: In a large mixing bowl, combine the all-purpose flour, rolled oats, baking soda, baking powder, ground cinnamon, and a pinch of salt. Whisk these dry ingredients together until evenly distributed. This step is crucial for ensuring that the leavening agents and spices are well blended, leading to uniform rising and flavor throughout the bars.
3. Combining Wet Ingredients: In another bowl, melt the unsalted butter and let it cool slightly. Then, add the brown sugar and granulated sugar to the melted butter, whisking until well combined. Next, add the egg, milk, and pure vanilla extract, mixing until you achieve a smooth and creamy consistency. It’s essential to mix these wet ingredients thoroughly, as they will help bind everything together.
4. Mixing the Batter: Gradually add the dry ingredients to the wet mixture, stirring gently with a spatula or wooden spoon. Be careful not to overmix; you want the batter to be just combined. Overmixing can lead to dense bars, so stop mixing as soon as you no longer see dry flour. If desired, fold in any optional chopped nuts at this stage for added texture.
5. Preparing for Baking: Once your batter is ready, pour it into the prepared baking pan, spreading it evenly with a spatula. Make sure to smooth the top for an even bake.
With these initial steps completed, you’re well on your way to creating a batch of delectable Cinnamon Roll Bliss Bars. Keep an eye out for the next part of this article, where we’ll delve into the baking process, frosting details, and creative serving suggestions!
Spreading the Batter: Techniques for an Even Layer
Achieving a perfectly even layer when spreading the batter for your Cinnamon Roll Bliss Bars is key to ensuring that every bite is delicious and equally enjoyable. Start by preparing your baking dish, typically a 9×13 inch pan, by greasing it lightly with butter or non-stick cooking spray. This will help prevent sticking and make it easier to remove the bars once they are baked.
When it comes to pouring the batter into the pan, use a spatula to scoop out the mixture and start from the center, gently nudging the batter outward towards the edges. This method helps to keep the batter evenly distributed. If you find the batter is thick and hard to spread, you can lightly dampen your spatula with some water or oil to assist in smoothing it out. Take your time to ensure that the batter reaches all four corners of the pan for a consistent bake.
Creating the Cream Cheese Drizzle: Achieving the Perfect Consistency
The cream cheese drizzle is what elevates your Cinnamon Roll Bliss Bars from good to great. To create this luscious topping, you’ll need softened cream cheese, powdered sugar, milk, and a splash of vanilla extract. Start by beating the softened cream cheese until it’s smooth and creamy, which helps avoid any lumps in your drizzle.
Gradually add in the powdered sugar, mixing until well combined. Then, slowly pour in the milk while continuing to mix. This step is crucial—the goal is to achieve a drizzle that’s not too runny but also not overly thick. If your drizzle seems too thick, add a bit more milk, a teaspoon at a time, until you reach your desired consistency. A well-prepared drizzle should flow smoothly off the spatula, allowing you to create beautiful patterns on top of your warm bars.
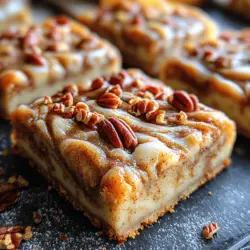
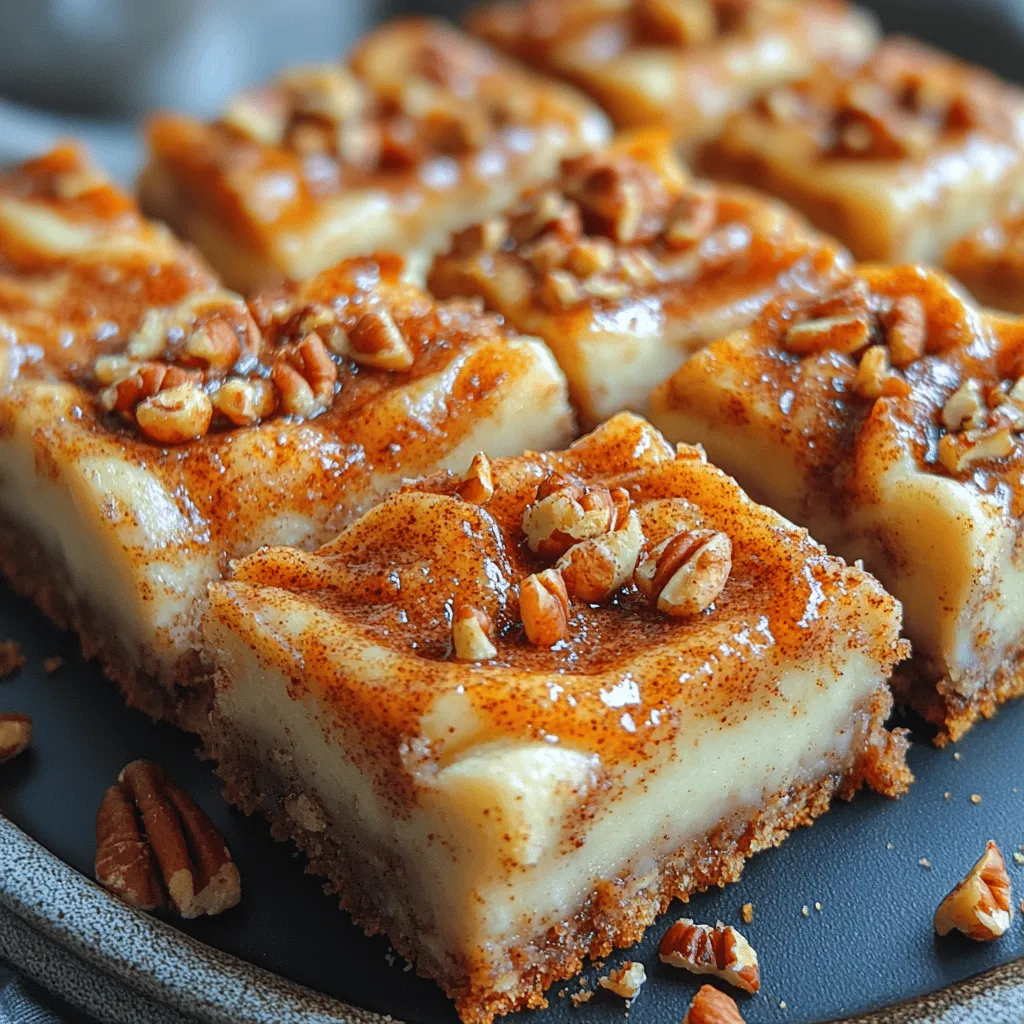
Swirling Technique: How to Create a Marbled Effect
The swirling technique is integral to the aesthetic appeal of the Cinnamon Roll Bliss Bars. To create that signature marbled effect, you can use a knife or a skewer. Begin by dolloping your cream cheese drizzle across the top of the batter in the pan. Use small spoonfuls, spacing them out evenly.
Once you’ve added the drizzle, take a knife or skewer and gently swirl it through the batter and drizzle. Be careful not to over-mix; you want to create a beautiful marbled effect that showcases both the batter and the cream cheese drizzle. This technique not only enhances the visual appeal of your bars but also ensures that the flavors intermingle beautifully during baking.
Optional Toppings: Discussing the Addition of Nuts for Enhanced Flavor
While the cream cheese drizzle is a delightful addition, considering optional toppings can further enhance the flavor of your Cinnamon Roll Bliss Bars. Chopped nuts, such as pecans or walnuts, can add a delightful crunch and a nutty flavor that complements the soft and gooey texture of the bars. To incorporate nuts, simply sprinkle them over the top of the cream cheese drizzle before baking.
If you’re feeling adventurous, you might even consider adding a sprinkle of cinnamon or a dash of nutmeg to the nuts for an extra layer of warmth and flavor. The combination of creamy, sweet, and crunchy is sure to elevate your dessert experience.
Baking Process
Preheating the Oven: Importance of Temperature
Before you place your prepared Cinnamon Roll Bliss Bars into the oven, preheating is essential. Set your oven to 350 degrees Fahrenheit (175 degrees Celsius) and allow it to reach the desired temperature before baking. Preheating ensures that your bars cook evenly and rise properly, preventing them from becoming dense or soggy.
Baking Time: What to Look For
The baking time for your Cinnamon Roll Bliss Bars typically ranges from 25 to 30 minutes. However, every oven is different, so it’s crucial to keep an eye on them as they bake. Look for golden edges and a firm center; the bars should spring back slightly when touched. To double-check that they are fully baked, perform the toothpick test: insert a toothpick into the center of the bars. If it comes out clean or with a few moist crumbs, your bars are ready to come out of the oven.
Cooling Instructions: Why Cooling is Important for Texture
Once you’ve taken your bars out of the oven, it’s important to let them cool in the pan on a wire rack for about 10-15 minutes. This cooling period allows the structure to set, ensuring that the bars hold together well when cut. If you cut into them too soon, they may crumble and lose their shape. After they’ve cooled slightly, you can transfer them to the wire rack to cool completely. This step is essential for achieving that perfect texture that is soft, yet sturdy.
Serving Suggestions
Enjoying Warm vs. Room Temperature
Cinnamon Roll Bliss Bars can be enjoyed both warm and at room temperature, each offering a different experience. When served warm, the cream cheese drizzle is gooey and melts into the soft bars, creating an indulgent treat that feels comforting and fresh out of the oven. On the other hand, room temperature bars allow the flavors to meld together more fully, offering a slightly firmer texture that still retains its moistness. Both options are delicious, so it ultimately comes down to personal preference.
Additional Drizzle: How to Enhance with Extra Cream Cheese Frosting
For those who can never have enough frosting, consider drizzling extra cream cheese frosting over the top of your bars right before serving. This not only enhances the visual appeal but also intensifies the flavor. You can prepare a simple frosting by mixing together more cream cheese, powdered sugar, and a splash of vanilla extract, adjusting the consistency with milk as needed. A generous drizzle of this frosting right before serving will take your bars to the next level.
Pairing Options: Beverages or Sides to Complement the Bars
To create a complete dessert experience, consider pairing your Cinnamon Roll Bliss Bars with a side beverage. A warm cup of coffee or tea complements the sweetness of the bars beautifully. Alternatively, for a refreshing contrast, serve them alongside a chilled glass of milk or a creamy vanilla latte. These pairings enhance the overall experience, making it even more enjoyable.
Nutritional Information
Per serving, a piece of Cinnamon Roll Bliss Bars contains approximately 250 calories, with around 12 grams of sugar and 4 grams of protein. This can vary slightly based on your specific ingredient choices and portion sizes. If you’re looking for dietary substitutions, consider using gluten-free flour for a gluten-free option, or substitute the cream cheese with a dairy-free alternative for a vegan-friendly version. These adjustments can allow everyone to enjoy this delightful treat without compromising on flavor.
Storing and Freezing
Room Temperature Storage: Duration and Conditions
To maintain the freshness of your Cinnamon Roll Bliss Bars, they can be stored at room temperature for up to three days. Make sure to store them in an airtight container to prevent them from drying out. If you live in a particularly humid climate, refrigeration may be a better option to prolong their freshness.
Refrigeration Tips: When to Refrigerate
If you choose to refrigerate your Cinnamon Roll Bliss Bars, they will last for up to a week. Be sure to wrap them tightly in plastic wrap or store them in an airtight container to prevent them from absorbing odors from other foods in the fridge. When ready to enjoy, simply allow them to come to room temperature or warm them slightly in the microwave for a few seconds.
Freezing Instructions: How to Freeze for Long-Term Storage
For long-term storage, freezing is an excellent option. To freeze your Cinnamon Roll Bliss Bars, first, allow them to cool completely. Once cooled, cut them into squares and individually wrap each piece in plastic wrap. Then, place the wrapped bars in a freezer-safe container or bag. They can be frozen for up to three months. When you’re ready to indulge, simply thaw them in the refrigerator overnight or on the counter for a few hours.
Conclusion
Baking Cinnamon Roll Bliss Bars is a joyous experience that brings the comforting flavors of traditional cinnamon rolls into a convenient bar form. With their soft texture, sweet cream cheese drizzle, and optional crunchy toppings, these bars are a perfect answer to any sweet craving. The recipe is straightforward, making it accessible for both novice bakers and seasoned pros alike.
Encourage friends and family to join you in the kitchen, sharing the love of baking and the delightful aroma that fills your home. These blissful treats are sure to become a favorite, offering an easy and satisfying alternative to classic cinnamon rolls. So grab your ingredients, preheat your oven, and get ready to create a batch of Cinnamon Roll Bliss Bars that will leave everyone asking for seconds.
Final Thoughts
There’s something special about enjoying home-baked goods, especially when sharing them with loved ones. The satisfaction that comes from preparing and serving treats like Cinnamon Roll Bliss Bars is unmatched. Whether for breakfast, dessert, or a sweet snack, these bars are a delightful way to treat yourself and those you care about. So roll up your sleeves and start baking—your taste buds will thank you!