Introduction
In today’s fast-paced world, where time is often a luxury, the appeal of no-bake desserts has skyrocketed. These delectable treats offer the convenience of quick preparation without the need for an oven, making them a favorite among busy individuals and families alike. Among the myriad of no-bake options available, Choco-Peanut Paradise Bars stand out with their irresistible combination of rich chocolate and creamy peanut butter. These bars are not only a delightful snack but also a versatile dessert suitable for various occasions, from casual gatherings to special celebrations.
Choco-Peanut Paradise Bars are more than just a sweet indulgence; they are crafted with nutritious ingredients that provide health benefits while satisfying your sweet tooth. With rolled oats, nuts, and the power of peanut butter, these bars deliver a wholesome energy boost that makes them a great choice for a midday snack or a post-workout treat. This recipe embodies the perfect balance between indulgence and nutrition, allowing you to enjoy a guilt-free dessert that fuels your body.
The Allure of No-Bake Desserts
No-bake desserts have gained immense popularity across various cuisines and cultures. From cheesecake and mousse to energy balls and bars, the range of no-bake recipes is vast, catering to diverse taste preferences and dietary needs. One of the primary reasons for their widespread appeal is the ease of preparation. With no baking time required, even novice cooks can whip up these treats in a matter of minutes. This convenience allows for spontaneous dessert-making, whether you’re craving a late-night snack or need to whip something up for a last-minute gathering.
The versatility of no-bake recipes is another factor contributing to their charm. Cooks can experiment with flavors, textures, and ingredients, tailoring each dessert to their liking. Whether you prefer a nutty flavor, a fruity twist, or a decadent chocolate indulgence, no-bake desserts can be easily modified to suit your tastes. This creative freedom encourages culinary exploration, making the process of preparing no-bake treats as enjoyable as indulging in them.
Ingredients Breakdown
The Choco-Peanut Paradise Bars are composed of a handful of simple yet nourishing ingredients that come together to create a delightful treat. Here’s a closer look at each component and its contribution to the bars:
– Creamy Peanut Butter: The star of this recipe, creamy peanut butter not only provides a rich, velvety texture but also packs a nutritional punch. It’s a great source of protein and healthy fats, which help to keep you feeling full and satisfied. Additionally, peanut butter contains essential vitamins and minerals, including vitamin E, magnesium, and potassium, making it a wholesome addition to these bars.
– Honey or Maple Syrup: Sweeteners like honey and maple syrup add a natural sweetness that complements the chocolate and peanut butter. Honey is known for its antibacterial properties and can provide a quick energy boost, while maple syrup is a lower-glycemic option that contains antioxidants. Both options bring unique flavor profiles to the bars, allowing you to choose based on your personal preference.
– Rolled Oats: Rolled oats serve as the base for the bars, providing a hearty texture and a good source of dietary fiber. This fiber not only aids in digestion but also helps maintain steady energy levels, making these bars a great snack for busy days. Oats are also a rich source of complex carbohydrates, which are essential for sustained energy.
– Unsweetened Cocoa Powder: To achieve that deep chocolate flavor, unsweetened cocoa powder is an essential ingredient. Beyond its rich taste, cocoa powder is loaded with antioxidants, particularly flavonoids, which can help improve heart health and reduce inflammation. This ingredient elevates the bars, making them not only delicious but also beneficial for your health.
– Chocolate Chips: Adding a touch of indulgence, chocolate chips (dark or semi-sweet) can be sprinkled throughout the mixture. Dark chocolate is known for its health benefits, including improved brain function and heart health, while semi-sweet chocolate provides a sweeter flavor. The choice between the two can be based on your taste preference and dietary needs.
– Crushed Walnuts or Almonds: While optional, adding crushed walnuts or almonds introduces a delightful crunch and extra nutritional benefits. Nuts are rich in healthy fats, protein, and fiber, which contribute to satiety and overall health. They also provide essential nutrients, including vitamin E and magnesium, making them a valuable addition to these bars.
– Vanilla Extract and Salt: A dash of vanilla extract enhances the overall flavor profile of the bars, adding warmth and depth to the sweetness. A pinch of salt balances the flavors, elevating the taste experience and making the chocolate and peanut butter flavors pop.
Step-by-Step Instructions
Creating Choco-Peanut Paradise Bars is a straightforward process that requires minimal effort and time. Follow these step-by-step instructions to ensure your bars turn out perfectly:
1. Lining the Pan: Begin by preparing your baking dish. Line an 8×8-inch square pan with parchment paper, allowing some overhang on the sides. This step is crucial for easy removal of the bars once they have set. The parchment paper prevents sticking and helps maintain the bars’ shape.
2. Mixing Wet Ingredients: In a mixing bowl, combine the creamy peanut butter and your chosen sweetener—honey or maple syrup. Stir these wet ingredients together until they are smooth and well incorporated. This step is vital, as a smooth mixture ensures that the flavors meld beautifully throughout the bars. Make sure to scrape the sides of the bowl to capture all of the peanut butter and sweetener for an even distribution.
3. Incorporating Dry Ingredients: Once your wet mixture is ready, add the rolled oats, unsweetened cocoa powder, and a pinch of salt. Mix everything together until the dry ingredients are fully coated with the wet mixture. The consistency should be thick and sticky, making it easy to press into the prepared pan.
4. Adding Chocolate Chips and Nuts: If you’re including chocolate chips and crushed nuts, fold them into the mixture at this stage. This step adds texture and bursts of flavor to your bars, enhancing the overall experience. Ensure the chocolate chips are evenly distributed throughout the mixture.
5. Pressing into the Pan: Transfer the mixture into the lined pan. Using a spatula or your hands, press the mixture firmly into an even layer. It’s important to compress the mixture well to prevent the bars from crumbling apart once set.
These initial steps set the foundation for your Choco-Peanut Paradise Bars, creating a deliciously satisfying treat that balances health and indulgence. As you continue with the recipe, you’ll soon discover how easy and rewarding it is to enjoy homemade no-bake desserts. Stay tuned for the continuation of this recipe, where we’ll explore the final steps to bring your Choco-Peanut Paradise Bars to life!
Combining Dry Ingredients
To create the perfect base for your Choco-Peanut Paradise Bars, start by combining your dry ingredients. This step is crucial for ensuring an even distribution of flavors and textures throughout the bars. In a large mixing bowl, whisk together rolled oats, cocoa powder, and a pinch of salt.
Whisking is not just about blending; it’s about aerating the mixture. Cocoa powder, in particular, can clump together, so a thorough whisking helps break up those clumps and ensures that every bite of your bars has a balanced chocolate flavor. The oats provide a hearty texture and contribute to the nutritional profile of the bars, making them both filling and satisfying.
Combining Mixtures
Once your dry ingredients are well mixed, it’s time to combine them with the wet ingredients. In a separate bowl, mix together the creamy peanut butter, honey (or maple syrup), and vanilla extract until smooth. The consistency should be thick but pourable, almost like a batter.
Next, pour the wet mixture into the bowl of dry ingredients. Use a spatula or a wooden spoon to mix thoroughly until all the dry ingredients are coated. This step is crucial; a well-combined mixture will yield bars that hold together beautifully without crumbling apart. Be patient and ensure there are no dry pockets left behind, as this can affect the overall texture of the final product.
Adding Chocolate Chips
Now, it’s time to incorporate the chocolate chips. Gently fold them into the mixture, being careful not to overmix. Folding is a technique that allows you to combine ingredients without deflating the mixture. By using a spatula, scoop from the bottom of the bowl and lift the mixture over the top. This technique maintains the integrity of the chocolate chips and ensures they remain intact, giving you delightful bursts of chocolate in every bite.
Pressing into the Pan
With your mixture ready, it’s time to transfer it to the prepared pan. Use a spatula or your damp hands to press the mixture firmly into an even layer in the pan. Damp hands can prevent sticking and help achieve a smooth surface. Press down firmly to ensure that the bars will hold together well once they set.
For an even distribution, start by spreading the mixture out in the pan, then use the palms of your hands to press it down with even pressure. The goal is to create a firm, compact layer that will slice easily once chilled.
Chilling
Chilling is a vital step in the preparation of your Choco-Peanut Paradise Bars. Place the pressed mixture in the refrigerator for at least 2 hours, or until firm. This cooling period allows the bars to set properly, making them easier to cut into squares or rectangles without falling apart.
Refrigeration helps the coconut oil and peanut butter firm up, which not only enhances the texture but also intensifies the flavors. If you prefer a softer bar, you can chill them for a shorter period, but keep in mind that a firmer bar will hold its shape better.
Cutting and Serving
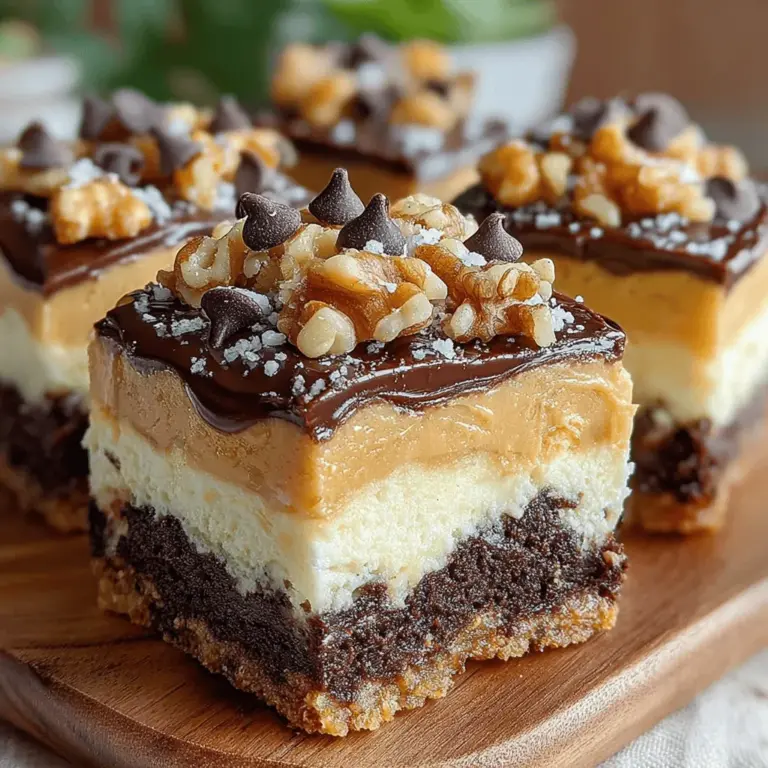
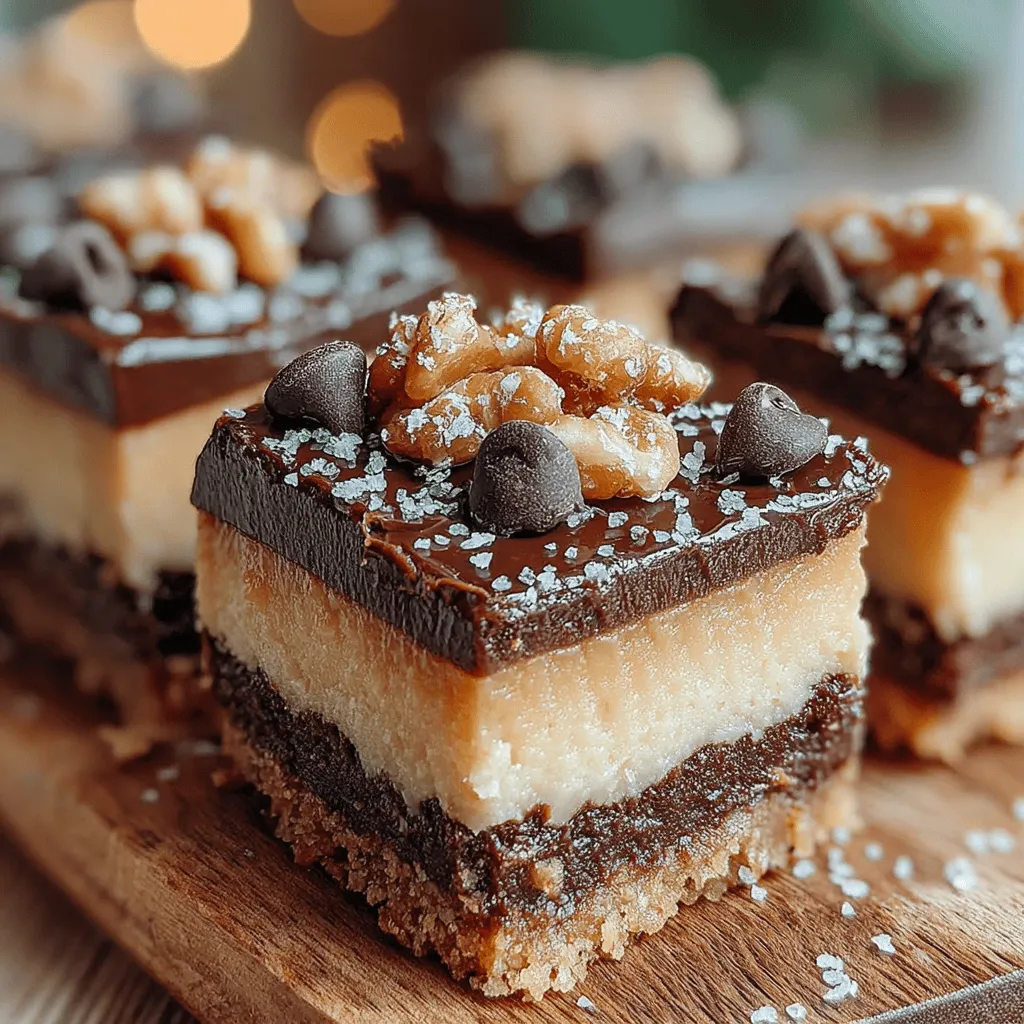
Once your bars have set, it’s time to cut and serve! Using a sharp knife, slice the chilled mixture into your desired portion sizes. For a standard serving, aim for squares about 2 inches in size, but feel free to adjust according to your preference.
For a beautiful presentation, consider arranging the bars on a platter and dusting them lightly with cocoa powder or drizzling them with melted chocolate. You can also garnish with crushed nuts or a sprinkle of sea salt for an added touch. These bars are perfect for serving at gatherings, as a snack for kids, or even as a post-workout treat.
Nutritional Benefits
Choco-Peanut Paradise Bars not only satisfy your sweet tooth, but they also pack a nutritional punch. Let’s take a look at the health benefits of some key ingredients:
– Peanut Butter: A rich source of protein and healthy fats, peanut butter can help keep you feeling full and satisfied. It contributes to muscle building and provides essential nutrients like vitamin E, magnesium, and potassium.
– Oats: These whole grains are excellent for digestive health, thanks to their high fiber content. Oats release energy slowly, making them a great source of sustained energy that can help power you through the day.
– Cocoa Powder: Rich in antioxidants, cocoa powder can help reduce inflammation and improve heart health. Its lower sugar content compared to traditional chocolate desserts makes it a healthier choice for chocolate lovers.
In moderation, these bars can be a guilt-free indulgence, allowing you to enjoy a sweet treat while still being mindful of your nutritional intake.
Storage and Shelf Life
To keep your Choco-Peanut Paradise Bars fresh and delicious, proper storage practices are essential. Here are some tips to maintain their quality:
– Room Temperature: If you plan to consume the bars within a week, you can store them in an airtight container at room temperature. However, keep them in a cool, dry place away from direct sunlight to prevent them from becoming too soft.
– Refrigeration: For longer-lasting freshness, store the bars in the refrigerator. They can last up to two weeks when properly sealed in an airtight container. Refrigeration not only keeps them fresh but also maintains their firm texture.
– Freezing: If you want to prepare these bars in advance, freezing is an excellent option. Cut them into portions and wrap each piece in plastic wrap or place them in an airtight freezer bag. They can be stored in the freezer for up to three months. When you’re ready to enjoy them, simply thaw at room temperature for a few hours.
Conclusion
Making and enjoying Choco-Peanut Paradise Bars is a delightful experience that combines the joy of cooking with the satisfaction of indulging in a nutritious treat. This no-bake recipe allows you to create a quick, satisfying snack that is suitable for various occasions, whether you’re hosting a gathering, looking for a healthy dessert option, or simply craving something sweet.
With the added benefits of protein, healthy fats, and fiber, these bars are not just a treat—they’re a well-rounded snack that can fit into a balanced diet. We encourage you to try this recipe and explore the joy of creating your own variations by adding different nuts, seeds, or dried fruits.
Embrace the flavors of Choco-Peanut Paradise Bars and enjoy the process of making them as much as the delightful taste that follows. Happy cooking!

