Decadent Bliss: Guilt-Free Chocolate Peanut Fudge

WANT TO SAVE THIS RECIPE?

Decadent Bliss: Guilt-Free Chocolate Peanut Fudge

Introduction

In recent years, the culinary world has witnessed a remarkable shift towards healthier eating habits, with a significant rise in the popularity of guilt-free desserts. More and more individuals are seeking ways to indulge their sweet cravings without compromising their health goals. This trend is not just a fleeting fad; it reflects a growing awareness of nutrition and the desire for treats that can satisfy the palate while being mindful of dietary choices.

Enter the Decadent Bliss Chocolate Peanut Fudge, a delicious alternative that caters to health-conscious dessert enthusiasts. This recipe offers a rich and creamy fudge experience that harmoniously balances the irresistible flavors of chocolate and peanut butter. The combination of these two ingredients is a classic favorite among dessert lovers, known for its ability to evoke feelings of comfort and nostalgia. With the Decadent Bliss Chocolate Peanut Fudge, you can savor this beloved combination without the guilt typically associated with traditional fudge recipes.

What sets this fudge apart is its commitment to wholesome ingredients that are both nourishing and satisfying. Made with natural sweeteners and healthy fats, this dessert promises to deliver the same indulgent experience as its conventional counterparts, minus the excessive sugar and unhealthy additives. Whether you’re vegan, gluten-free, or simply looking to reduce refined sugar in your diet, this fudge is designed to cater to a variety of dietary preferences while ensuring that each bite is a moment of pure bliss.

Understanding Guilt-Free Indulgence

Guilt-free desserts are characterized by their ability to provide the pleasure of indulging in sweets without the remorse that often follows a sugary binge. These treats are usually crafted with healthier ingredients, making them a more suitable option for those looking to maintain a balanced diet. The significance of guilt-free desserts lies not only in their health benefits but also in their ability to fulfill cravings in a mindful way. By opting for guilt-free alternatives, individuals can enjoy desserts that are lower in calories, sugar, and unhealthy fats, all while still satisfying their sweet tooth.

The benefits of choosing healthier alternatives to traditional sweets are manifold. First and foremost, these desserts often include natural sweeteners and wholesome fats that provide energy without the crash associated with refined sugar. Moreover, many guilt-free recipes incorporate nutrient-dense ingredients, which can contribute to overall wellness. For instance, using nut butters can add protein and healthy fats, while incorporating whole-food sweeteners can provide vitamins and minerals that processed sugars lack.

The Decadent Bliss Chocolate Peanut Fudge is a prime example of a guilt-free indulgence, featuring a carefully curated list of ingredients that promote health without sacrificing flavor. Each component is chosen not only for its taste but also for its nutritional value, ensuring that you can enjoy each bite with confidence.

Ingredient Breakdown

To understand why this fudge is both decadent and guilt-free, let’s take a closer look at the ingredients that make it a wholesome choice.

1. Natural Almond Butter (or Peanut Butter): Nut butters serve as the creamy base for this fudge. Almond butter, in particular, is rich in healthy fats, protein, and essential vitamins, making it a fantastic option for a nutritious dessert. Peanut butter, on the other hand, brings its own unique flavor profile and is a great source of protein and fiber. Both options provide a satisfying texture that enhances the fudge’s richness.

2. Pure Maple Syrup or Agave Nectar: These natural sweeteners replace refined sugars, offering a healthier alternative with a lower glycemic index. Pure maple syrup is packed with antioxidants and minerals, while agave nectar has a mild flavor that complements the chocolate and peanut butter beautifully.

3. Unsweetened Cocoa Powder: This ingredient is the star when it comes to delivering a deep chocolate flavor. Unsweetened cocoa powder is rich in antioxidants and can boost heart health, making it a guilt-free way to indulge in chocolate. Its robust taste also enhances the overall richness of the fudge.

4. Coconut Oil: Often touted for its health benefits, coconut oil adds a silky texture to the fudge. It contains medium-chain triglycerides (MCTs) that can boost metabolism and provide a quick source of energy. Additionally, its subtle flavor pairs well with chocolate and peanut butter.

5. Vanilla Extract: A splash of vanilla extract elevates the flavor profile of the fudge, adding warmth and depth. Beyond its aromatic qualities, vanilla has been linked to various health benefits, including antioxidant properties.

6. Sea Salt: While it may seem counterintuitive to add salt to a sweet treat, a pinch of sea salt is essential in balancing the sweetness of the fudge. It enhances the flavors and brings out the richness of the chocolate and nut butter.

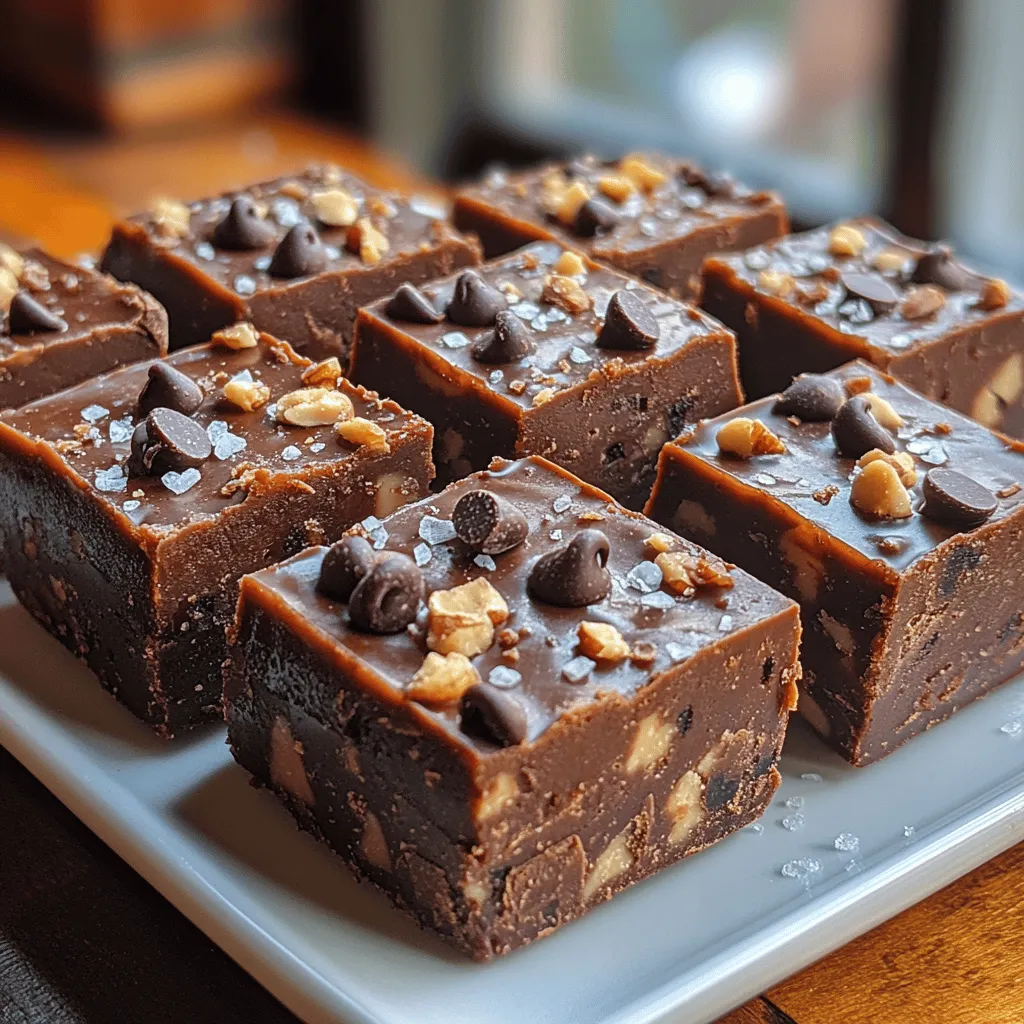
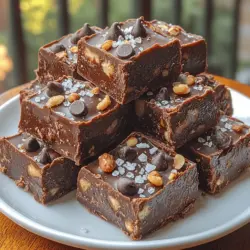
7. Dark Chocolate Chips: Choosing high cacao content dark chocolate chips not only contributes to the fudge’s decadent flavor but also provides health benefits such as antioxidants and improved heart health. Dark chocolate is a delightful way to satisfy sweet cravings while keeping the dish on the healthier side.

8. Optional Toppings: The fudge can be customized with a variety of toppings, such as crushed nuts, coconut flakes, or a sprinkle of sea salt. These additions can enhance both the texture and flavor, allowing for a personalized touch that caters to individual preferences.

Preparation Steps for Decadent Bliss Fudge

Now that we have explored the ingredients that will come together to create this guilt-free dessert, it’s time to dive into the preparation steps for the Decadent Bliss Chocolate Peanut Fudge. The process is simple and quick, making it perfect for both novice and experienced bakers alike.

1. Gather Your Ingredients: Start by assembling all your ingredients on the countertop. This will ensure a smooth preparation process as you won’t have to pause to find items mid-recipe.

2. Prepare Your Pan: Line an 8-inch square baking dish with parchment paper, allowing some overhang on the sides for easy removal later. This step is crucial for preventing the fudge from sticking to the pan.

3. Melt the Coconut Oil: In a small saucepan over low heat, melt the coconut oil until it becomes liquid. Be careful not to overheat it, as you want to preserve its nutritional properties.

4. Mix the Ingredients: In a mixing bowl, combine the melted coconut oil with natural almond or peanut butter, pure maple syrup or agave nectar, unsweetened cocoa powder, vanilla extract, and a pinch of sea salt. Stir the mixture until it is smooth and well-combined.

5. Incorporate the Dark Chocolate Chips: Gently fold in the dark chocolate chips, ensuring they are evenly distributed throughout the fudge mixture. The warmth from the other ingredients will slightly melt the chocolate, creating a delightful marbled effect.

6. Pour into the Pan: Transfer the fudge mixture into the prepared baking dish, spreading it evenly with a spatula. If desired, sprinkle additional chocolate chips or toppings over the top to enhance the visual appeal and flavor.

7. Chill and Set: Place the baking dish in the refrigerator for at least 2 hours, or until the fudge is firm. This step is essential for achieving the perfect texture.

With these steps completed, you will be well on your way to enjoying a rich, chocolatey treat that you can feel good about eating. Stay tuned for the next part of this article, where we will explore ways to serve and enjoy your Decadent Bliss Chocolate Peanut Fudge, as well as tips for storage and customization options.

To begin crafting your <strong>Decadent Bliss Chocolate Peanut Fudge</strong>, the first step involves preparing your baking pan. This is crucial for ensuring that your fudge can be easily removed without any hassle. Line an 8-inch square baking pan with parchment paper, leaving some overhang on the sides. This allows you to lift the fudge out easily once it’s set. Parchment paper not only prevents sticking but also helps maintain the integrity of the fudge during slicing. For best results, you can lightly grease the parchment paper with a bit of coconut oil or cooking spray, enhancing the ease of removal.” /></p>
</p>
<h2>Preparing the Baking Pan</h2>
</p>
<p>To begin crafting your <strong>Decadent Bliss Chocolate Peanut Fudge</strong>, the first step involves preparing your baking pan. This is crucial for ensuring that your fudge can be easily removed without any hassle. Line an 8-inch square baking pan with parchment paper, leaving some overhang on the sides. This allows you to lift the fudge out easily once it’s set. Parchment paper not only prevents sticking but also helps maintain the integrity of the fudge during slicing. For best results, you can lightly grease the parchment paper with a bit of coconut oil or cooking spray, enhancing the ease of removal.</p>
</p>
<h2>Mixing the Base</h2>
</p>
<p>Next, it’s time to mix the base of your fudge. For a silky and creamy texture, it’s important to blend your ingredients thoroughly. Start by adding your nut butter to a mixing bowl—creamy peanut butter works wonderfully here. If you prefer a different nut butter, feel free to experiment with almond or cashew butter. Combine this with your sweetener, which could be maple syrup or agave, and a touch of vanilla extract.</p>
</p>
<p>Using a hand mixer or a stand mixer, blend these ingredients until they form a smooth mixture. If you prefer a denser fudge, you can use a spatula to mix by hand. The key is to ensure that there are no lumps, and everything is well incorporated. A smooth base not only enhances the texture of the fudge but also improves its overall flavor.</p>
</p>
<h2>Incorporating Chocolate Chips</h2>
</p>
<p>Once your base is well mixed, it’s time to fold in the chocolate chips. Using semi-sweet or dark chocolate chips, sprinkle them into the mixture and gently stir. To ensure even distribution, you can use a spatula to fold the chips into the mixture rather than stirring vigorously. This prevents the chocolate chips from breaking apart and allows for a delightful bite of chocolate in every piece of fudge.</p>
</p>
<p>If you prefer a more intense chocolate flavor, consider using mini chocolate chips. They will distribute evenly throughout the fudge, giving you that chocolatey goodness in each bite.</p>
</p>
<h2>Transferring to the Pan</h2>
</p>
<p>When your mixture is ready, transfer it to the prepared baking pan. To achieve an even finish, use the back of a spatula to smooth the top. Start in the center and work your way outwards, applying gentle pressure to spread the mixture evenly across the pan. This step is essential for achieving uniform thickness, which ensures even slicing later on.</p>
</p>
<p>After smoothing the top, you can give the pan a gentle tap on the counter. This helps to eliminate any air bubbles that may be trapped in the fudge, resulting in a denser and creamier texture.</p>
</p>
<h2>Adding Toppings</h2>
</p>
<p>Now comes the fun part—adding toppings! While your fudge is delicious on its own, a few creative toppings can elevate it to the next level. Consider sprinkling chopped nuts, such as pecans or walnuts, on top for added crunch. You can also add a handful of shredded coconut or a sprinkle of sea salt to enhance the flavor profile.</p>
</p>
<p>For those looking to add a touch of sweetness, consider drizzling melted dark chocolate over the top. Alternatively, for a fruity twist, add dried cranberries or cherries. Get creative and personalize your fudge to suit your taste preferences.</p>
</p>
<h2>Chilling and Setting</h2>
</p>
<p>To achieve the perfect consistency, refrigerate your fudge for at least 2-3 hours. This chilling period is crucial as it allows the fudge to set properly, making it easier to slice. Cover the pan with plastic wrap or another layer of parchment paper to prevent moisture from getting in.</p>
</p>
<p>Once chilled, you should be able to press the fudge lightly with your finger, and it should hold its shape without being sticky. If you’re in a hurry, you can also place it in the freezer for about 30 minutes, but be careful not to freeze it completely, as that could change the texture.</p>
</p>
<h2>Slicing and Serving</h2>
</p>
<p>After the fudge has set, it’s time to slice and serve! Using the parchment paper overhang, carefully lift the fudge out of the pan and place it on a cutting board. With a sharp knife, cut it into squares or rectangles, depending on your preference. For clean cuts, wipe the knife with a damp cloth between slices to avoid sticking.</p>
</p>
<p>For presentation, consider placing the fudge squares on a decorative platter or wrapping them individually in parchment paper tied with a ribbon for gifting. This not only makes for an attractive presentation but also adds a personal touch for friends and family.</p>
</p>
<h2>Nutritional Information and Health Benefits</h2>
</p>
<p>When indulging in <strong>Decadent Bliss Chocolate Peanut Fudge</strong>, it’s important to consider its nutritional content. Each square of fudge typically contains around 100 calories, with a good balance of healthy fats, protein, and natural sugars. This is significantly lower in calories and sugar compared to traditional chocolate fudge, which can often pack over 150 calories and a higher sugar content per piece.</p>
</p>
<p>The use of ingredients like nut butter provides healthy fats that are essential for energy and satiety. These fats help keep you full longer, making it easier to enjoy fudge without overindulging. The natural sweetness from maple syrup or agave offers a guilt-free way to satisfy your sweet tooth without the crash that often accompanies refined sugars.</p>
</p>
<h2>Creative Variations of Guilt-Free Fudge</h2>
</p>
<p>One of the best aspects of this fudge recipe is its versatility. Feel free to experiment with different nut butters to create your own unique flavors. Cashew butter offers a subtle sweetness, while sunflower seed butter can provide a nut-free alternative that’s just as delicious.</p>
</p>
<p>For those looking to boost the nutritional profile, consider incorporating superfoods like chia seeds or hemp seeds into the mixture. These ingredients not only add texture but also increase the fiber and protein content of your fudge.</p>
</p>
<p>When it comes to toppings, the options are endless. For a tropical twist, try adding dried mango or coconut flakes. Spices like cinnamon or nutmeg can also add an unexpected flavor dimension that pairs beautifully with chocolate.</p>
</p>
<h2>Storing and Serving Suggestions</h2>
</p>
<p>To maintain the freshness of your fudge, store it in an airtight container in the refrigerator. This will keep it firm and flavorful for up to two weeks. If you want to store it for longer, consider freezing individual squares. Wrap them in parchment paper and place them in a freezer-safe container. When you’re ready to enjoy, simply let them thaw at room temperature.</p>
</p>
<p>When serving your fudge, consider pairing it with fresh fruits like strawberries or bananas for a refreshing contrast. You can also incorporate it into other desserts, such as crumbling it over yogurt or adding it as a topping for smoothies. Its rich flavor and creamy texture make it an excellent addition to various sweet treats.</p>
</p>
<h2>Conclusion</h2>
</p>
<p>Creating <strong>Decadent Bliss Chocolate Peanut Fudge</strong> is not only a delightful culinary adventure but also a satisfying way to indulge in a guilt-free treat. The blend of creamy nut butter and rich chocolate creates a decadent experience that satisfies cravings without derailing your health goals.</p>
</p>
<p>As you experiment with various flavors and toppings, this fudge can easily become a staple in your healthy treat repertoire. Embrace the joy of making this fudge, sharing it with loved ones, and exploring the endless creative possibilities it offers. Enjoy your guilt-free indulgence, knowing that you’re treating yourself to something both delicious and nutritious.</p>
</div>

To begin crafting your Decadent Bliss Chocolate Peanut Fudge, the first step involves preparing your baking pan. This is crucial for ensuring that your fudge can be easily removed without any hassle. Line an 8-inch square baking pan with parchment paper, leaving some overhang on the sides. This allows you to lift the fudge out easily once it’s set. Parchment paper not only prevents sticking but also helps maintain the integrity of the fudge during slicing. For best results, you can lightly grease the parchment paper with a bit of coconut oil or cooking spray, enhancing the ease of removal.

Guilt-Free Chocolate Peanut Fudge

Indulge your sweet tooth without the guilt with this Decadent Bliss Chocolate Peanut Fudge recipe. Combining rich chocolate and creamy nut butter, this fudge offers a satisfying treat that's mindful of your health. Made with natural sweeteners and wholesome ingredients, each bite is packed with flavor and nutrition. Perfect for those with dietary restrictions, this easy-to-make fudge can be customized with your favorite toppings, making it a versatile and delicious dessert option. Enjoy the bliss of guilt-free indulgence!

Ingredients
  

1 cup natural almond butter (or peanut butter)

1/2 cup pure maple syrup or agave nectar

1/4 cup unsweetened cocoa powder

1/4 cup coconut oil, melted

1 teaspoon vanilla extract

1/4 teaspoon sea salt

1/2 cup dark chocolate chips (preferably 70% or higher)

Optional toppings: chopped nuts, shredded coconut, or sea salt flakes

Instructions
 

Prepare the Pan: Line an 8x8 inch square baking dish with parchment paper, leaving some overhang for easy removal. Set aside.

    Mix the Base: In a large mixing bowl, combine the almond butter, maple syrup, unsweetened cocoa powder, melted coconut oil, vanilla extract, and sea salt. Stir well until the mixture is smooth and creamy.

      Add Chocolate Chips: Gently fold in the dark chocolate chips until evenly distributed throughout the fudge mixture.

        Transfer to Pan: Pour the fudge mixture into the prepared baking dish and spread it evenly using a spatula. Smooth out the top for an even finish.

          Add Toppings (Optional): If you’d like, sprinkle your choice of toppings over the fudge: chopped nuts, shredded coconut, or a sprinkle of sea salt flakes for an added flavor contrast.

            Chill the Fudge: Place the baking dish in the refrigerator for at least 2 hours, or until the fudge is firm and set.

              Slice and Serve: Once the fudge is set, lift it out of the pan using the parchment paper overhang. Cut into squares or rectangles, as desired. Store any leftovers in an airtight container in the refrigerator.

                Prep Time: 15 minutes | Total Time: 2 hours 15 minutes | Servings: 16 squares

                  WANT TO SAVE THIS RECIPE?

                  Leave a Comment

                  Recipe Rating


                  Sharing is Caring

                  Help spread the word. You're awesome for doing it!